Rate limiting can protect and improve the availability of your API-based services. If you’re talking to an API and receive the HTTP 429 Too Many Requests response status code, you’ve been rate limited. That means you’ve exceeded the number of requests allowed within a given period of time. Slow your roll and wait a bit, before trying again.
Why rate limit?
When you’re thinking about limiting your own API-based service, you need to balance tradeoffs between user experience, security, and performance.

The most common reason to control the flow of data is to maintain availability for your API-based services. But there are security benefits too. A single unintentional, or intentional, surge in inbound traffic can tie up valuable resources and impact the availability for other users.
By controlling the rate of incoming requests, you can:
- protect services and resources from being overwhelmed
- slow down brute-force attacks
- prevent distributed denial-of-service (DDOS) attacks
How can you implement rate limiting?
Rate limiting can be implemented at the client-level, application-level, infrastructure-level, or anywhere in between. There are a few ways to control inbound traffic to your API service.
- By user — track calls made by a user with an API key, access token, or IP address
- By geography — such as decreasing rate limits at peak times of the day for each geographic region
- By server —if you have multiple servers handling different calls to your API, you might implement stricter rate limits for access to more expensive resources
You can use any one (or even a combination of) these types of rate limiting.

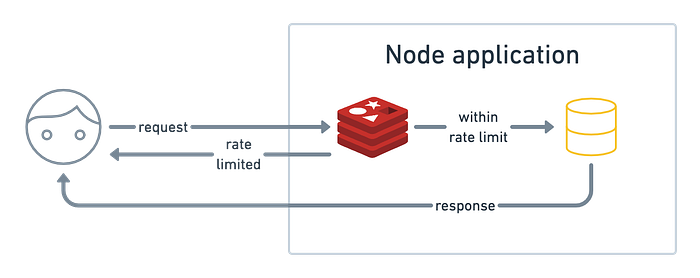
No matter how you choose to implement it, the goal of rate limiting is to establish a checkpoint that either rejects or passes through requests to access your resources. Many programming languages and frameworks have inbuilt capabilities or middleware to do this. There are also options for various rate limiting algorithms.
This is one way to make your own rate limiter with Node and Redis:
- Create a Node app
- Add a rate limiter with Redis
- Test in Postman
💻 Check out the code sample on GitHub.
Before you begin, make sure you have Node and Redis installed on your machine.
Step 1: Create a Node app
Set up a new Node app from the command line. Walkthrough the CLI prompts, or add the --yes flag to accept the default options.
$ npm init --yesCreate a file called index.js for your entry point if you accepted the default option during the project setup.
$ touch index.jsInstall the Express web framework, and initialize the server in index.js.
const express = require('express')const app = express()const port = process.env.PORT || 3000app.get('/', (req, res) => res.send('Hello World!'))app.listen(port, () => console.log(`Example app listening at http://localhost:${port}`))
Start the server from the command line.
$ node index.jsBack in index.js, create a route to first check the rate limit, and then allow access to resources if the user is not over the limit.
app.post('/', async (req, res) => { async function isOverLimit(ip) { // to define } // check rate limit let overLimit = await isOverLimit(req.ip) if (overLimit) { res.status(429).send('Too many requests - try again later') return } // allow access to resources res.send("Accessed the precious resources!")})
In the next step, we’ll define the rate limiter function isOverLimit.
Step 2: Add a rate limiter with Redis
Redis is an in-memory key-value data store, so it can retrieve data very quickly. It’s also pretty straightforward to implement rate limiting with Redis.
- Store a key like a user’s IP address
- Increment the number of calls made from that IP
- Expire the record after a specified timeframe
The rate limiting algorithm shown below is an example of a sliding window counter. A user who submits a modest number of calls, or spaces them out over time, never reaches a rate limit. A user who exceeds the maximum requests within a 10-second window must wait for enough time to pass to resume their requests.

Install a Redis client for Node called ioredis from the command line.
$ npm install ioredisStart the Redis server locally.
$ redis-serverThen require and initialize the Redis client in index.js.
const redis = require('ioredis')const client = redis.createClient({ port: process.env.REDIS_PORT || 6379, host: process.env.REDIS_HOST || 'localhost',})client.on('connect', function () { console.log('connected');});
Define the isOverLimit function that we started writing in the previous step, by following this pattern from Redis to keep a counter by IP.
async function isOverLimit(ip) { let res try { res = await client.incr(ip) } catch (err) { console.error('isOverLimit: could not increment key') throw err } console.log(`${ip} has value: ${res}`) if (res > 10) { return true } client.expire(ip, 10)}
And that’s our rate limiter.
When a user makes a call to the API, we check Redis to see if the user is over the limit. If they are, the API immediately returns the HTTP 429 status code with the message Too many requests — try again later. If the user is within the limit, we proceed to the next code block where we can allow access to protected resources like a database.
During the rate limit check, we find the user’s record in Redis and increment the count of their requests. If there’s no record of the user in Redis, then we create a new record. And lastly, each record will expire within 10 seconds of the latest activity.
In the next step, let’s make sure our rate limiter is working correctly.
Step 3: Test in Postman
Save your changes, and restart the server. We’ll use Postman to send POST requests to our API server running locally at http://localhost:3000.
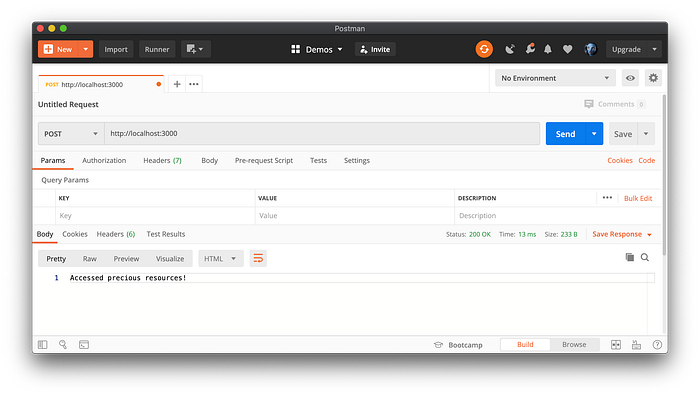
Continue sending requests in rapid succession to hit your rate limit.
Final thoughts about rate limiting
This was a simple example of a rate limiter with Node and Redis. This is just the start. There’s a bunch of strategies and tools available to structure and implement your rate limits. And there are other enhancements to explore with this example, like:
- Letting the user know how much time they should wait before trying again, either in the response body or as a
Retry-afterheader - Logging the requests reaching the rate limit, for insight into user behavior and to alert of malicious attacks
- Trying a different rate limiting algorithm or other middleware
Remember, when you’re exploring API limits you’re balancing tradeoffs between performance, security, and user experience. Your ideal solution for rate limiting will change over time along with these considerations.