Autocomplete Select Inputs on React Native
Building autocomplete select inputs with React Native.

Introduction
While the image gives you a hint, you still may be first asking, “What is an autocomplete select input?”. I wrote a separate article on this topic: Autocomplete Select Inputs on Mobile.
The final solution is available for download.
Initial Setup
If you are looking to follow along, we develop this project using:
- Expo: React Native development environment
- eslint-config-airbnb: Stringent code linting; followed instructions for using with React Native. Also had to configure to allow JSX in .js files
- macOS: We are developing a cross-platform (iOS and Android) solution
I first wrote this first for iOS and then at the end tweaked it to support Android.
Also, I created separate branches for each section below to allow you to see the code as the effort progressed (was just too much code to put into the article directly).
Simple Form
Before we tackle the autocomplete select input, we need a starting point. Here we start with single screen consisting of a fixed header (red) and a scrollable form (green) with three text inputs (labeled A, B, and C).

At this point the code simply consists of four components:
- App.js: Entry component
- components / Header / index.js: The fixed header (red)
- components / Form / index.js: Stateful container component for the simple form
- components / Form / FormView / index.js: Presentational component for the simple form (green); uses third-party library react-native-keyboard-aware-scroll-view to scroll inputs into view
React Navigation
The Google Flights implementation of an autocomplete select input (Destination) navigates to a new screen when pressed.

To create this same behavior in our form, we use React Navigation. To start, we add a fourth input (D) than when pressed simply navigates to a new screen (we will later implement the full functionality).

At this point the code consists of seven components:
- App.js: Entry component
- RootStack.js: React Navigation component; with routes (Home and Autocomplete) for the two screens
- components / Home / index.js: Layout for the initial screen
- components / Home / Header / index.js: The fixed header (red)
- components / Home / Form /index.js: Stateful container component for the simple form
- components / Home / Form / FormView /index.js: Presentational component for the simple form (green);
- components / Autocomplete / index.js: A placeholder screen for future autocomplete select input
Navigation Parameters
The next bit of behavior we want to implement involves passing parameters to routes.
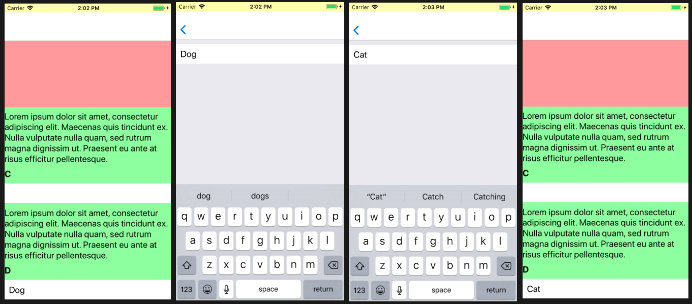
- Pressing the autocomplete input (D) on the form screen causes the application to navigate to the autocomplete screen (passing the value of the input, e.g., Dog)
- The autocomplete screen sets the value of its text input to the passed value (Dog).
- When the autocomplete screen’s text input blurs (loses focus), the application navigates back to the form screen (passing the value of the text input), e.g., Cat.
- The form screen sets the value of the D input to the passed value, e.g,. Cat.
The changes to the code at this point are generally:
- The Form component now maintains the value of the D input in local state (valueD)
- The FormView component displays valueD
- Using React Navigation navigation parameters, the Form and Autocomplete component pass information back and forth
- Split out the view for the Autocomplete component into the AutocompleteView component
Options List
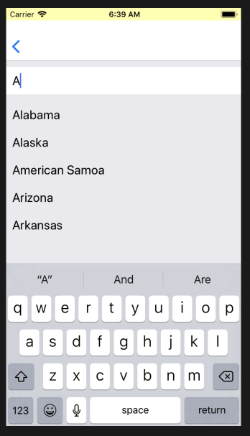
Now we want to display matching options below the autocomplete’s text input. Because the number of options is potentially large, we will use an asynchronous API call, e.g., a network request, to obtain the matching options.
The changes to the code at this point are generally:
- apis / states.js: We create an asynchronous API (simulated); given a value it returns a promise that resolves to matching US states, specifically., fetchStates
- The Form component passes fetchStates as the fetchOptions navigation parameter to the Autocomplete component
- The Autocomplete component uses the passed fetchOptions parameter to update the options list based on changes to the text input
- The AutocompleteView component uses a Flatlist to display the options
In the Autocomplete component, when there are changes to the text input, we carefully update the options:
- Because fetchOptions is asynchronous, we only want the last pending call to it to update the options; we don’t want to flash the screen with a multiple updates
- We also want to debounce the options update, i.e., we want to wait until the changes to the text settles down before calling fetchOptions; we don’t want to make unnecessary calls to the API
Miscellaneous
We next want to ensure that the user can see all the options when the keyboard is visible in both the portrait and landscape orientation. When the keyboard is dismissed, we also want to maximize the use of the screen.
We also want the implement the final additional behavior:
- Pressing an option, navigates back to the form screen with the selected value
- Pressing enter in the input when there is not a singular matching option or if the list of options is stale (waiting on a network request), simply closes the keyboard
- Pressing enter in the input when there is a singular matching option and the list of options is up-to-date, navigates back to the form screen with the singular matching option’s value
- Pressing the back button, navigates back to the form screen with no changes
The changes to the code at this point are generally:
- Autocomplete component: Adding a handler for presses on options
- Autocomplete component: Adding logic to the handler for blurring the input
- AutocompleteView component: To enable a single click on an option to work, we have to use the obscure feature keyboardShouldPersistTaps=”always”.
Android
It turns out there are some minor display differences between iOS and Android that we need to address:
- manually account for the height of the Android status bar
- React Navigation bar height is different between iOS and Android
- The Android status bar shows in both the portrait and landscape orientations
The code at this point is the close to a final version.
Cleanup
After I wrote this article, I remembered that I did not optimize the application using PureComponent as described in the article When to use Component or PureComponent.
The one less-obvious choice was using stateless functional components, e.g., in Header, instead of PureComponent(s) in some circumstances; recommended and enforced by a linting rule.
The code at this point is the final version (hopefully).
Wrap Up
Hopefully you will find this to be a good starting point.
