Beyond the Basics: 5 Powerful Advanced Tools in Git

Commit, push, pull… Every developer knows the basic vocabulary of version control with Git these days. But beyond those basics, there’s a whole world of other, more advanced features in Git. And it’s exactly these features that can dramatically improve how you build software! These tools can help you…
- Undo mistakes
- Find bugs quickly
- Clean up your commit history
- Integrate third-party code in a well-structured way
- …and much more!
In this post, I’ll give you a brief introduction to five advanced Git features. We can’t go into epic detail with all these features but I’ll point you to some in-depth learning material for each topic if you want to know more.
But now: let’s go!
Using the Reflog to Undo Mistakes
The “Reflog”, although tremendously helpful, is a rather little-known feature in Git. In short, you can think of the Reflog as Git’s “diary”; Git uses it to protocol all of the HEAD pointer movements that happen in your local repository. This means that every time you commit, rebase, merge, reset, or cherry-pick, Git will take note of this in this special journal. Such a protocol of your most important actions is, of course, a perfect safety net for when you made a mistake!
Let’s look at a simple example: you’re not happy with your last few commits and want to get rid of them. You perform a “reset”, rolling back your commit history a couple of commits — and thereby removing those unwanted commits. Let’s also say that, a couple of minutes later, you realize that you shouldn’t have done this and now desperately want those commits back! 😱

This is where the Reflog comes in handy! Take a look at the following little video, which shows both our mistake (performing a “reset”) and using the Reflog to undo this mistake:

Note: I’m using the Tower Git client in the above example for easier visualization of the workflow.
Notice how I used “git reset” once more to bring back the old state. Alternatively, I could have also used “git branch” if I had preferred to have the old state in a separate branch.
If you want to learn more about undoing mistakes with Git then take a look at the (free) “First Aid Kit for Git” video series.
Using Bisect to Find Bugs
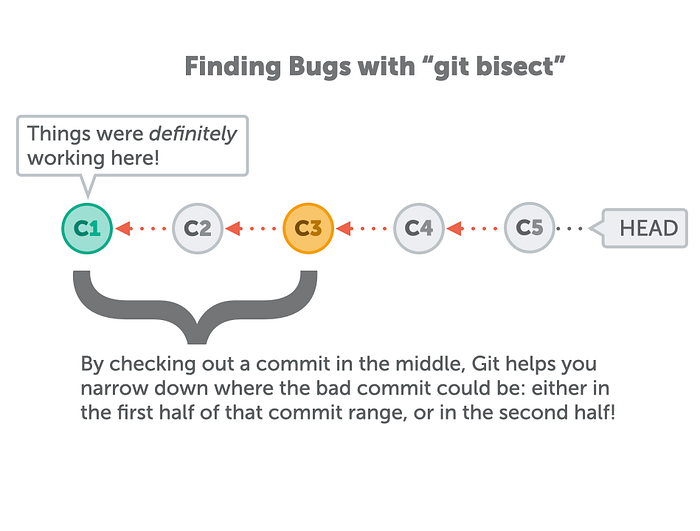
I’m pretty sure that the following situation will sound familiar to you. You know that your code used to work at some time but you don’t know exactly when (in which commit) you introduced some nasty bug! How can you find the commit that contains the bug? Git’s answer to this question is its “Bisect” tool.

Bisect requires that you tell it one commit hash where things were definitely okay. Once you feed it this safe commit’s hash, Git knows there’s a “bad” commit somewhere between now and this “good” commit. What Git now does is fairly simple, but also fairly effective; it splits the range of commits in half and checks out the commit in the middle.
It is now up to you to run your application and test if it’s working — or if it still contains a bug. Depending on your test, you’ll know if the bug is contained in the first half of that commit range or in the second half. Git will repeat this process with you until you’ve singled out the revision which must contain the bug!
Git Bisect in practice
So how does “git bisect” work in practice? The first step is to explicitly start the process:
$ git bisect startNot much has happened yet because Git is waiting for you to provide both a “good” and a “bad” commit. Let’s start with the bad commit. In most cases, this is easy because (probably) the current state is faulty — so we can simply provide “HEAD” as the bad revision:
$ git bisect bad HEADThe second information, a revision that is definitely “good”, might need a bit of digging around. You can start by checking out an older revision where you are quite confident that everything was still fine. Let’s say we found such a “good” revision:
$ git bisect good fcd61994Git will then start the actual “bisecting” process and check out a revision in the middle of this range of commits between the “good” and “bad” one:
Bisecting: 3 revisions left to test after this (roughly 1 step)
 [0023cdddf42d916bd7e3d0a279c1f36bfc8a051b] Changing page structure
The ball is now in our court. After Git has checked out this commit in the middle, we have to run or build our application and test to see if the bug is still present or not. And we have to tell Git the result of our little test, either with “git bisect bad” or “git bisect good”.
Depending on our answer, Git will then repeat the process and split either the first or second half of the original commit range — and again check out a commit in the middle and invite you to test. By repeating this process a couple of times, you will single out the bad commit rather quickly!
Once you have found the culprit, you can then end the bisect process:
$ git bisect resetThis will instruct Git to finish bisecting and take you back to your previous HEAD commit.
Managing Large Files with Git LFS
These days, software projects often involve more than just plain text code files: visual assets like images or movies, audio files, and many other types of assets are very common today. And indeed, why should you pass on the wonderful benefits of version control for these types of files? Knowing your files are safe, can’t be overwritten by mistake, and can be rolled back to previous versions are benefits that are just as valuable for large binary files.
However, in the past, many teams had nonetheless decided to NOT include large binary files in their Git repositories — and for an understandable reason; by adding large files their Git repositories had grown very quickly and ultimately became almost unmanageable. When a new teammate had to clone one of these Git repositories they were left with Gigabytes of downloads and a bloated local Git repository.
LFS puts an end to “Large File Bloat”
Things became much better when, a few years ago, the “Git LFS” extension was released. “LFS” stands for “Large File Storage” and is all about improving the handling of large binary files. LFS does this by adding two critical new components: a local LFS cache and a remote LFS store.
- Local LFS Cache: Once you tell Git that a certain file (or file type) should be managed through LFS, these files are only saved as pointers in the local repository. The actual file data is then located somewhere else: in the local LFS cache that now accompanies your local Git repository.
- Remote LFS Store: On the remote, a new LFS store saves and delivers all of these large files on demand.
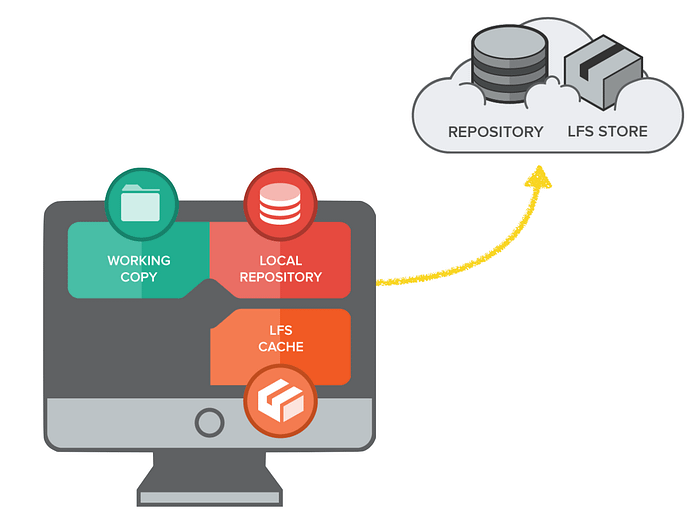
Whenever Git encounters an LFS-managed file in your local repository it will only find a pointer and not the actual file data. Git will then ask the local LFS Cache to deliver it. To do that, the local LFS Cache looks up the file by its pointer — and if it doesn’t already have it, it requests it from the remote LFS Store.
This is the big revolution: you only need to have the file data on disk that is necessary for you at the moment — for the exact revision you have checked out. Anything else can be downloaded on demand. For example, when you check out a different revision that has different versions of those large binary files.
Git LFS in practice
So how does Git LFS work in practice?
1. Installation: Before you can use LFS, you need to install the corresponding extension. There’s a detailed description including download links on GitHub.
2. Tracking Files: You then need to tell Git which files or types of files you want it to track using LFS:
# Tracking a single, specific file:
$ git lfs track “design.psd”

# Tracking certain file types:
$ git lfs track “*.mov”
From this point on, new files that match the tracking patterns you’ve set will be handled through LFS. The benefits are instantly noticeable. When you clone such a repository, you will NOT be left with gigabytes of data that you don’t actually need. Instead, you will only receive the data that’s necessary for the current revision, anything else will be delivered on-demand when you need it.
If you want to learn a bit more about LFS and how to work with it, I recommend that you take a look at the article “Handling Large Files with LFS”.
Rebase
Git offers two main ways to integrate one branch into another: Merge and Rebase. While Rebase isn’t exactly a “secret” or “pro feature” anymore, only a few people thoroughly understand how it works.
Before we get into the specifics here, let’s clarify an important point: Rebase isn’t “better” than Merge. There are many teams that deliberately choose Merge over Rebase for good reasons. And there are other teams that prefer Rebase in certain situations. It all comes down to personal preferences and clear guidelines for your team.
Commit history as a straight line
Let’s first talk about why you might want to use Rebase instead of Merge. Here’s a classic example of the result of using “git merge”:
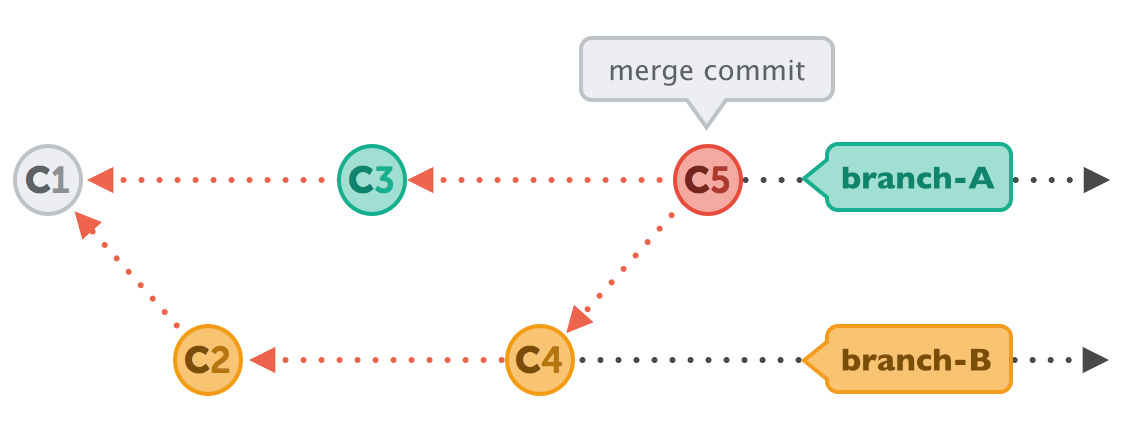
The typical end result is a “merge commit” that melts the two branches together. While some teams actually prefer to have this automatic commit, other teams dislike it — and therefore use Rebase:

Rebase will produce a straight line of history, unlike a Merge. There is no visible “knot”, no merge commit that would indicate that two branches have actually been integrated. As said before, some teams — in some situations — prefer this way of integration.
But how does Rebase actually work?
The mechanics behind rebase
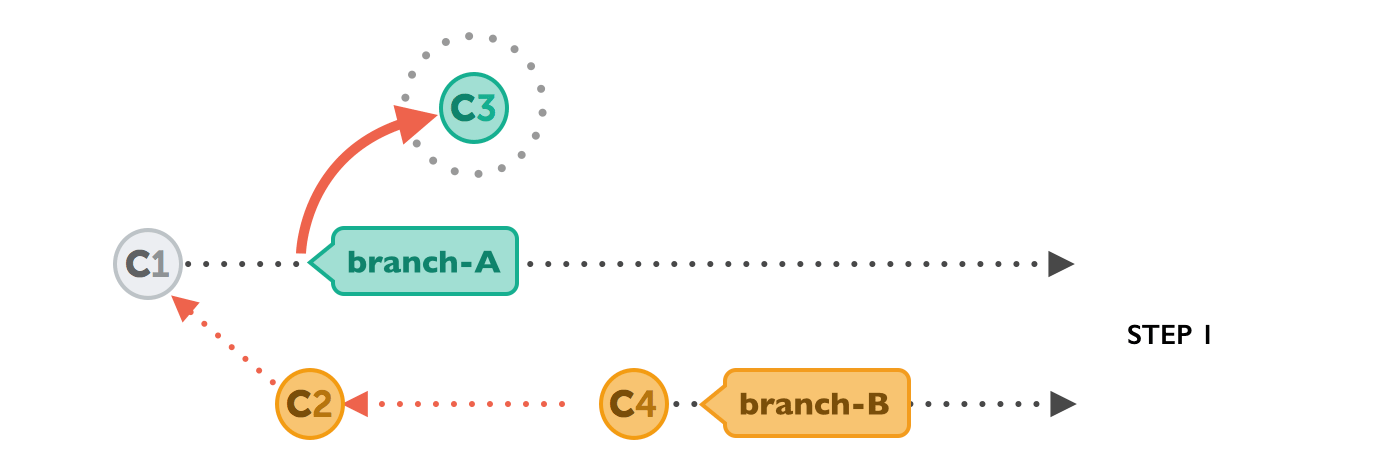
The first step, of course, is to actually start the Rebase process by telling Git which branch you want to integrate into your current HEAD branch:
$ git rebase branch-BNow, on our current HEAD branch, Git will “undo” all the commits that happened after it was branched out. No need to worry, however, as Git won’t discard these commits! Instead, you can think of those commits as being “parked temporarily”:
Next, Git will apply the commits we want to integrate from branch-B. At this point, in the middle of the Rebase operation, both branches look exactly the same:
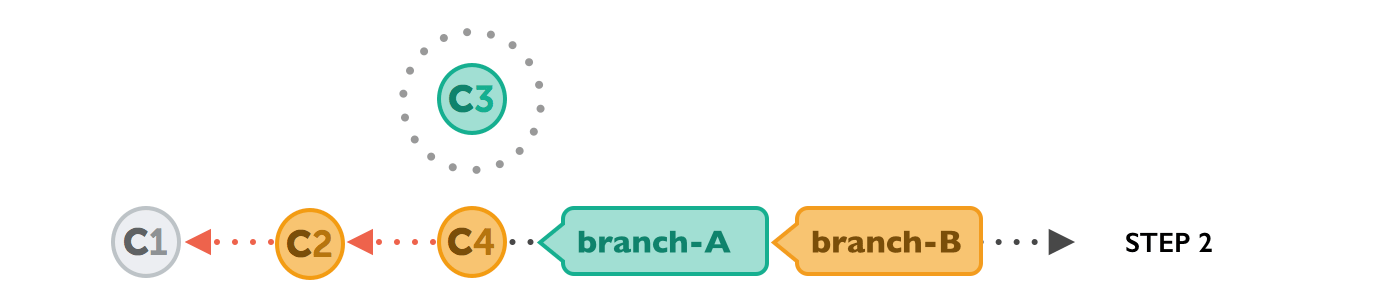
In the last step, the “parked” commits on branch-A are now reapplied, but now on top of the integrated commits from branch-B. They are based on a new ancestor — hence the term “re-base”.
The final result looks as if development had happened in a straight line. And instead of a merge commit (which would contain the combined changes), the original commit structure has been preserved.

There’s a lot more to say about rebase, of course! If you’re curious, take a look at the article “Rebase as an Alternative to Merge”.
Submodules
Many modern software projects rely on code from other projects, third-party libraries, and frameworks, or simply your own collection of tools and helpers. In any case, you won’t find many projects that don’t need to include code from somewhere else.
While you could simply integrate external code via “copy & paste”, you would soon find this to be a very error-prone approach. What happens when the library or framework is updated? Do you repeat the process of copy-and-pasting again and again?! And, much more importantly, code from another “project” simply shouldn’t be part of your own project’s Git repository! It’s a different project and therefore should reside in its own Git repository.
Git offers a very elegant and practical way for these use cases: Submodules. In short, Submodules are Git repositories inside of other Git repositories. Using Submodules to integrate other code offers a couple of crucial advantages, including:
- Clean Separation: Most importantly, you have a clean separation between your project’s code and additional code from other sources.
- Updating Third-Party Code: Additionally, it becomes very easy to update your third-party code. You simply open the sub-repository and pull in new changes, as you’d do in any other Git repository!
- Standard Git Repositories: On top of all this, Submodules are just standard Git repositories! This means that you can make changes, commit, or pull like you’re used to.
Adding a Submodule to a project
To add a Submodule to your project, simply move to the folder where you want to download it and use the “git submodule add” command:
# Move into the folder where you want the Submodule files:
$ cd lib

# Add the Submodule repository from its remote URL:
$ git submodule add https://github.com/djyde/ToProgress

# Adding a Submodule, like any other change, must be committed to the repo:
$ git commit -m “Add Submodule to project”
This will download the project to the specified location and create the necessary configuration in your local Git repository. Git manages Submodule configuration in multiple places; mainly in “.gitmodules”, but also in your local “.git/config” file and in the internal “.git/modules” folder. Submodule configuration is quite a complex and wobbly topic, which is why I’d like to give you one piece of advice: never mess with Submodules manually! Always use the appropriate commands or use a desktop GUI like Tower for this kind of work!
Cloning a remote project with Submodules
Let’s say you want to clone an existing project that contains Submodules. If you were to use a plain “git clone” command, you might be surprised to see that, after the cloning has finished, none of your Submodule files are there. You can correct this in one of the following ways:
(a) You can simply add the --recurse-submodules option to the “git clone” command. This will instruct Git to also initialize all Submodules after the cloning has finished.
(b) Alternatively, if you used a plain “git clone” command without that option, you’ll have to manually initialize the Submodules afterward using git submodule update --init --recursive.
Either way, your cloned project will then also contain the files of any connected Submodules.
Checking Out a Revision in a Submodule
Normal Git repositories, in almost all cases and at almost all times, are checked out on a branch. Submodules, in contrast, always point to a specific commit. What seems like a marginal distinction is actually an important feature of Submodules!
Imagine what would happen if Submodules, like normal Git repositories, were to be checked out on branches. The nature of branches is that their actual contents change over time; as new commits arrive, they automatically move their pointers to the newest commit. In a Submodule, however, you often don’t want that. Rather, you want to be 100% sure about the exact code the Submodule is bringing into your project. That’s why Submodules always point to a specific revision, which guarantees that you always have the correct code in your main project.
Learning to Work with Submodules
Since we can’t go into all the details of working with Submodules, I highly recommend that you dig a bit deeper and read this guide on Git Submodules.
Once you understand how they work, you’ll be much more confident about using Submodules in practice!
Conclusion
At first sight, after mastering the basics and some committing, pulling, and pushing, it seems that Git is not the “big deal” that some people make it out to be. But upon second look you’ll discover lots of powerful features; some of which have the potential to truly improve the way you write software. I hope that you have found this article helpful. Have fun discovering the power of Git!
About the Author
Tobias Günther is the CEO of Tower, the popular Git desktop client that helps more than 100,000 developers around the world to be more productive with Git.