Building a Budget Manager with Vue.js and Node.js (Part I)
The app is now completed and deployed
Part two is here!
In this tutorial series you’ll learn how to build a complete Vue.js and Node.js Budget Manager application. For simplicity we will not be using Vuex and try to stay as simple and clean as possible.
Please keep in mind I’m nowhere near being a JavaScript guru, but in this road for knowledge I might as well try to teach what I have learned so far.
In this part of the tutorial we will cover:
- Simple JWT Auth with Passport.js
- Folder structure
- API methods
- MongoDB and Mongoose Models
- Express routes
You can check this project github’s repository here
So lets start!
First of all, you should make your folder structure as follows:

Don’t worry about the index.js file, it’s empty for now.
Now we need to install a few dependencies, go to your root folder (in my case focus-budget-manager) and do the following:
npm i --save express body-parser mongoose consign cors bcrypt jsonwebtoken morgan passport passport-jwt module-aliasNow I’ll try to explain what each of these dependencies do:
- Express
Express is a framework for Node.js, we will use it to facilitate our API developing. - Body Parser
Body Parser is a Node.js body parsing middleware, it parses incoming request bodies before our handles so we can access it under req.body property. - Mongoose
Mongoose is a MongoDB object modelling tool to work in an asynchronous environment. - Consign
This package is completely optional as it works as an autoload for your scripts. - CORS
This is a package for providing Connect/Express middleware that can be used to enable CORS. - Bcrypt
This package is used to generate salt and hashes. - Morgan
An HTTP request logger middleware for Node.js. - Module Alias
Allows you to create aliases of directories and register custom module paths in Node.js.
After installing these packages, create a .gitignore file in the root folder if you intend to use git and write:
/node_modules/Now lets finally do some coding!
Create a file named index.js inside your BudgetAPI/config folder and write the following:
module.exports = {
  secret: 'budgetsecret',
  session: { session: false },
  database: 'mongodb://127.0.0.1:27017/budgetmanager'
}
This file holds our database connection parameters and the secret we’ll use to generate our JWT token.
You can change
127.0.0.1:27017to localhost or even use a MongoDB that’s located in the cloud such as MLabs.
Next we will create our Users model for our JWT Auth. Go to BudgetManagerAPI/app and create a folder named models which contains a user.js file.
At the top of the file, we will require these packages:
const mongoose = require('mongoose'),
      bcrypt = require('bcrypt');
We’ll need mongoose so we can create our User model and Bcrypt to hash our users passwords.
const Schema = mongoose.Schema({
  username: {
    type: String,
    unique: true,
    required: true
  },  password: {
    type: String,
    required: true
  },  clients: [{}]
});
This will create our User schema, one user will have:
- A username
- A password
- Clients
And each client will have:
- An email
- A name
- A phone
- Budgets
Every budget will have a state, a title, items and a price.
// We won't use arrow functions here because of automatic lexical scope bindingSchema.pre('save', function (next) {
  const user = this;  if (this.isModified('password') || this.isNew) {
    bcrypt.genSalt(10, (error, salt) => {
    if (error) return next(error);    bcrypt.hash(user.password, salt, (error, hash) => {
      if (error) return next(error);      user.password = hash;
        next();
      });
    });
  } else {
    return next();
  }
});
In this function we generate a salt and hash our users passwords.
Now just below this we’ll add a function to compare passwords to check if the login attempt is valid or not:
Schema.methods.comparePassword = function (password, callback) {
  bcrypt.compare(password, this.password, (error, matches) => {
    if (error) return callback(error);
    callback(null, matches);
  });
};
And then at the end of the file we will finally create our User model:
mongoose.model('User', Schema);Now that we have our User model created, we’ll create our passport.jsfile in BudgetManagerAPI/config
Lets start by requiring some stuff
const PassportJWT = require('passport-jwt'),
      ExtractJWT = PassportJWT.ExtractJwt,
      Strategy = PassportJWT.Strategy,
      config = require('./index.js'),
      models = require('@BudgetManager/app/setup');
We’ll need Mongoose to access our User model and PassportJWT for our authentication.
And then:
module.exports = (passport) => {
  const User = models.User;  const parameters = {
    secretOrKey: config.secret,
    jwtFromRequest: ExtractJWT.fromAuthHeaderAsBearerToken()
  };  passport.use(new Strategy(parameters, (payload, done) => {
    User.findOne({ id: payload.id }, (error, user) => {
      if (error) return done(error, false);
      if (user) done(null, user);
      else done(null, false);
    });
  }));
}
In here we’ll instantiate our User model and then get a user by matching the JWT token with the token got from the client.
After this, we need to create our database.js file which will be responsible for our database connection, so navigate to BudgetManagerAPI/config and create the file.
module.exports = (mongoose, config) => {
  const database = mongoose.connection;
  mongoose.Promise = Promise;  mongoose.connect(config.database, {
    useMongoClient: true,
    promiseLibrary: global.Promise
  });  database.on('error', error => console.log(`Connection to BudgetManager database failed: ${error}`));  database.on('connected', () => console.log('Connected to BudgetManager database'));  database.on('disconnected', () => console.log('Disconnected from BudgetManager database'));  process.on('SIGINT', () => {
    database.close(() => {
      console.log('BudgetManager terminated, connection closed');
      process.exit(0);
    })
  });
};
In this file we first set our Mongoose promise library to Promise, otherwise you might get some warnings on your console. And then we proceed to do a standard mongoose connection.
Lets take a break from this and actually setup our server.
Navigate to services folder and create an index.js file:
require('module-alias/register');
const http = require('http'),
      BudgetManagerAPI = require('@BudgetManagerAPI'),
      BudgetManagerServer = http.Server(BudgetManagerAPI),
      BudgetManagerPORT = process.env.PORT || 3001,
      LOCAL = '0.0.0.0';BudgetManagerServer.listen(BudgetManagerPORT, LOCAL, () => console.log(`BudgetManagerAPI running on ${BudgetManagerPORT}`));
We begin by registering our module_aliases that we will config later on (this is optional, but it helps to keep your code clean), if you prefer to not use the module_alias package, instead of @BudgetManagerAPI you should use ./services/BudgetManagerAPI/config .
After this you can start your server by navigating to your root folder (mine is focus-budget-manager) and typing node services on your cmd , bash or whatever you’re using.
Now lets finally create our app.js file inside BudgetManagerAPI/config folder
We’ll start by requiring our packages:
const express = require('express'),
      app = express(),
      bodyParser = require('body-parser'),
      mongoose = require('mongoose'),
      morgan = require('morgan'),
      consign = require('consign'),
      cors = require('cors'),
      passport = require('passport'),
      passportConfig = require('./passport')(passport),
      jwt = require('jsonwebtoken'),
      config = require('./index.js'),
      database = require('./database')(mongoose, config);
In this line:
passportConfig = require('./passport')(passport)We import our passport configuration file and we pass passport as an argument because of this part in our passport.js file:

We do it like this so we can access passport inside our passport.jsfile without needing to require it.
And below all of this we start using our packages in our app and setting our secret:
app.use(express.static('.'));
app.use(bodyParser.urlencoded({ extended: true }));
app.use(bodyParser.json());
app.use(morgan('dev'));
app.use(cors());
app.use(passport.initialize());app.set('budgetsecret', config.secret);
Alternatively you can use:
app.use(function(req, res, next) {
  res.header("Access-Control-Allow-Origin", "*");
  res.header("Access-Control-Allow-Headers", "Origin, X-Requested-With, Content-Type, Accept");
  next();
});
instead of CORS package if you want to.
Now we’ll start coding some of our API methods, go to BudgetManagerAPI/app and create the folder api with a file named auth.js inside of it.
Now leave it aside for a while and go to your root folder and open your package.json and add the following just above dependencies :
Note: you should add the _moduleAliases part, homepage and dependencies are just there so you can guide yourself
"homepage": "https://github.com/gdomaradzki/focus-gestor-orcamentos#readme",
"_moduleAliases": {
    "@root": ".",
    "@BudgetManager": "./services/BudgetManagerAPI",
    "@BudgetManagerModels":"./services/BudgetManagerAPI/app/models",
    "@BudgetManagerAPI":"./services/BudgetManagerAPI/config/app.js",
    "@config": "./services/BudgetManagerAPI/config/index.js"
  },
"dependencies": {
This will make so we can access our root directory by @root , our config file by @config and also every other alias we set it here.
After setting our aliases, head to BudgetManagerAPI/app folder and create a new folder named setup with a file named index.js inside.
const mongoose = require('mongoose'),
      UserModel = require('@BudgetManagerModels/user');const models = {
  User: mongoose.model('User')
}module.exports = models;
We do this to ensure that our models are loaded before anything else in our application.
Now lets head back to our auth.js :
const mongoose = require('mongoose'),
      jwt = require('jsonwebtoken'),
      config = require('@config');
See that? We managed to keep our module require a lot cleaner with module_alias otherwise it would look like this:
config = require('./../../config);After requiring our packages do this:
Note: I used a GitHub gist here because Medium’s code block was messing with the indentation
We create an empty object named api and we will store every method we want inside of it.
In our login method we first pass a User argument since we need our method to access our User model, and then we pass req and res.
What this method does is finding the User that has a matching username if the username is invalid, we throw an error, else we compare the password and the token that the user’s bearing.
Now we need another method to get the token and parse it:
api.verify = (headers) => {
  if (headers && headers.authorization) {
    const split = headers.authorization.split(' ');  if (split.length === 2) return split[1];
    else return null;
  } else return null;
}
This method verifies the headers and gets the Authorization header. We can finally export our api object:
module.exports = api;In this section we will create our API routes. Navigate to services/BudgetManagerAPI/app and create a folder named routes that contains a file named auth.js :
const models = require('@BudgetManager/app/setup');module.exports = (app) => {
  const api = app.BudgetManagerAPI.app.api.auth;  app.route('/')
     .get((req, res) => res.send('Budget Manager API'));  app.route('/api/v1/auth')
     .post(api.login(models.User));
}
In this module we pass our own app into it so we can set our routes,
our const api is so we can access our auth.js file inside our api folder,
we set the default route '/' to send the user “Budget Manager API”,
and in our '/api/v1/auth' route (which is accessed by a POST request) we use our login method, passing our User model as an argument.
Now go back to your app.js file inside BudgetManagerAPI/config folder:
app.set('budgetsecret', config.secret);consign({ cwd: 'services' })
      .include('BudgetManagerAPI/app/setup')
      .then('BudgetManagerAPI/app/api')
      .then('BudgetManagerAPI/app/routes')
      .into(app);module.exports = app;
Here we make sure that our setup file is loaded before anything else, so our models are going to be instatiated first, then we load our api methods and then our routes.
Lets go back to our BudgetManagerAPI/app/api folder and create a new file named user.js :
const mongoose = require('mongoose');const api = {};api.setup = (User) => (req, res) => {
  const admin = new User({
    username: 'admin',
    password: 'admin',
    clients: []
  });admin.save(error => {
    if (error) throw error;console.log('Admin account was succesfully set up');
    res.json({ success: true });
  })
}
This setup method is just so we can create an admin account for debugging and should not exist in a production environment.
Now lets create a test method where we’ll be able to see every User that’s registered in our app just to test our authentication.
api.index = (User, BudgetToken) => (req, res) => {
  const token = BudgetToken;if (token) {
    User.find({}, (error, users) => {
      if (error) throw error;
      res.status(200).json(users);
    });
  } else return res.status(403).send({ success: false, message: 'Unauthorized' });
}
And a Sign Up method that we will use later on:
api.signup = (User) => (req, res) => {
  if (!req.body.username || !req.body.password) res.json({ success: false, message: 'Please, pass a username and password.' });
  else {
    const newUser = new User({
      username: req.body.username,
      password: req.body.password,
      clients: []
    });    newUser.save((error) => {
      if (error) return res.status(400).json({ success: false, message:  'Username already exists.' });
      res.json({ success: true, message: 'Account created successfully' });
    })
  }
}module.exports = api;
This checks if the username or password aren’t empty and then creates a new user if the username is valid.
Now that we have our users api methods done (for now), we’ll create a user.js file inside routes folder:
const passport = require('passport'),
      config = require('@config'),
      models = require('@BudgetManager/app/setup');module.exports = (app) => {
  const api = app.BudgetManagerAPI.app.api.user;  app.route('/api/v1/setup')
     .post(api.setup(models.User))  app.route('/api/v1/users')
     .get(passport.authenticate('jwt', config.session),  api.index(models.User, app.get('budgetsecret')));  app.route('/api/v1/signup')
     .post(api.signup(models.User));
}
Here we import passport for authentication, our config file so we can set the session and our models so we can check if the user accessing our endpoint is valid or not.
Lets test what we’ve built so far:
If we go to http://localhost:3001/
Our server will give us the GET method, the status (which should be 200, meaning that it was successfull) and the response time.

Our client (browser) will give us a white page with Budget Manager API written on it.
Now lets try to check if our login route in http://localhost:3001/api/v1/auth
Our server will give us the GET method, the status (which will be 404, meaning that it we communicated with our server, but nothing was found) and the response time.

This happens because we only use this endpoint for a POST method, there’s nothing there for us to GET .
Now lets try to access our user routes:
http://localhost:3001/api/v1/users
Our server will give us the GET method, the status(which should be 401, meaning that our request has not been applied because it lacks valid authentication credentials for the target resource) and the response time.
Our client however will also give us a response now, it will be a white page with Unauthorized written on it.
This means that our authentication works, but then how do we test our login method if we don’t have any sign in form to submit?
One way of doing this is using Postman.
You can either download it from their own website or get the chrome extension.
First lets access our setup endpoint to create our default admin account:
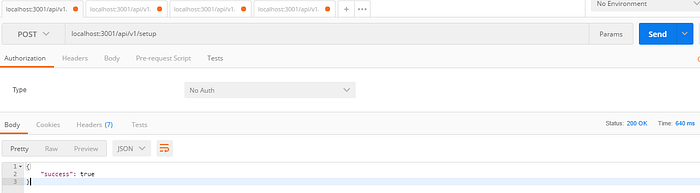
Type the address, change the method to POSTand click Send
Now lets try to login using our admin account:

Type the address to our auth endpoint, add the username and password keys to Body, type their values and press Send
Your response should be similar to this:

Now lets copy this Token, change the Address to our users endpoint where we list all available users and add the Authorization Header with the value being Bearer token (just paste the token we copied a few moments earlier) and press Send.

You should get a similar response:

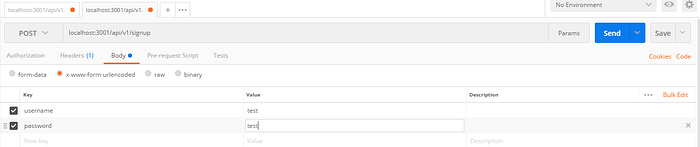
Now lets test our signup method:
Open a new tab with our signup endpoint, and in the Body add the username and password keys with something different than admin.

And if we go back to our last tab and check the users again we will have

So that’s it for this part of the tutorial, we learned how to create a Node application from scratch and do a simple JWT authentication, on the next part we will start developing our Front End with Vue.js. Thank you for reading and don’t forget to check the next part soon!
You can find more about me following me on twitter @thegutze
or my github @gdomaradzki

✉️ Subscribe to CodeBurst’s once-weekly Email Blast, 🐦 Follow CodeBurst on Twitter, view 🗺️ The 2018 Web Developer Roadmap, and 🕸️ Learn Full Stack Web Development.

