Building React Native Projects with Native Code: Part 2
Exploring the workflow in updating the React Native (JavaScript) code.

This article is part of a series starting with Building React Native Projects with Native Code: Part 1.
Building Expo Review Applications
Thinking about our workflow, the most common activity is updating the React Native (JavaScript) code in the develop branch through pull requests from feature branches.

Before these feature branches are merged into develop, it is important to be able test the application with the new feature (say by a quality assurance group).
note: At this point, our application does not include any native code so we can fully test our application with Expo Client. Later, when we include native code we will take special precautions so that we can continue to test, with limited functionality, using Expo Client.
One approach would be to have the quality assurance group pull the feature branch locally and run the application as a developer would.
It, however, would be nice if the quality assurance group could simply test the application with the new feature using the Expo Client application on a physical device; and loading the application from an URL. Just so happens, Expo.io has a service that does just this (publishing applications).
With this in mind, another approach is to use a continuous integration service, Travis CI, to automatically publish the Expo application when a pull request to develop (develop-native and master) is created. We will use the pull request’s id to create specific versions of the application using Expo’s Release Channel feature. We call these review applications as they are used to review the pull request.
One-Time Configuration
The first step is to create a number of accounts (no-cost to start with):
We then create a GitHub repository, e.g., react-native-scaffold, for the application and push up the three branches that we created earlier; develop, develop-native, and master.
In Travis CI, we update the settings for the newly created GitHub repository to only Build on pushed pull requests (at least for now).

Also, because we are automating publishing Expo applications, we add environment variables with our Expo.io username and password; we do not want to store these secrets in our public repository.

Starting a Feature Workflow
We begin a feature workflow by creating and checking out a new local branch off the develop branch, e.g., travis.
Once full configured, we would be making changes to our application at this point. For this first pull request, however, we need to also create a Travis CI configuration file:
.travis.yml
Observations:
- The Travis CI configuration file describes the build environment and steps
- The complex part (first three steps in before_install) are just the official method of installing Yarn
Commit the changes and push the branch to GitHub.
From GitHub, we create a pull request from the branch to develop (make sure to change from the default master).


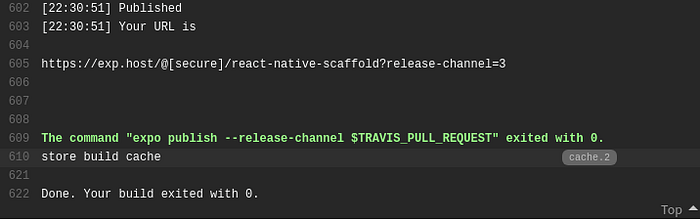
At this point, Travis CI will automatically run the Travis CI configuration; as indicated in the GitHub page for the pull request (the build progress can be inspected on the Travis CI site).

When Travis CI build is complete, the URL to open the application in the Expo application is provided at the end of the build progress on the Travis CI site.
Observations:
- The string [secure] in the URL is to be replaced with your Expo username, e.g., larkintuckerllc
- Notice that the URL is always (for this project) the same except for the release-channel parameter which is based on the pull request id
note: On Expo for Android, I ended having to email myself the URL, clicking on it, and selecting Expo open it.
Amending the Feature
Say the quality assurance group requested a change to the application as part of their review of the feature, e.g., they wanted to display the label, version:, in front of the version. We update:
App.js
Commit the changes and push the branch to GitHub.
Pushing updates to the source branch of a pull request will automatically trigger a new Travis CI build. Once the build is complete, we can reopen the same URL in the Expo application to see the changes.
note: The default Expo behavior is that the application will download the updated version once it is opened. The updated version, however, is not run until the next start of the application.

Merging the Feature
Once we are satisfied with the change, we can merge the pull request and delete the feature branch, e.g., travis, from GitHub.
For completeness, we also pull the update to our develop branch and delete the feature branch in our local repository.
Deleting the Review Applications
Now that we are done working on the feature and deleted all the unused GIT branches, it would be good practice to delete the unused published Expo applications.
From the local repository, we can run the following to list all of the published Expo applications.
expo publish:history --release-channel=3
I was tempted to write a script to automate the deletion of the unused applications; but then I decided to save that for another day. We delete them manually using the channel id, e.g., to delete the first one (repeating four times).
expo publish:rollback --channel-id 6aa28da7-da84-48e0-ae3a-866c1aad5853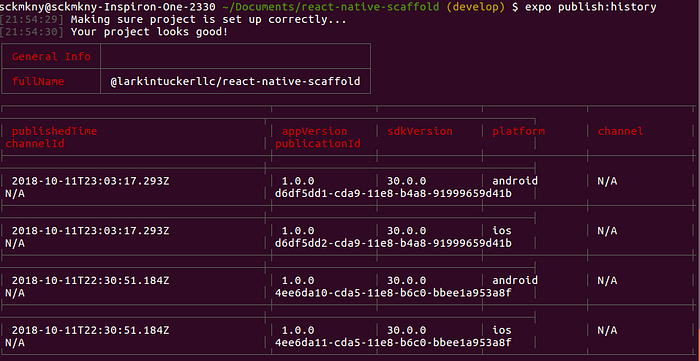
Observation:
- Notice the channelId is not set to N/A
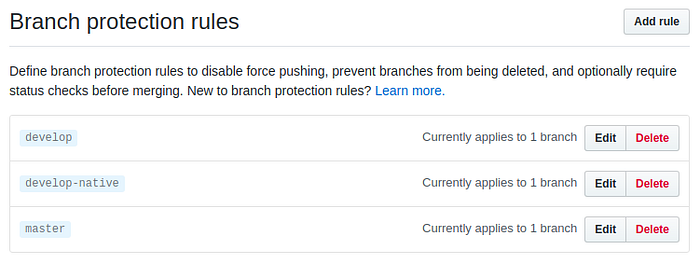
Securing The Branches
In thinking about our workflow (using review applications), we want to only merge code into the develop, develop-native, and master branches via pull requests.
From the GitHub repository Settings > Branches, we add branch protection rules for the three branches to Require status checks to pass before merging with the Travis CI — Pull Request status check.
Wrap Up
In the next article, Building React Native Projects with Native Code: Part 3, we will explore the workflow in updating the native code.
