Building React Native Projects with Native Code: Part 3
Exploring the workflow in updating the native (Android now iOS later) code.

This article is part of a series starting with Building React Native Projects with Native Code: Part 1.
note: Warning… While each step in this configuration is fairly straightforward, there are a lot of steps to get this setup; not for the faint-at-heart.
Merging Develop into Develop-Native
After we complete the React Native (JavaScript) workflow, merged a pull request into the develop branch, we need to merge these changes into the develop-native branch.

Because the feature has already been presumably tested using an Expo review application, we can simply merge the develop branch into the develop-native branch and push the develop-native branch to GitHub (requires an administrator account).
note: On completely different topic, one suggestion is to change the GitHub repository Settings > Branches > Default branch to the develop branch as most pull requests will be made to the develop branch.
Building Native Review Applications
Thinking about our workflow again, the a less common activity is updating the native (iOS and Android) code in the develop-native branch through pull requests from feature branches.

Before these feature branches are merged into develop-native , it is important to be able test the application with the new feature (say by a quality assurance group).
note: At this point, our application does include native code so we have to build a native application.
One approach would be to have the quality assurance group pull the feature branch locally and run the application as a developer would. Given the complexities of getting a development environment setup for native development and the amount of time a native build takes, this is not a reasonable solution.
As before, our goal is to use Travis CI to automate the build for a review application that the quality assurance group can simply load on their physical device.
(One Time Configuration) Building Android Review Application Locally First
note: Again, right now I am only using Android as my target platform. Later in the series I plan on documenting the workflow for iOS.
As we will not have Android Studio in our Travis CI build environment, we need to configure the project so that we can build and sign an Android application from the command line.
Here we will be working in the develop-native branch and directly push (as administrator) these changes to GitHub.
As we are on the develop-native branch (ejected from Expo), we have a React Native project; thus can follow the React Native instructions on Generating Signed APK. For now use a temporary (insecure) keystore and password and don’t build yet.
Observations:
- The instructions has one placing the keystore into the project folder; we will have to explore how to avoid committing an un-encrypted version of this file into our repository
- Likewise the instructions has one updating gradle.properties with secrets (passwords); we again will have to explore how to avoid committing an un-encrypted version of this file into our repository
- Buried in their documentation is instructions to delete a line, org.gradle.configureondemand=true, in the gradle.properties file
Because the build process generates a lot of artifacts that we do not want to commit to GIT, we want to first commit our changes to the develop-native branch and push it to GitHub (this is the last of the changes that we will commit in this section).
Before we build the Android application, we need to first publish the Expo application; again to a release channel as this is a review application.
expo publish --release-channel sampleIn addition to publishing the application, this automatically updates the generated Android code.
- modify: android/app/src/main/java/host/exp/exponent/generated/AppConstants.java
- add: android/app/src/main/assets/shell-app-manifest.json
- add: android/app/src/main/assets/shell-app.bundle
My early attempts at getting a working application using a release channel were failures; the build would only work with the default channel. Looking deeper into these modified and added files, we see that the shell-app-manifest.json does get generated with the release channel information:
"releaseChannel":"sample"
"hostUri":"exp.host/@larkintuckerllc/react-native-scaffold?release-channel=sample"
but the AppContants.java is not:
public static String INITIAL_URL = "exp://exp.host/@larkintuckerllc/react-native-scaffold";
…
 public static final String RELEASE_CHANNEL = "default";
This is a reported bug (by me). We can manually update these entries with the release channel information, but we are going to have to script this into our automated build process later.
Now that everything is setup, we can build our Android application. The instructions has us running the following command from the android folder:
./gradlew assembleReleasenote: For web development folks, think of gradlew as npm (or yarn) running scripts from the package.json file. The full list of scripts (wow there are a lot) can be listed using:
./gradlew tasks --allThe assembleRelease task builds four different signed APK files (taking 8 minutes to do). The one we want to side-load into our Android device is in the folder:
android/app/build/outputs/apk/prodMinSdkProdKernel/release
Whew! All this and we have not automated the process yet.
(One Time Configuration) Basic Travis CI Configuration
Because this is sufficiently complicated, let us first build a basic Travis CI configuration that replicates our local build.
- We will ignore that we need to encrypt the keystore and the gradle.properties (we earlier committed temporary, insecure, files)
- We will publish using the default channel to avoid having to script in the fix to the bug with release channels
Because our local build littered our project with so many artifacts, we go ahead and clone down a fresh version of it from GitHub.
The Android configuration is based on the Travis CI documentation, Building an Android Project.
In the develop branch, we go ahead and update the Travis CI configuration file, commit the change, and push it to GitHub:
Observations:
- We use Travis CI matrices (aka, jobs) to create three different jobs; one for each of the three branches.
- Because the develop-native job is using the android language, we need to install Node.js to be able to publish the Expo bundle.
- It was not clear from the React Native documentation, but it appears that Android 27 (and the corresponding build tools) are required
We then merge the updated configuration file into the develop-native branch.
Finally (to test), we create a feature branch off of the develop-native branch, push it to GitHub, and create a pull request back to the develop-native branch to trigger a Travis CI build (if all goes well, in about 20 minutes the build will complete).
(One Time Configuration) Deploy Step
When the Travis CI build is complete, the APK file is available as:
android/app/build/outputs/apk/prodMinSdkProdKernel/release/app-prodMinSdk-prodKernel-release.apk
We now want to make that file available to the quality assurance team to load on their physical device; i.e., we want to deploy a build artifact (the APK file). One rather simple solution is to create an Amazon S3 bucket and upload the file there.
Turns out that both Travis CI’s artifact and deploy features do not run with pull request builds (frown). The good news is that we can write a simple Node.js application to upload the APK file to an Amazon S3 bucket.
In the develop branch (we want a common build infrastructure across all the branches), we install the AWS SDK:
yarn add --dev aws-sdkWe create the Node.js application:
deploy.js
and update the Travis CI configuration:
.travis.yml
Observations:
- The deploy.js script is only being used for the develop-native builds
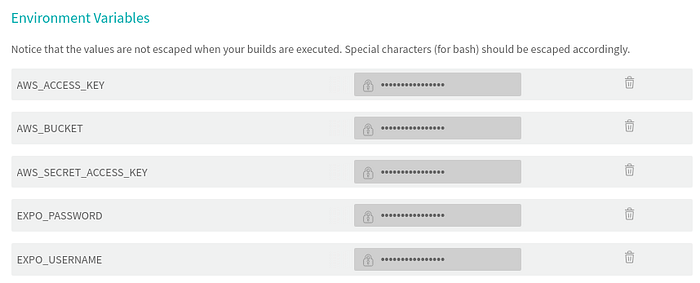
The deploy.js script expects three additional environment variables that we setup in Travis CI. This requires that one has an Amazon AWS account, create a S3 bucket, and generate Amazon AWS access keys (assume that you can figure this out on your own).
We commit these changes to the devlelop branch and then merge these changes into the develop-native branch.
Finally (to test), we create a feature branch off of the develop-native branch, push it to GitHub, and create a pull request back to the develop-native branch to trigger a Travis CI build (if all goes well, in about 20 minutes the build will complete and now there is a new APK file in your AWS bucket).
(One Time Configuration) Fixing Ignored Issues
In the previous builds, we ignored two problems:
- We ignored that we need to encrypt the keystore and the gradle.properties (we earlier committed temporary, insecure, files)
- We published using the default channel to avoid having to script in the fix to the bug with release channels
Using the develop-native branch. We first encrypt the two files. In following the Travis CI instructions on Encrypting Files, I wrested with the Travis CI specific (using travis-cli) solutions and ended using the more manual approach they provided.
From the develop-native branch:
First, I encrypted the two files with a passphrase.
cd android
gpg -c gradle.properties
cd app
gpg -c my-release-key.keystore
and deleted the two unencrypted versions.
Then I went ahead and committed these changes to the develop-native branch.
Again, as we want our build configuration to be the same across all branches, we change to the develop branch.
We need to update the .gitignore so that we never commit the unencrypted secret files:
.gitignore
We then update our Travis CI configuration to decrypt the files before we install.
.travis.yml
note: Also slipped in the release channel fix into the Travis CI configuration using the following shell script. Was lazy and only wrote the script to be specific to this project; adjust as necessary.
release-channel-patch.sh
We commit these changes to the develop branch. When then need to merge these changes into the develop-native branch.
We can now test using the following workflow.
Final Workflow for Updating Native (Android) Code
- Create a feature branch off of the develop-native branch
- Make and commit changes to the native code
- Push feature branch to GitHub
- Create a pull request back to the develop-native branch to trigger a Travis CI build
- If all goes well, in about 20 minutes the build will complete and now there is a new APK file in your AWS bucket that uses the appropriate release channel
- Side load the APK file into Android device
- Continue commit changes and push feature branch to GitHub to trigger a Travis CI build (with new APK file)
- Once satisfied with the pull request, merge it into develop-native
- As before, we need to then clean (rollback) up all the unused published Expo applications
- We, also, now need to delete the unused APK files in the AWS bucket
Next Steps
In the next section, Building React Native Projects with Native Code: Part 4 (writing in progress), we will revisit the workflow in building native code with a more specialized continuous integration service.

✉️ Subscribe to CodeBurst’s once-weekly Email Blast, 🐦 Follow CodeBurst on Twitter, view 🗺️ The 2018 Web Developer Roadmap, and 🕸️ Learn Full Stack Web Development.
