Building your first command line app with Node.js
This is about the experience building my first command line app with Node.js. I’m a front-end guy and have never built a command line app. So all of this is from a beginner’s perspective.

Let’s build a command line app to read top hacker news posts. We intend to get “n” number of top posts with its link and several other information.
This tutorial assumes that you have basic knowledge about Node.js and Javascript.
Before starting here is the link to the Github Repo of the sample project. At every point, we will be referring to function in the repo, instead of including it here — because Github does it best.
Install Node.
Follow this link for step by step tutorial on how to install Node if you haven’t already installed it.
That’s it with the environment set up. We are good to go and write our first line of code.
Let’s break down the app into logical steps.
Initialising node app
Node app can be initialised with a normal npm init. Fill in the name, description etc to generate the package.json file. Let’s name the starting point file as hackernews.js.
Do not forget to add the following to your package.json file. This enables us to use the command hackernews to execute hackernews.js
“bin”: { “hackernews”: “hackernews.js” },Important modules used
Request — To make http requests.
Optimist — Optimist is a Node.js library for option parsing ( Optional if you want to do it manually ).
Valid-url — To validate the URI. Another optional package.
Cache-manager and Cache-manager-fs for caching.
The application
The logic is simple.
Hit the top posts url. Get the post ids. Get the details for each post. Display it.
We are expecting an input that looks like
hackernews --posts 1010 is the number of posts, can be anything less than a 100.
We can read the post counts using optimist.
const postsCount = optimist.argv["posts"];postsCount is passed to init function.
We won’t jump deep into code logic since it’s pretty basic. However, let’s see what is happening overall.
init function validates the arguments, and initiates the request.
initRequest function gets the ids of the top HackerNews posts.
checkCache function is used to demonstrate the purpose of Caching, and is a very basic caching function. More complex cache function must be implemented in practice or if used in production scale.
Once we decide the source of the data, the next step is to actually get it. If the cached data is to be used getResultFromCache is executed.
If not we have to fetch the actual data. We use promises to fetch data for each posts, and once all the data is fetched, the data is processed and logged on to the console.
This part is done by handlePosts and performRequest.
If you are not familiar with promises take a moment to read and understand it. Highly recommended.
Finally, we use the finalOutput to process the data in the way we want.
OS specific code
You have to add one line at the top of your code — #!/usr/bin/env node
Why? When you install a node package for windows it creates a cmd file. But for UNIX based system a shell script is created. The OS specific part is taken care of by the above line.
Publishing to npm registry
Run npm publish ( assuming that you already have a npm account)
That’s it. Your app is ready to be used by the world.
Now go to some random directory in your system and run npm install -g hackernewscmd
Now you can get top hacker news posts info by running hackernews — posts 10
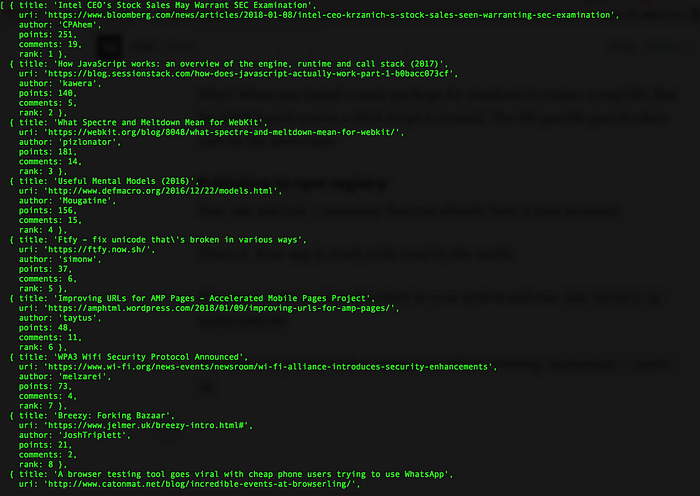
If all is well you’ll get something like this.
Now go out there and make your first command line app using Node.js.