CI/CD with GitHub, Travis CI and Heroku

First of all, this post is not specifically for DevOps people. Don’t get scared about the title, this setup will be so simple that even a frontend developer like me will get it easily :)
I’m a huge fan of these services and how they make our lifes a lot easier. I use it in some of my personal projects and decided to share with you how you can get started with these.
The demo
As a living demo, we’ll be talking about one of my projects, my personal page. Which you can find at www.orodolfo.com.
This is an open source project and to achieve this Continuous Integration / Continuous Deployment environment I’m not only using GitHub + Travis CI + Heroku, I’m also using some other tools like webpack, jest and ESLint + eslint-config-airbnb.
Let’s see how we can get it all together.
What we’ll get
A github repo following git-flow that, whenever a push is made to the master branch, will trigger Travis CI’s pipeline checking if all your code meets all the ESLint rules and if all your automated tests pass. If all of this succeeds, then a new deployment is made to your heroku app.
If you already know all these services and tools, you can just jump right into “Making it happen” section.
Github along with git-flow

Well I think these two don’t need much introduction, but let me explain why am I using them.
Github will be the one who will enable us to host our git project and git flow we’ll be the one responsible for assuring that we are adding new code in the master branch only when needed/desired.
I’m not going in much detail about git-flow but you can read more about it here.
The mindset is: Develop new features in a new feature branch and when you’re done, merge it into the develop branch. Whenever you think you have enough features to perform a new release, create a release branch from develop, do all your tests and fix every bugs founded and then merge this release branch back to develop and master branches.
Travis CI

Travis CI is a Continuous Integration service used to build and test projects hosted at GitHub.
You can use https://travis-ci.org for free along with a public repo at github. If you want to setup Travis for a private repo, then you’ll need to use https://travis-ci.com. We’ll be using the free service since we’re dealing with a public repo.
It will be responsible for running our linter and automation tests. The linter will check if all our source code meets the eslint-config-airbnb rules and if all ours tests are passing. (Travis will do this for every branch you push to github unless you tell him otherwise).
If all succeeds we’ll get a green build like the following, otherwise we’ll get an email warning us about the failure and you’ll be able to see the logs so you can understand what did go wrong.

You can see the demo’s build history here.
Heroku

“Heroku is a container-based cloud Platform as a Service (PaaS). Developers use Heroku to deploy, manage, and scale modern apps. Our platform is elegant, flexible, and easy to use, offering developers the simplest path to getting their apps to market.” — https://www.heroku.com/about
Heroku is the best service I ever used for hosting my websites since you can easily deploy new code using git. You can use it for free for small projects or you can use it as your main hosting service for production. Take a look about their Dynos.
This platform will be the one responsible for letting us achieve the Continuous Deployment! Whenever new code is pushed into the master branch, Travis CI will trigger a new build and if all succeeds a new deployment will be performed and a new version of our heroku app will be available online.
Making it happen
Well first of all, we’ll be working with a Node.js project but feel free to use any tech stack you want.
Let’s get started.
1. Create your Node project and your git repository
npm init
...
git init
2. Create your repo at github (guide)
3. Connect your local repo to the remote you’ve just created
git remote add origin <your-github-repo-link>4. Set up Travis CI
You’ll have to login into https://travis-ci.org and in your profile you’ll see all your public repos at GitHub (check the example below).
All we need to do is to switch the button next to the repo name and then add a .travis.yml file at the root of our repo.
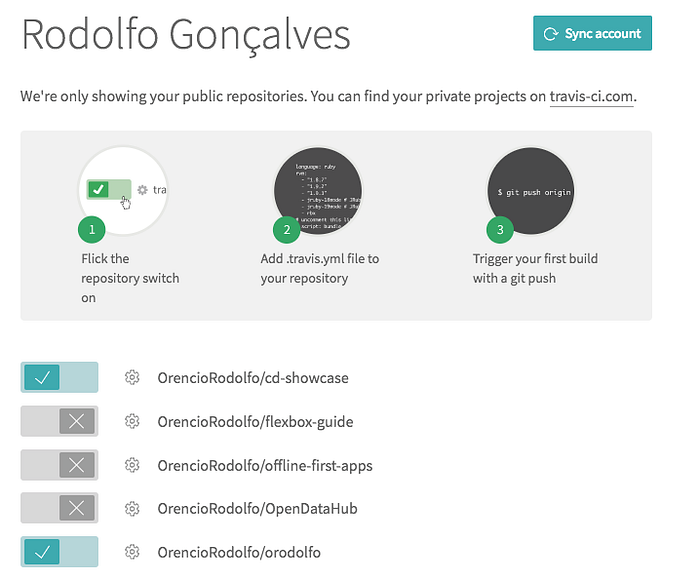
This .travis.yml will be responsible for telling that this is a Node.js project and which scrips will we be executing for each build (this would be our build pipeline).
language: node_js
node_js:
  - 8.5.0
script:
  - "npm run lint"
  - "npm run test"
Do you see those npm run lint npm run test scripts? That get us the package.json file.
At package.json we have this “scripts” section which enables you to perform several tasks using local dependencies from the project you’re building.
...
"scripts": {
  ...
  "test": "jest",
  "lint": "eslint src/**/*.js src/**/*.mjs"
},
...
In this case, we have “lint” to check if our “src” code is following ESLint rules (.eslintrc) and jest to run all the automated tests.
Now, every time you perform a new push to your github repo, a new build will be triggered following the defined pipeline.
If you, for any reason, want to skip builds for some branches you can do it so by adding some additional info to your .travis.yml file.
Example:
# blocklist
branches:
  except:
  - legacy
  - experimental

# safelist
branches:
  only:
  - master
  - stable
Read more about this here.
5. Set up heroku
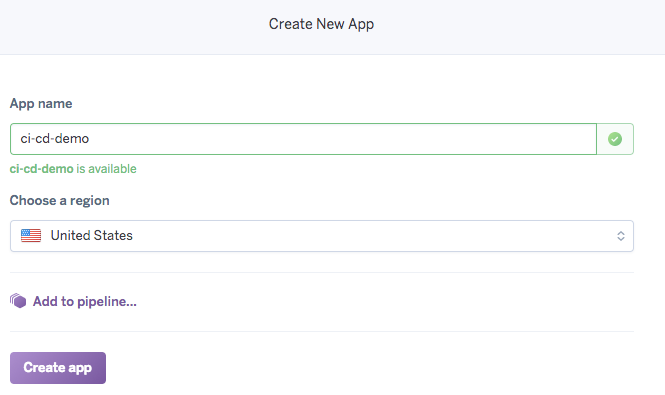
First you’ll need to create your Heroku app. For that you’ll have to login at Heroku go to your apps page an click on the “New > Create new app” button.
Then you specify your new app name
And then, at this time you’ll have basically two ways of doing the connection between GitHub, Travis CI and Heroku.
1st approach
This is the simplest one. You only have to go to the “Deploy” section of your app select “GitHub” as your deployment method, connect to your github repo and in the “Automatic deploys” section select the production branch (master in our case) and check the little “Wait for CI to pass before deploy” checkbox.
What this will do is: Whenever a new push is made to the production branch (master) heroku will wait until our CI passes (Travis CI in our case) and when it does, a new automatic deploy will be performed.

The downside of this approach is that Travis CI doesn’t really know about heroku and so, it won’t include the Heroku deployment logs at the build log.
2nd approach
Not hard at all neither. You’ll only have to add some more content at the .travis.yml file.
You’ll need to specify which is the provider (heroku in our case), the authentication API key (which you can find in your account page) and which app are you referring to.
Example:
deploy:
  provider: heroku
  api_key:
    secure: <your-api-key>
  app: cd-showcase
  on:
    repo: OrencioRodolfo/cd-showcase
With this 2nd approach your Travis CI setup will know about Heroku and will be able to include the Heroku deployment logs at the build log.
Project built
There’s still one little and important thing to talk about.
Remember when I’ve said that this demo is using some tools like webpack? I’ve said that because it is important to our releases at heroku. If you’re using Gulp, or Grunt, or Webpack or any other automation task/bundling tool I’m sure you’ll need it to be executed when performing a new release. Because every time you launch a new release Heroku performs it in a shiny new and clean environment and it will do something like:
- Clone your project
- Install all the project dependencies (That’s why is so important to manage your dependencies and devDependencies at package.json with care)
- Run any task you define at postinstall script
- Launch the new version of your project
Did you notice that 3rd step? The postinstall script? That’s where we tell to Heroku to execute our Webpack.
The postinstall is one of the scripts defined at package.json and is what gets immediately executed when the dependency installation finishes (read more about it here). In our demo we have the following:
"scripts": {
  "postinstall": "webpack",
  ...
},
What ensures that webpack is executed when our installation step finishes and this way our app is prepared to get up and running.
And it’s done!
As you can see, this is a very basic CI/CD setup that you can build for any of your websites for free. Any of these tools are really powerful and you can do so much more with them.
I think this is a nice setup for a web project, it helps you to deploy your apps more easily and safely.
Hope you enjoyed it!
