
(Outdated) do not reference this guide
Create a static site in 15 minutes or less using Vue/Nuxt and Netlify
This is a quick tutorial to get a generated static website up and running using Vue.js, Nuxt.js & Netlify.
Introduction
The term “static site” is not new, nor is the concept. A static site is simply a website that is served to a client with purely static assets like HTML, CSS & JavaScript. There is no database, there is no PHP or Ruby-on-Rails, there is no CMS like Drupal or Wordpress. Basically, there is no calculation done between the time a browser asks for a webpage and the time they receive it.
The fastest way to create a static site is to save a file on your desktop with the .html extension and double-click on it! Your browser will open the file and display the text inside. It’s that easy!!
In the real world, things aren’t so simple. But they don’t have to be much harder, either. I’m going to show you a few quick steps to follow to have your very own static site up and running in 15 minutes or less!
We will be using some of the newest technologies out there to make scaling, code management and development a breeze! We’re going to use nuxt.js, a platform for built on Vue.js for developing entire websites.
Getting started
For this project you will need the following:
gitinstalled locally- A GitHub account
- A Netlify account linked to your github
nodeandnpminstalled locally
Creating a project
The first step after setting up your environment is to set up a project based on the nuxt.js boilerplate. We will use the vue-cli to easily create a turn-key app, on top of which we’ll build our site.
Install the vue-cli
The vue-cli will allow us to easily create a new nuxt project and set up (almost) all the necessary bits. Type the following into your terminal.
npm install vue-cli -gCreate a nuxt starter
Once the vue-cli has finished installing, you can navigate to the directory you want to house your project folder. It is common to have a repos directory in your main user profile. You can then type the following into the terminal:
vue init nuxt/starter <project-name>
  # Follow the command line instructions
  # (most defaults should be fine) so just press enter a few times
cd <project-name>
npm install
Make sure to replace <project-name> with the name you want for your site project. If you are in fact trying to make a personal website, try something like “my-site” or “my-portfolio.” Remember this name, as it will come in handy in a later step 😉
Initialize git locally
In order to interact with GitHub, we have to initialize our folder as a git repository, we will then link it to a remote repository hosted by GitHub. Type the following into your terminal (make sure you are the root of your <project-name> directory).
git init      # initializes git
git add .     # stages all files to be committed
git commit -m "Initial commit"
Create an empty repository on GitHub
The next step is to create an empty repository on GitHub. Log in to github.com and select “New repository.”


GitHub will ask you to name your new repo, to keep things consistent, you should use the project name from the earlier step! You can skip adding a license and readme for now, because we are about to publish our nuxt project to this repo. So just click “Create repository.”
On the next screen you will see instructions to “push an existing project from the command line.” We will use these to publish our project to GitHub. Go back to your terminal and type the commands provided to you by GitHub. They should look something like this:
git remote add origin git@github.com:Jexordexan/project-name.git
git push -u origin master
After pushing, check GitHub to see if your code was published.
Generating a static site
In this section we are going to generate our site and take a look at the content that was created.
Running a dev server
When we initialized our project, the vue-cli gave us a few quick commands for developing our site. The first is used for developing your site locally:
npm run devThis will compile all of your pages and files and start a web server using webpack. You can now navigate your browser to http://localhost:3000 and see the splash screen for the project. This is just a placeholder, you will want to customize this page to become your own site. To edit the index.html open src/pages/index.vue in your favorite text editor. Change any of the content within the template tag and save. You will immediately see your changes show up in your browser.
To create a new page, add a new file in the same pages directory with the name of the file being the path with the extension .vue. For instance, if you want to have a page at www.mysite.com/about create a file called about.vue. Then place your html inside of a <template></template> tag at the top of the file. You can read much more about developing your site in the nuxt documentation.
Generating the static site code
Nuxt.js will automatically convert your project to a static site that can be distributed on any http server. As a bonus, it comes with a lot of bleeding edge technology like prefetch and HTTP2 support baked in! Better yet, it’s as easy as typing one command in your terminal:
npm run generateYou will see a new folder pop up called/dist in the root of the project. This is where your static site has been placed. Feel free to look at how it is organized! All of the code is minified, but it all works!
Publishing to Netlify
Now it’s great that your code works, but it’s sitting on your computer and can’t be seen by anyone else! Let’s change that!
Linking Netlify to the GitHub repo
In order for Netlify to get your code, it needs to know where to get it! Thankfully this is really easy to do. First you need to login to https://app.netlify.com. You should probably register with your GitHub profile to make it easier.
Next, look for a button like this:
Click it and then select “GitHub” from the list of Continuous Deployment options.
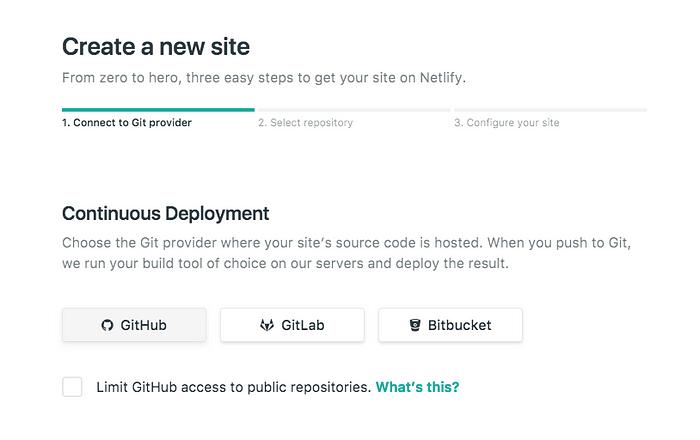
Next you need to give Netlify access to your repositories, so just authorize when prompted and you should see a list of all your repos.
Select the repo we created from the list.
The next page is instructions for Netlify to know how and where your site code lives. Match the settings below and press “Deploy site”
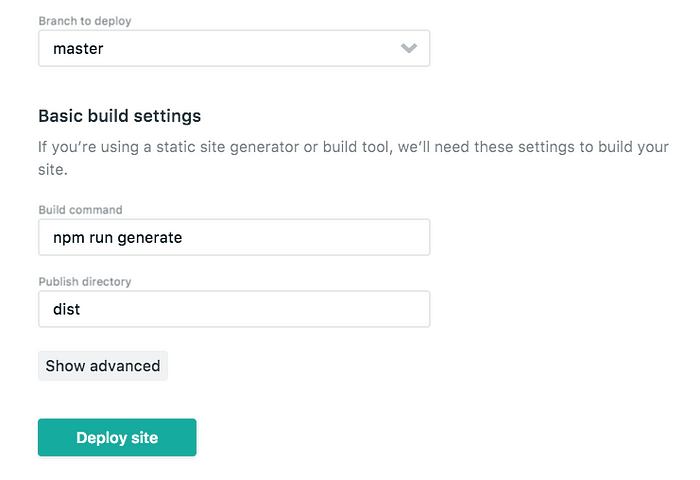
Notice how the “Build command” is exactly what we typed to generate our local site, and “Publish directory” is where it was placed? That’s because Netlify just waits until your code is done generating and grabs the output wherever it ends up. It then pushes that to its servers and your site is live!
Netlify generates a random domain to host your site. If you already have your own domain, you will need to follow steps to link the DNS servers with Netlify. They have an easy step by step guide to help you do this.
🎉 You did it!!!
Your site is now live and can be seen by anyone with the link! Whenever you push changes to GitHub, Netlify will generate and host your new build automatically. What a world we live in!
This post is a follow-up to a lightning talk I gave at a JAMStack Boston meetup. If you are in Boston and feel like learning more about JAMStack technology, come hang out with us!
You can see the demo site for that talk here: https://palmist-selina-23424.netlify.com/
Have fun developing and don’t be afraid to ask for help!
