Creating a full-stack web application with Python, NPM, Webpack and React
The ability to make ideas come to life is what separates a thinker from a doer. Whether you work for a global conglomerate, or you are trying to found your own startup, those who are capable of crystallising ideas into actual products have an invaluable skillset and a clear advantage. Becoming someone with the ability to create a full-stack web application in less than an hour, will give you the freedom to quickly make a simple MVP for your next Great Idea, or to start building a new application at work.
This article takes you though the steps needed to create a simple full-stack web application, with a Python Flask server and a React front-end. You can easily build on it as-is, change pieces for others that better suit your purpose, or add new technologies like Redux.
As our internet driven world has made basic technology skills an essential tool in any modern business person’s toolkit, this article is suitable for anyone with a basic understanding of programming and technology who want to learn how to make a simple web-based application.
You can find the code seen in this blog post on my GitHub page, but you will get the greatest learning outcome if you build your application from scratch, following this blog post.
*Edit 2019: By far the easiest way to set up a new React project is to use the official Create React App script. This article explains how to set up your app if you do not want to use the script, and helps you understand how the underlying technologies work.
Initial Project Setup
Start by creating the following directory structure inside your project folder:
.
├── README.md
└── fullstack_template/
    ├── server/
    └── static/
        ├── css/
        ├── dist/
        ├── images/
        └── js/
We will be using the npm package manager to handle our Javascript dependencies. Npm is great, because it is easy to use and well documented, with almost half a million packages available, as well as sensible default project settings.
Using a package manager makes it painless to keep your project dependencies up to date, and to fetch and install new packages.
Let’s initialise the project:
$ cd fullstack_template/static
$ npm init
Accept the default prompts, but fill in your application name and Git repository, if you have those available. Doing this will create a package.json file in your static directory.
The package.json file has several purposes:
- It keeps track of all your dependencies and their versions.
- It informs other developers about your project; like application name, tagline, owner, and repository location.
- It makes installing, running and updating a project via npm an automatic process, that is easily reproducible.
Install and Configure Webpack
Webpack is a module bundler. It takes all your module dependencies and generates static assets that represent them. Using a module bundler reduces the amount of modules your browser need to load, thereby decreasing the loading time of your webpages significantly for larger projects.

Install Webpack:
$ npm i webpack --save-devTo use webpack, we need to add a Webpack config file. The config tells webpack where to find the Javascript and React files, and where to put the generated Javascript bundle.
Add a file named webpack.config.js in your static folder, with the following contents:
const webpack = require('webpack');const config = {
    entry:  __dirname + '/js/index.jsx',
    output: {
        path: __dirname + '/dist',
        filename: 'bundle.js',
    },
    resolve: {
        extensions: ['.js', '.jsx', '.css']
    },
};module.exports = config;
Add Run Commands
Adding a few run commands to the package.json file makes the development process more fluid. I always add build, dev-build and watch to my package.json.
Build is used for production builds, and dev-build for non-minified builds. Watch is similar to dev-build, with the added benefit that it monitors your project files. Any changed files will be automatically rebuilt, and refreshing your browser will show the change you just made.
An added benefit of automatically building your code, is that you won’t spend time wondering why your most recent changes aren’t showing up. This would commonly be because you forgot to build them!
Here is my package.json:
{
  "name": "FullStackTemplate",
  "version": "1.0.0",
  "description": "A Template for creating a Full Stack Web Application using Python, NPM, Webpack and React",
  "main": "index.js",
  "scripts": {
    "build": "webpack -p --progress --config webpack.config.js",
    "dev-build": "webpack --progress -d --config webpack.config.js",
    "test": "echo \"Error: no test specified\" && exit 1",
    "watch": "webpack --progress -d --config webpack.config.js --watch"
  },
  "keywords": [
    "fullstack",
    "template",
    "python",
    "react",
    "npm",
    "webpack"
  ],
  "author": "Angela Branaes",
  "license": "MIT",
  "devDependencies": {
    "webpack": "^3.0.0"
  }
}
Add Babel Support
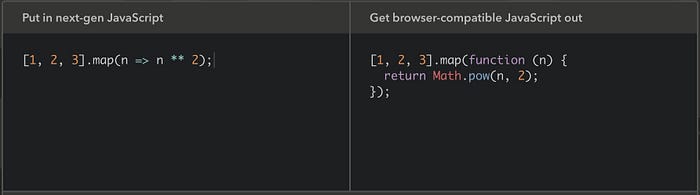
Babel allows us to write next generation Javascript before it becomes the browser standard. By installing the es2015 and react presets, Babel converts our Javascript and React jsx files into Javascript syntax compatible with all modern browsers.
Install Babel:
$ npm i @babel/preset-env @babel/preset-react --save-devAdd the Babel presets to the package.json:
"presets": [
  "@babel/preset-env",
  "@babel/preset-react"
}
},
Add a babel-loader rule to the Webpack config. Note that we exclude node_modules. This will ensure that Babel does not try to transform any of our node modules, thereby speeding up the loader significantly.
module: {
  rules: [
    {
      test: /\.jsx?/,
      exclude: /node_modules/,
      use: 'babel-loader'
    }
  ]
}
Create index.jsx and index.html
To have something visible in the browser, we will create a simple index.html file that will serve a “Hello World!” alert from a Javascript file, to show that the setup is so far correct.
In the static folder create the following index.html file:
<!— index.html —>
<html>
  <head>
    <meta charset="utf-8">
    <!-- Latest compiled and minified bootstrap CSS -->
    <link rel="stylesheet" href="https://maxcdn.bootstrapcdn.com/bootstrap/latest/css/bootstrap.min.css">
    <title>Creating a Full-Stack Python Application with NPM, React.js and Webpack</title>
  </head>
  <body>
    <div id="content" />
    <script src="dist/bundle.js" type="text/javascript"></script>
  </body>
</html>
In the static/js folder, create an index.jsx file with the following line:
alert(“Hello World!”);Start the Webpack watch command we just created in a separate terminal tab. This means it can run in the background whilst we continue working. It should build your bundle without errors.
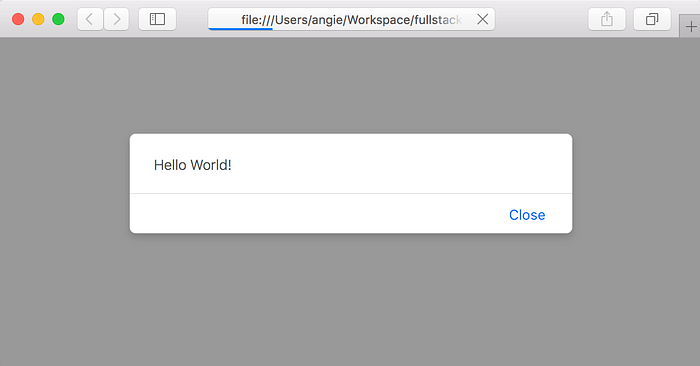
$ npm run watchOpen the index.html file in your browser of choice. It should show an alert saying “Hello World!”.
Creating a Simple React App
First we need to install react.
$ npm i react react-dom --save-devNext we replace the alert in the index.jsx with a simple React app, and have it load a React class we have created in a separate App.js file.
// index.jsx
import React from "react";
import ReactDOM from "react-dom";
import App from "./App";ReactDOM.render(<App />, document.getElementById("content"));
React classes need to be exported to be importable in a different react file. It is common practice to only have one class per file, and export that file.
// App.jsx
import React from “react”;export default class App extends React.Component {
  render () {
    return <p> Hello React!</p>;
  }
}
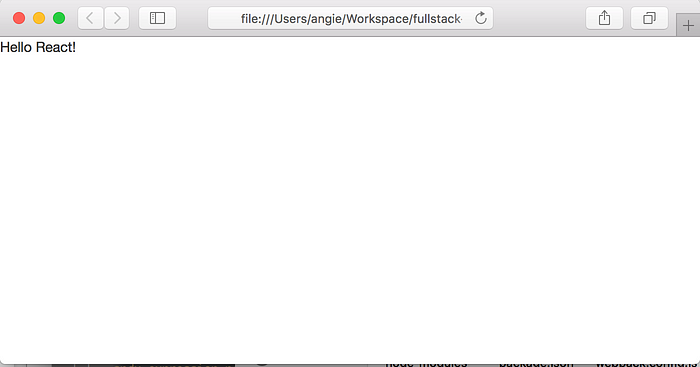
If we now reload the browser widow, it will display “Hello React!” on a page, instead of the “Hello World!” alert we got earlier.
Configure the Python Server
For our Python server we will be using Flask. Flask is an excellent choice for small Python applications. The “microframework” is quick and easy to get started with, and you can get a server up and running in less than a minute. For larger applications and in industry you will generally see companies use Pyramid or Django. Pyramid is great if you want full flexibility and custom config between your environments. Django is great if you want a web framework packed full of features, and don’t want to spend some time initially customising your application choices, like which database to use.
Create a new Python virtualenv and install Flask. In the server directory, create the Flask server file. Add a “/hello” endpoint which will return “Hello World!” and a an index endpoint “/“ that will render the index.html template.
# server.py
from flask import Flask, render_template
app = Flask(__name__, static_folder="../static/dist", template_folder="../static")
@app.route("/")
def index():
    return render_template("index.html")
@app.route("/hello")
def hello():
    return "Hello World!”
if __name__ == "__main__":
app.run()
Run the python server:
$ python server.pyGoing to http://localhost:5000/ should display “Hello React!” from the react app. Going to http://localhost:5000/hello should display “Hello World!” from the Python endpoint.
Congratulations, you now have a basic full-stack application!
If you want to learn how to talk to your server from React, and how to make your application beautiful, you can follow the steps in my follow-up tutorial: