Creating a Rock, Paper and Scissors game in Angular

Hello there! In this blog posts, we are going to create a rock, paper and scissors game in Angular. If you are an experienced Angular developer, you might not find something new in this article. This is for beginner but I also assumed that you know just enough Angular cause I will not be explaining all the basic stuff ( there’s a ton of tutorial about it and covered beautifully).I also want to show you how easy it is to create something in Angular. We’re going to use a little bit of Angular Material and CSS Grid to make things quickly. With that out of the way, let’s get down to it.
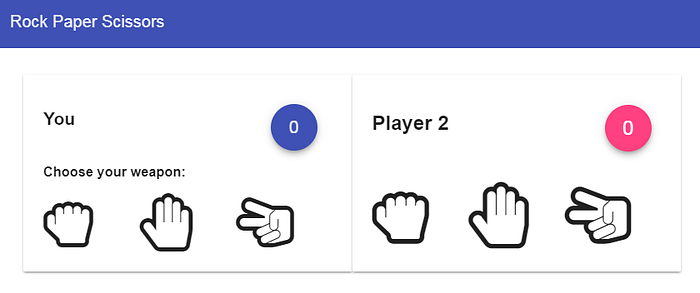
Final product
If you want to follow along, click on this stackblitz project here
- Layout
I want to create a 2 cards ( for you and Player 2 ). Feel free to do anything you want here, but I will use two columns using CSS Grid to have two equal cards.
Go to app.component.html and add
and in your app.component.css
Now our project looks like this
2. Content
Next is we’re going to add a bit of text and we’re going to use fab buttons for displaying the score. We’re also going to use font awesome for the icons for rock, paper and scissors
If you noticed the card for player 2, I used flexbox when displaying the icons, cause I’m only going to show the icon one at a time and I want it to be centered. For now all of them are displayed and we will get back to it in a minute.
For the css, I’m going to use css grid again ( don’t judge me, I’m practicing my css skills :D ) for .content1 and .content2.
Now the app looks like this
3. Logic
Here’s the variables we need. Go to app.component.ts and add this
Next we’re going to create a function that we’re going to bind to a click event when choosing a weapon.
Now we’re going to modify the app.component.html again to bind to our functions and variables.
We bind pick() function to our rock, paper and scissors icons on click event and pass the corresponding values.
Also, the icons for player 2 are now hidden and only shows after you picked your weapon.
We are almost done and the only thing left to do is displaying the results.
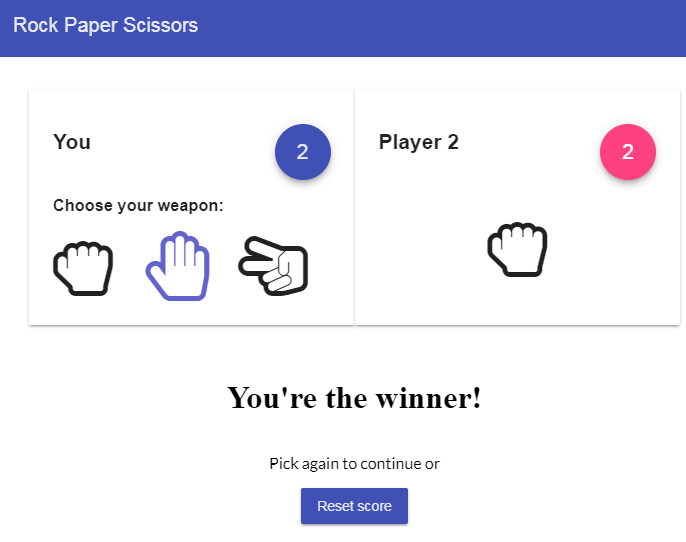
4. Showing results
We are going to display if you win, lose or a tie, and add a button to reset the scores. Also, we are going to show a loading spinner to add some effects when the delay is not yet finished. Here’s the code and add this at the end of your app.component.html.
Note that I used ngSwitch when displaying the results. Though you can also use *ngIf/Else if you like, but I think ngSwitch here is better suited here.
5. Bonus — Highlighting the selected weapon.
The app is now working but I want to add some highlight to the selected weapon. I wanted to use the primary color from angular material and after some experiments, I was able to get it by using the background property.
And using NgClass to add the class for the selected weapon
That’s pretty much about it. Congratulations!
If this article helped you, smash the clap buttons on the left.
You can get the full code here