What is a URL Shortener?
Suppose you have an e-commerce application with different types of products under different categories.
Forex: www.myshoppingsite/category/shoe/product/nike132032
If a customer wants to share the product using the above link, this could be really annoying due to the excessive character length of the URL.
Below are listed some of the problems due to this:
- Can’t remember the URL easily
- Can’t use the links where there are restrictions on text length Ex. Twitter.
The best solution to overcome this issue is by shortening these URLs
Forex: www.myshoppingsite/category/shoe/product/nike132032 to www.myshoppingsite/SdfsS
There are 2 popular shortening service available now,

Why Custom URL Shortener?
But by implementing the above solutions, we will be facing another issue. A string value, goo.gl will be appended along with the URL shortener.
So every URL will have the domain name goo.gl. In order to avoid this issue, we can implement a new shortening service.
Note:
- Google is planning to end the support for
goog.glservice in 2018. Read here - These services providing some additional features like analytics, dashboard, no. of clicks, etc.
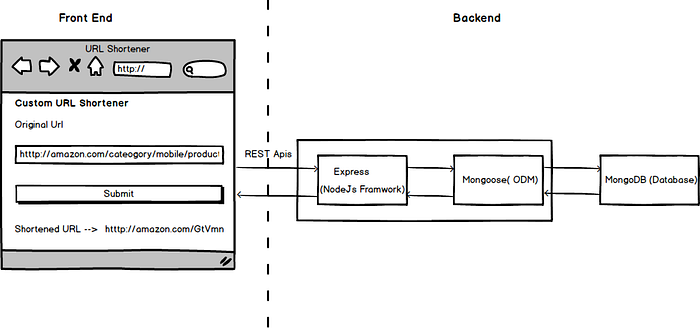
How to build a Custom URL Shortener?
Here, I am using Nodejs for building the shortener service.
Architecture
Pre-requisites
Have the following pre-installed:
- Yarn — Package manager
- Node- Runtime environment for running the javascript applications outside the browser.
- MongoDB- Non-relational database
- Nodemon- Monitor any changes in your Nodejs application
- Nginx — Event-based web server.
Create the main repository
mkdir URL-Shortner && cd URL-ShortnerLet's start from Backend
Here’s a list of the technologies I’m using for the backend
- Express.js -Node.js web application framework
- MongoDB — Document-oriented NoSQL database
- Mongoose- MongoDB object modeling tool
- Short-id- Short-id generator
- Valid-URL- URI validation functions
- Nginx- Nginx is an event-based and asynchronous web server.
Let us start by creating a directory called server
In your terminal type the following:
mkdir server && cd server
yarn init -y
This first command will create our directory and move into it, then we initialize a package.json accepting defaults.
{
  "name": "server",
  "version": "1.0.0",
  "main": "index.js",
  "license": "MIT"
}
Add dependencies express, mongoose, shortid, and valid-URL.
In your terminal type the following:
yarn add express mongoose shortid valid-urlSetting up Express
In the root directory (server) we create the entry file index.js
touch index.jsAt this point, you can open your favorite editor (mine is VS Code), then point the editor to the root of this project.
Open URL-Shortener/server/index.js and paste the following:
// Require express module
const express = require("express");
const app = express();
const PORT = 7000;
//Start server on Port 7000
app.listen(PORT, () => {
 console.log(`Server started on port`, PORT);
});
Add the following lines in the package.json file to start the server
"scripts": {
  "start": "nodemon index.js "
}
Where nodemon is used for automatically restarting the server when we make the changes in the code.
package.json
{
  "name": "server",
  "version": "1.0.0",
  "main": "index.js",
  "license": "MIT",
  "scripts": {
   "start": "nodemon index.js "
  },
  "dependencies":
  {
    "express": "^4.16.3",
    "mongoose": "^5.0.12",
    "shortid": "^2.2.8",
    "valid-url": "^1.0.9"
  }
}
Run the application using the command
yarn run startYou will get a log message
Server started on port 7000Now the express server is running in the port 7000
Setting up MongoDB
I am assuming that MongoDB is already installed on your local machine. Check MongoDB is running or not by using the following command.
mongodIt will start your mongod server if MongoDB is properly installed on your machine.
Now we will connect the express app with MongoDB by using Mongoose.
The following is the code for connecting the express app with MongoDB
const mongoURI = "mongodb://localhost/url-shortner";
const mongoose = require("mongoose");
const connectOptions = {
  keepAlive: true,
  reconnectTries: Number.MAX_VALUE
};
mongoose.Promise = global.Promise;
mongoose.connect(mongoURI, connectOptions, (err, db) => {
  if (err) console.log(`Error`, er);
  console.log(`Connected to MongoDB`);
});
url-shortener is the database name.
Complete code
index.js
const express = require("express");
const bodyParser = require("body-parser");
const mongoose = require("mongoose");
const mongoURI = "mongodb://localhost/url-shortner";
const connectOptions = {
  keepAlive: true,
  reconnectTries: Number.MAX_VALUE
};
//Connect to MongoDB
mongoose.Promise = global.Promise;
mongoose.connect(mongoURI, connectOptions, (err, db) =>
{
  if (err) console.log(`Error`, err);
  console.log(`Connected to MongoDB`);
});
const app = express();
app.use(bodyParser.json());
const PORT = 7000;
app.listen(PORT, () => {
  console.log(`Server started on port`, PORT);
});
Now our basic server with DB connection is ready.
Create Mongoose Modals
Mongoose allows us to have access to the MongoDB commands.
Models represent documents that can be saved and retrieved from our database.
Models are defined using the Schema interface. The Schema allows you to define the fields stored in each document along with their validation requirements and default values.
Here we need one model UrlShorten with the following fields,
- originalUrl- URL used to perform the shortening service.
- shortUrl- Unique shortcode generated by using short-id
- urlCode- The Unique code created in shortUrl.
- createdAt- Created date
- updatedAt -updated date
Then open a new tab in the terminal and create a schema file UrlShorten.js under models the folder
mkdir models
touch models/UrlShorten.js
below is the schema definition for UrlShorten
Initialize the schema in the index.js file
require('./models/UrlShorten')Create RESTful APIs
Basically we need 2 APIs
- Creating the shorten URL from the original URL
- Render original URL by passing shorten URL
Create a file urlshorten.js inside routes folder
mkdir routes
touch routes/urlshorten.js
urlshorten.js
const mongoose = require("mongoose");
const UrlShorten = mongoose.model("UrlShorten");
module.exports = app => {
  //GET API for redirecting to Original URL
  app.get("/api/item/:code", async (req, res) => {

  });
  //POST API for creating short url from Original URL
  app.post("/api/item", async (req, res) => {  });
};
Complete code urlshorten.js
our main entry point is index.js.
We need to route these two APIs to corresponding files. Initialize the urlshorten.js in the index.js file
require("./routes/urlshorten")(app);Finally, we build two APIS
http://localhost:7000/api/item[POST]http://localhost:7000/api/item/:shortcode[GET]
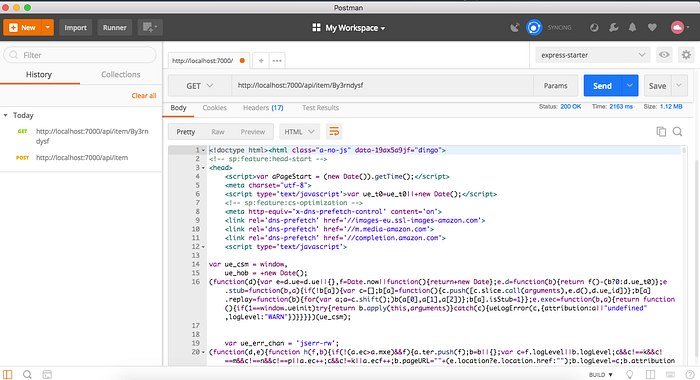
Test the shorten generation API by using postman

We got a short URL http://localhost/By3rndysf for the URL https://www.amazon.in/Apple-iPhone-X-Silver-256GB/dp/B071P37652/ref=sr_1_1?s=electronics&ie=UTF8&qid=1522661136&sr=1-1&keywords=iphone
So successfully created the shortening service
Start front end
Note: I am not going into detail about front end and will be highlighting information required only for the shortening service
Go to the main directory
cd URL-Shortnermkdir client
Clone the project URL-Shortner.
copy all the contents from client folder and paste to newly createdclient folder.
Then open a new tab in the terminal and install dependencies
cd client
yarn install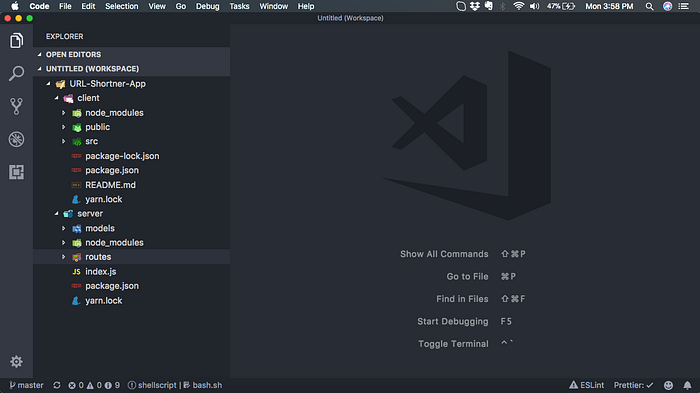
Run the front end project
yarn run startThe project will start in the URL http://localhost:3000/. Then start to explore the URL shortener.
Start copying a link to the text box and click on the submit button. You will get an error message some think like in the below image.
“response to the preflight request doesn’t pass access control check no ‘access-control-allow-origin’”

This means that requests can only be made via AJAX to the same domain (or subdomain). Requests to an entirely different domain will fail.
There are several ways to fix this CORS issues.
- Use a plugin for your browser
- Enable CORS on server
Here I am using the second approach. Below is the code for enabling CORS on Express application
app.use(function(req, res, next) {
  res.header("Access-Control-Allow-Origin", "*");
  res.header("Access-Control-Allow-Methods", "GET,PUT,POST,DELETE");
  res.header(
    "Access-Control-Allow-Headers",
    "Content-type,Accept,x-access-token,X-Key"
  );
  if (req.method == "OPTIONS") {
    res.status(200).end();
  } else {
    next();
  }
});
Update index.js
Then click the submit button again, you will get a shortened URL in the form of
So our shorten service ready. But when you click on that link. You will get the following error.
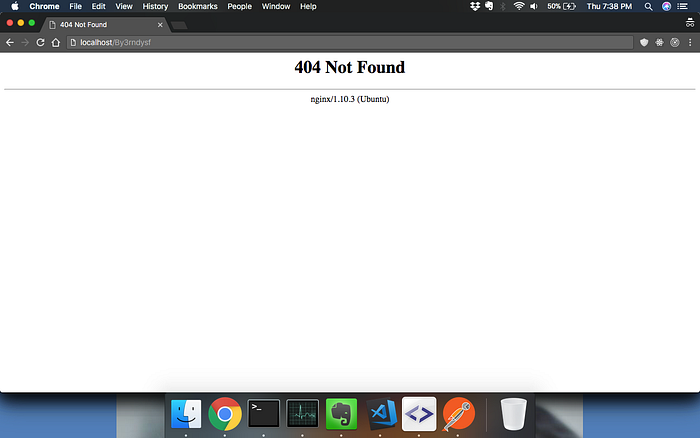
It means redirection is not working. The solution is map Short URL to the Original URL. This is the core functionality of the shortening service. We can use Nginx it for that.
Configure Nginx
The actual magic is happening is on the Nginx server.First check Nginx is installed or not by using the command.
sudo systemctl status nginxOpen your nginx.confg file
sudo nano /etc/nginx/sites-enabled/defaultAdd rewrite rules for the Original URL.
When we call http://localhost/[0–9a-z@]{5,15}$ [Shortened URL] then Nginx will call the API http://localhost:7000/api/item/$1.So express server render corresponding Original URL
Add bolded lines
server {
 listen 80
 index index.html
 server_name _;
 location ~* "^/[0-9a-z@]{5,15}$"  {
    rewrite ^/(.*)$ http://localhost:7000/api/item/$1 redirect;
 }
}
Restart Nginx server
sudo systemctl restart nginxWhen you try to call
http://localhost/By3rndysfThe Nginx will take BJMVw_ksf code from the URL and try to call the API
http://localhost:7000/api/item/By3rndysfSo above API will return the corresponding original URL.
The above API returns a Web page
Note: When you try to host the web app on the server. The localhost will change to your IP address or domain name.
Demo

Conclusion
You can get the full code on the GitHub repository.
Thank you for reading and I hope you liked it. This is my first blog post. Don’t forget to share and give some Claps 👏👏.

✉️ Subscribe to CodeBurst’s once-weekly Email Blast, 🐦 Follow CodeBurst on Twitter, view 🗺️ The 2018 Web Developer Roadmap, and 🕸️ Learn Full Stack Web Development.