Phoenix Chat for your Rails application

Every coding language or framework in the world has a bunch of example applications. For 93.786% of them it is a TODO app, for Rails it is a blog and for Phoenix — a chat. And it comes as no surprise — at the moment of appearing possibility to work with web sockets(and do it extremely fast) was one of the killer-features of the framework.
Today I’m going to show you just another one chat application but with some nice features:
- It can be added to your existing(Rails, Django, Nodejs or whatever) application with ease
- It allows your users to create one-on-one chats with each other
- It saves all messages and your users can see them later
- If a user was not in the chat at the moment of sending a message, he will get a notification about it after next login
The application I’ve made is not a code that you can immediately deploy to your production server, but it’s very simple and easy to understand so you can adjust it to your needs with minimum efforts.
Why do I need to add another technology to my beautiful app?
I’m glad you asked. When you have an existing application add another technology to it is always a tough decision. But imagine that you have Rails application, you update it to Rails 5 and now can use all advantages of Action Cable. You write new code being happy with how easy it is to add a whole new transport system to your app.
But then it appears that after some small load of your server it starts to take 10 seconds and more just to connect to a socket. You start looking for information where can be a problem and find a picture like this:

That’s a number of clients that one machine(4 cores/16GB RAM) can handle with the simplest code you can write in different languages.
And you get upset. With this article, you will see that it might be easy to start to use Phoenix beside your existing project and how few lines of code(just like in Rails) you need to make it works.
Name
Firstly we need to come up with a fancy name. Obvious point.
I call my app ElChat — short version of “Elixir Chat for cool guys”.
Now we are ready for some serious stuff.
Connecting Phoenix and Rails
There are many ways to connect different applications — allow them to share a database, use some MQ solution and so on. But the easiest way, in this case, is to have JS code that is rendered in Rails and then communicate without Rails being involved anymore.
JS code that I wrote you can find here.
How it works:
- Rails generates a hash from user id and name with some secret
- It renders this hash as a token, user id and name. Also it renders other users you want to be able to chat
- JS use generated token to connect to Phoenix
- Phoenix knows the secret that Rails used and can check the token
- At this point, JS and Phoenix don’t need Rails anymore
That’s all. Of course, if you need some more complicated logic like checking rights or blocking users you will need to have another way to communicate between Rails and Phoenix, but this is a good point to start.
Users and messages lifecycles
Before starting writing code, we need to decide how users will communicate in the chat.
I prepared two diagrams for you that shows what happens when user connects to a chat and sends a message in different circumstances:
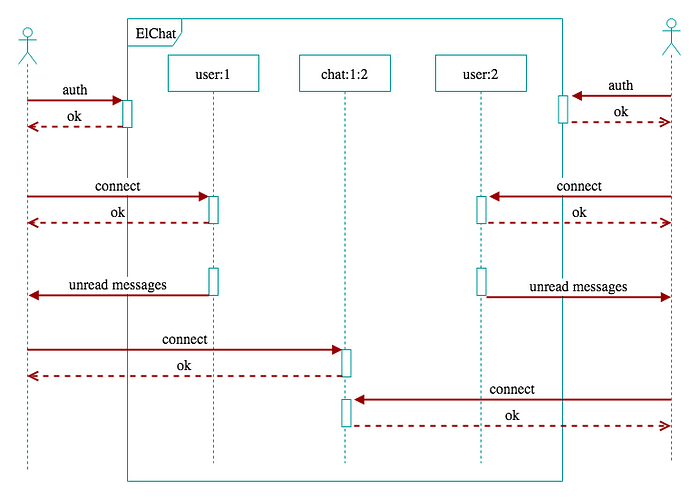
What happens here:
- User connects to a socket
- User connects to his “lobby” channel with information intended only for this user and gets all unread messages
- User connects to a chat channel with the second user and now he is ready to send and get messages
- Same happens to the second user

What happens here:
- User sends a message and it is broadcasted to both users
- Second user sends a message and it is broadcasted to both users
- Second user lefts the chat channel
- First user sends a message, application checks that the second user is not in the chat anymore and sends a notification to his lobby channel
Now we are ready to write some code.
Writing backend code
At this point, I assume that you know how to set up basic Phoenix project connected to a database. If you have troubles with that check the Phoenix website.
Database structure
We will use a completely new database for this application so you don’t need to change anything in your existing database.
Let’s start by creating message database table. It will be the only table that we will have.
Message will have this fields:
- room —which chat the message was sent
- user_id — who sent the message
- opponent_id — to whom was the message sent
- sent_at — at what time the message was sent
- is_delivered — is the message delivered to the target(with this field we will understand does the user have unread messages)
You can create the table by running one of Phoenix’s built-in generators:
Let’s change a bit created migration file and add indexes for the most often queries we will use.
User Socket
As I said before, to authorize users Rails generates a hash and we need to ensure that this hash is correct. For that purpose, I created a helper that takes a string and a hash as params and checks if a hash that was taken from the string with some secret(don’t keep this secret in the code, use environment variables instead!) equals hash from params.
Now we are ready to change connect function in UserSocket to authorize users when they connect to the socket:
So if the token is correct user_id is assigned to socket and error is returned otherwise.
User Channels
Each user will have its own “lobby” chat with information intended only for this user. These channels will be named like “user:1”, “user:2” and so on. The only thing we need to check on connection is that user_id from a channel name is the same as user_id from the socket.
After joining the lobby we find(with help of a simple SQL query) all chats with unread messages for the user and push this information to the channel.
Don’t forget to add information about this channel to the UserSocket!
Chat channels
For chats between users we will use channels named like “chat:1:2” where 1 and 2 are user ids in is ascending order.
At the moment of joining the channel, we need to check if user id is one of the ids mentioned in the channel name. After join, we send all previous messages from the channel to the user.
When user sends a message we create a changeset from it and save it in the database. If everything is ok we can broadcast the message to the channel.
After user gets the message he sends a “read” event with an id of the last message he got. With this id we can set is_delivered to true for all messages before(including this one).
And again don’t forget to add information about this channel to the UserSocket
Presence
The last thing we need to solve is to understand when a user you chatting with is in the chat channel and when we need to send a message to his lobby channel. Fortunately, Phoenix has a tool for it — Phoenix.Presence behavior. It provides presence features such as fetching presences for a given topic, as well as handling diffs of join and leave events as they occur in real-time.
Let’s set it up:
Now as the generator output says we need to add a new module to the supervision tree
Everything is ready to track users after joining chat channels:
Now when one user sends a message and another user is in the channel we just send it to this channel, but if he is not — we will send a notification about the message to his lobby channel
And that’s it. All features we wanted to be implemented is ready now. You can be proud of yourself.
You can find full code of the project here and an example of JS code here.
Conclusion
As you can see, adding a completely new part(Phoenix in this case) to your project can be not so painful and can be even fun. So next time when you will need to add some interesting functionality to your project you might consider this option too.
Thank you for your attention!
You can also check my articles about Neural Network to play a snake game and Zero Downtime Deployment With Docker.

✉️ Subscribe to CodeBurst’s once-weekly Email Blast, 🐦 Follow CodeBurst on Twitter, view 🗺️ The 2018 Web Developer Roadmap, and 🕸️ Learn Full Stack Web Development.