Git, Version Control System & Github

Why use Git
Git allows group of people to work on the same documents (often code) at the same time. It eliminates confusion when more than one person is making changes to the same document or code. It’s a distributed version control system.
Version control is the only reasonable way to keep track of changes in code, manuscripts, presentations, and data analysis projects.
Why use Github
GitHub is a development platform inspired by the way you work. From open source to business, you can host and review code, manage projects, and build software alongside millions of other developers.
Github is like facebook for programmers. Everyone’s on there. You can look at what they’re working on and easily peruse their code and make suggestions or changes.
It’s really open source. “Open source” is not so open if you can’t easily study it. With github, all of the code is easily inspected, as is its entire history.
Github lowers the barriers to collaboration. It’s easy to offer suggested changes to others’ code through Github. I was able to fix a mistake in the npm-expansion library for the official npm website, because it’s hosted on Github. I fixed some problems in some very useful code developed by someone I don’t know, because it’s hosted on Github.
The start
I often faced a lot of confusion myself when I started with version control or GIT as we all know it.
Then I thought that it would be a good idea to write something, to offer some clarity and ease the pain a bit of using git as one goes onto develop serious projects which would have a big impact of version control on the project.
This tutorial however walks you through the very basic set commands to get you started with git. There are tons of articles and useful links which can be worth a read. Okay so much for the introduction…
Initialise Repository
So lets say that we have our project directory created with the name “git-tutorial”. To initialise a git repository we would type the following command.
$ git init
Add New fIles/ Make change to existing files
Once we hit the “git init” command, an empty /.git/ repository created. This repository is a hidden directory where the Git operates.

So now that we have an empty repository created, lets see how can we go about adding a new file in the directory and then adding it to this git repository to track when changes are made to the file. Going back to the terminal, hit the following command.
$ touch example.txtThis will create a new file called example which will be a text file and will be added to the empty repository as the first file added to the repository. Pretty simple. Okay moving on to the inetresting stuff, if you now run the following command:
$ git statusThis is what you see,

Now as the name suggests, git status displays the working tree status of your repository where you are running the command. It would show you the working tree progress. Now what is a working tree. Notice how Git is already tracking what the files that are new as it automatically suggests that there are untracked files.
Add Untracked Files
Now that we now we have an untracked file in our repo, how do we go about adding it to the repo and make sure we keep tracking the newly added file for further changes.
$ git add "example.txt"Since we just one file in the repo and we do not need to worry about adding all the files in the repository one may just simply run:
$ git add ."We can also add all the files with similar extension quickly."$ git add '*.txt'or $ git add '*.js'
$ git add '*.css'
$ git add '*.html'
This adds all the untracked file to the staging area where they are ready to be committed to the master branch and thus kept track of in the future for any changes. But now you are wondering what is a staging area ? It is nothing but an imaginary where files are kept before they are added to the repository. One may add or remove files from this staging area.

Notice how the terminal never gives us a confirmation if the file we wanted is added to the staging area and is ready to be committed? Not a problem remember we can check the status of our working tree using the command, git status. Lets do that.

As its evident we have successfully added the file to the staging area and is ready to be committed. But Notice how the terminal shows us one other useful command.
$ git rm --cached <file>$ git rm --cached "example.txt"
This command would remove the file example.txt from the staging area and would stop the Git to track any further changes to this file. A very handy command when you end up adding unnecessary files or if you would no further want the file to be tracked.
Commit Changes
Alright So onto our next thing, as the terminal suggests, we have the file ready to be committed. Lets see how to commit this file.
$ git commit -m "adding file example.txt"So this command has some pieces lets break it down. the -m is to signify that we are committing to the master branch, which is also our working branch. Next followed by that is a small message relating to what the commit is all about. At start this may look redundant when you are the only one working on the project but image a situation where you have hundreds of developers working on the same project. It only gets very critical and sometimes the most important part to keep a check on the kind of changes one does to the overall source code. Once we hit the command on our terminal let’s see what happens:

Now as it says we have changed/added in this case one file. So it gives us a confirmation of the commit. Very well, moving on, lets say we have our project growing at exponential pace and we are way ahead of the idea which was on a simple .txt file. We have a working prototype which is more than just a single file. Since my background is of web development, lets add some basic web files. namely index.html, app.css, app.js. After this we would repeat the same steps of adding the file and then committing them to the repository.
$ touch index.html
$ touch app.css
$ touch app.jsOnce the files are created run, $ git statusAdd the files to the staging area by,$ git add . or
$ git add "index.html"
$ git add "app.css"
$ git add "app.js"Once again $ git statusNow the final would be to commit the newly added files, $ git commit -m "adding new files"
If you have done every thing right then you should see something like this,

So now we have made a few commits, now lets see how can we browse through those commits till date,
$ git logSimple and easy command, lets see what would this give:

This gives us a nice neat sheet of changes with the date and time stamp with that message we included in each of our commit messages.
Enter Github
Okay so this is great but all the work we have till now is restricted to our local computer, how can we got about adding this repository Github servers.
Go to your Github profile and start by creating a simple repo, name it anything for this tutorial I will name it “github-tutorial”. Once that the repository is created look for the clone or download button. Click on it and copy the HTTPS link.
But why ?
We do this to push our local repository to Github servers and to do so we will need to create a remote repository. Copy the https link

My copy link looks like “https://github.com/user_name/github-tutorial.git” your may have your username and the repository name.
Now onto our next command, git remote.
$ git remote add origin https://github.com/user_name/github-tutorial.gitThis command takes a remote name and a remote URL. In my case I have named my remote repository to be origin for the sake of simplicity and I would strongly urge to do the same. However feel free to name it anything. Moving on, now that we have a remote repository lets push this to the Github repository.
Pushing Remotely
$ git push -u origin masterThis command lets you push the local repo to the Github repo we created and named it origin, by default the local brach is called master. The -u tells Git to remember the parameters, so that next time we can simply run git push and Git will know what to do.
Only If you come across an error like,

As you see the tip of our current branch is behind the remote repository created on Github. As Git is smart to give us hint and see what should be the next step. It is suggesting us to git pull the changes from remote counter part and merge it with the local branch. When you do so, it would then give you an error and inform that there is no tracking information for the current branch and thus is confused as to which branch to pull.
$ git branch --set-upstream-to=origin/master master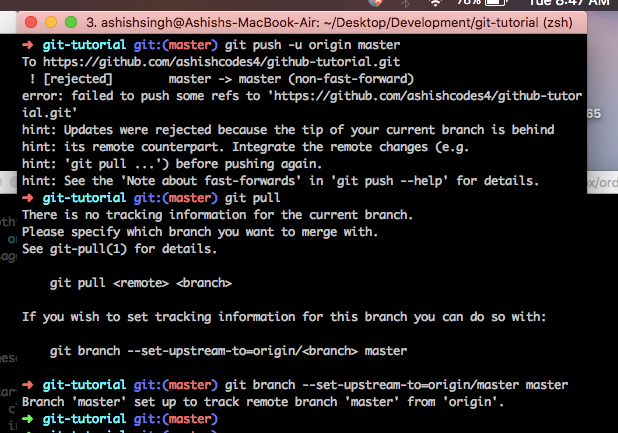
This would set the tracking information between local branch and the remote master branch.
Now the final step is to push the repository on Github servers:
$ git push -u origin master
Git Pull
Now lets say that you recently have another developer added on the team and he code the initial code and made some changes and pushed his changes on the repository. We can check for any updates and pull those updates to our local repository by doing:
$ git pull origin master In case you see that there is any difference in the code or the file structure you could see that change/difference by running another command,
$ git diff HEADIn our case we want to see what is different or what has changed since our last commit, In this case we want the diff of our most recent commit, which we can refer to using the HEAD pointer.
Creating a new branch
Why do we need to do this ?
One fine day someone working on a JS file decides to change the markup which causes the server dependency to collapse. Just to stop issues as such we need to branch out the master branch and have a local branch. That some one now can make changes to the local branch and push the changes when he/she thinks the changes are ready to be merged. This very method is called separation of concerns.
Lets look at the git command:
$ git checkout <branch-name>Branch name can be anything, another useful command is to know the list of branches you already have in the main project file.
$ git branchThis gives a list of of all the branch available in the repository at that time. Navigating between. Once you know the list of branches. you may hit the git checkout <branch-name> command to get to a certain branch and make changes to that specific branch.
Conclusion
From a developers point of view, understanding Git and its usage with Github is very crucial and equally fruitful for anyone who aspires to be a good developer one day, but to understand the importance one needs to understand where did version control come from ?
We earlier had centrally located version control system. Wherein any change made on to any file in the codebase was made on the only centrally located file base. What changed with distributed version control system is that now if any developer has to make any change in the file base he has to first get a copy of the main file base often referred as the master branch. Make changes to that personal master branch and make a pull request to get the personal branch to be pulled in with the master branch.
There is just a lot to all of this to summarise in one article. I hope this atleast makes some of you curious to know more about this awesome developer tool.
Thats all for this one, until the next one.

✉️ Subscribe to CodeBurst’s once-weekly Email Blast, 🐦 Follow CodeBurst on Twitter, view 🗺️ The 2018 Web Developer Roadmap, and 🕸️ Learn Full Stack Web Development.