Google Kubernetes Engine By Example: Part 2
Serving our application through Google Kubernetes Engine.

This article is part of a series starting with Google Kubernetes Engine By Example: Part 1.
Google Container Registry
We will need an online location to store Docker images in order to deploy them using Google Kubernetes Engine; right now our images are stored in our local Docker registry. Also, it is likely that we will want to keep these images private; so we will need a private registry.
note: In my first pass at this article, I explored using a private registry at Docker Hub. I, however, discovered that while Kubernetes supports private registries, it was a more complicated solution (requiring setting up security keys and separate billing).
Given that we are going to be using Google Kubernetes Engine, the tightly integrated Google Container Registry is a natural solution for our private registry.
Before continuing, there are some important Docker concepts to understand (not well covered in the official Docker documentation):
There is a hierarchical system for storing images. The following terminology is used:
Registry
A service responsible for hosting and distributing images. The default registry is the Docker Hub.Repository
A collection of related images (usually providing different versions of the same application or service).Tag
An alphanumeric identifier attached to images within a repository (e.g., 14.04 or stable ).
— Adrian Moaut — Using Docker, Developing and deploying Software with Containers
Also, if you are going to follow along, you will need to follow the Quickstart for Container Registry to enable the feature in a Google Cloud Platform project (that you will also likely need to create) and install the gcloud command-line tool.
We next need to create an image in our local registry, in the hellokubernetes repository, and with the 1.0.0 tag:
docker build --tag=hellokubernetes:1.0.0 .We then authorize Docker using credentials supplied to gcloud:
gcloud auth configure-dockerWe tag the local image for Google Container Registry:
docker tag hellokubernetes:1.0.0 gcr.io/[PROJECT-ID]/hellokubernetes:1.0.0Observations:
- The selection of gcr.io hostname assumes an US location
- Replace [PROJECT-ID] with your Google Cloud Platform project id
We finally push this tagged image to Google Container Registry:
docker push gcr.io/[PROJECT-ID]/hellokubernetes:1.0.0Google Kubernetes Engine (GKE)
Now that we have stored our Docker image online with Google Cloud Registry, we will run a container based on it using GKE.
The assumption is that the reader is already familiar with GKE basics; for this there is an excellent article Kubernetes 101: Pods, Nodes, Containers, and Clusters (it is actually a three-part series and all are helpful).
note: If you read the official Docker documentation, they define similar (but different) concepts: stacks, swarms, and clusters. Since we are using Kubernetes, these concepts do not apply.
Also, if you are looking to follow along, you will have to setup a GKE enabled Google Cloud Platform project (the same project used for Google Container Repository) and have access to both the gcloud and kubectl command-line tools; instructions are available at GKE Quickstart.
We first create a cluster: mycluster:
gcloud container clusters create myclusterand get the credentials so that we can interact with it:
gcloud container clusters get-credentials myclusterBecause we have a stateless application, we create a Kubernetes deployment.
k8s/deployment.yaml
Observations:
- This configuration, when applied, will create a deployment named hellokubernetes
- The hellokubernetes deployment will maintain a single pod labeled with app: hellokubernetes
- The pod has a single container, named hellokubernetes, that provides port 3000 to be exposed by the pod
We apply this deployment:
kubectl apply -f deployment.yamlWe can see that were successful:
kubectl get deployments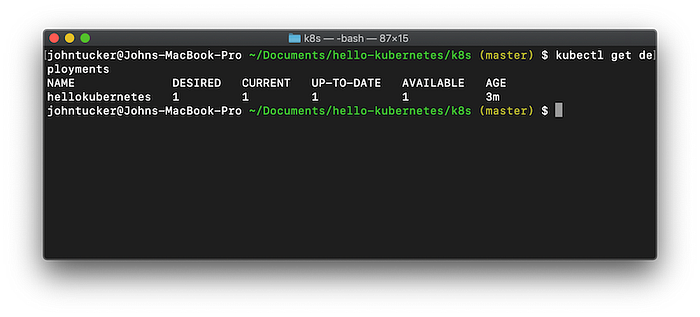
We now have the left side of this final diagram built:

Per the diagram, our last step will be to create a load balancer service with an external IP address. The load balancer exposes port 80 that is mapping to port 3000 on pods labeled app: kubernetes.
k8s/service-load-balancer.yaml
We apply the service:
kubectl apply -f service-load-balancer.yamlWe can see that were successful:
kubectl get service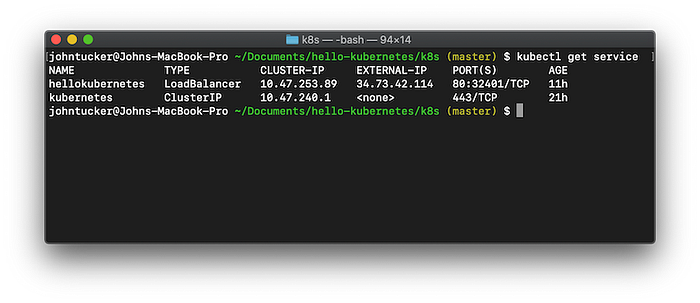
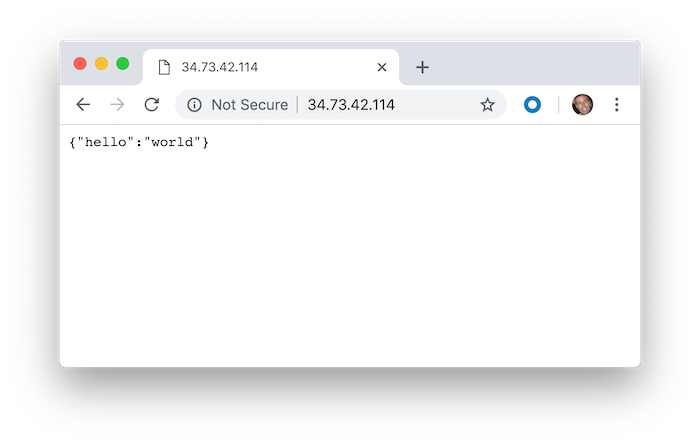
The final validation is opening the external IP address in a browser.
Next Steps
We will continue our investigation in the next article, Google Kubernetes Engine By Example: Part 3.
