How I nailed a job with this NodeJS LinkedIn bot

LinkedIn is a professional networking site designed to help people make business connections, share their experiences and resumes, and find jobs. As a software engineer, I find LinkedIn to be a great platform on which to explore new opportunities in my industry. But also as a software engineer, I naturally want to find the most effective way to achieve this goal.
Most people would now say, “Just, use LinkedInconnect to as many people as you can, and then write a post with your CV.” Or, “Dude, have you never heard of recruitment companies?” While these are legit options, they are also a bit uninspiring and so boring! What I really want is a solution that will help me shine and stand out from the thousands of other software engineers that are looking for jobs on LinkedIn.
Let’s find a job with style :)
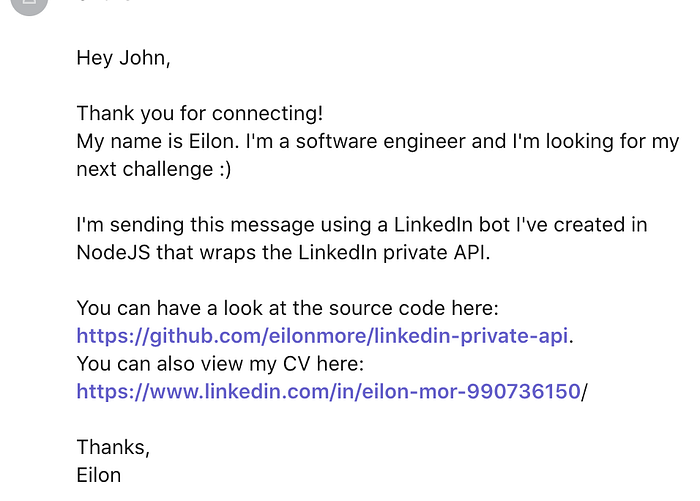
A great way to achieve this, I decided, was to demonstrate my skills. I thought what better way to do this than by creating a bot that automatically connects to other people in the industry, whether they be other software engineers or HR employees of software companies. The idea was that, after they accepted my invitation to connect, I could then send the following message automatically:
Hey <User Name>,
Thank you for connecting!
My name is <My Name>. I’m a software engineer, and I’m looking for my next challenge :)
I’m sending this message using a LinkedIn bot I’ve created in NodeJS that wraps the LinkedIn unofficial API.
You can have a look at the source code in my GitHub.
You can also view my CV here: <Link>
Thanks,
<My Name>
TL;DR
You can find the complete source code of this bot here.
If you want to create some more cool LinkedIn tools/bots, checkout the NodeJS LinkedIn Private API
Disclaimer
This article describes how to write a bot that uses the LinkedIn unofficial API.
Please note that using this API carelessly could cause your account to be banned. Always take care with this, and understand that we cannot be held accountable for any account being banned.
Also, this bot and the code in this article is in no way affiliated with, authorized, maintained, sponsored by or endorsed by LinkedIn or any of its affiliates or subsidiaries. This is an independent and unofficial API. Use it at your own risk.
Getting started
Two alternatives for creating our bot
- One option is to use an automation library, like Puppeteer, to run a headless browser with logic for interacting with the LinkedIn UI.
- The other option is interacting directly with the LinkedIn API used by the UI.
Each approach has its pros and cons, but I decided to go with the second option for my solution as I found it quite fascinating to explore the LinkedIn API.
I’d already built an awesome npm package for communicating with the LinkedIn unofficial API, and I wanted to use it to help me get a job.
Tools and prerequisites
- Basic knowledge of JavaScript/NodeJS
- NPM and NodeJS installed
- LinkedIn Private API library installed
Creating a new NodeJS project and installing dependencies
To create a new NodeJs project, run in the CLI npm init and follow the instructions there.
To install Linked In Private API run in the project directory:
npm install linkedin-private-api// oryarn add linkedin-private-api
That’s it! This is all the setup you need to write your LinkedIn bot. Now, let’s write some code :)
Hello LinkedIn
Login
The first step to writing our bot is to authenticate it with the LinkedIn API.
We can do that by simply running:
Tuning our filter criteria
Let’s first define our target audience.
For instance, I want to search for people who are:
- In the computer software industry
- Not connected to my account (I want to send invitations to new people and expand my network)
- From my country (Israel in my case)
I wanted to make it even more interesting and decided to add one more criterion: I want to find a job in one of the big companies: Google, Microsoft, Facebook, or LinkedIn ;)
If we look at the UI, the filter selection will look like this:
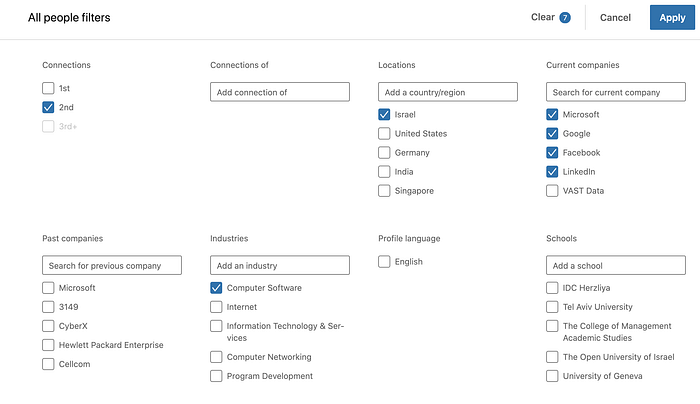
Note that we can actually bypass the industry filter. In reality, it’s redundant anyway since we are filtering by software companies.
Fetching companies
We first need to fetch the IDs of the companies to be able to use them for filtering. This step is optional if you already know the company IDs.
This is how we can fetch the required companies:
client.search.searchCompanies returns a utility class for working with the LinkedIn pagination mechanism. This class is called a “Scroller” and has three methods:
scrollNextto get the next page of the results.scrollBackTo get the previous page of the results.resetTo start from the beginning.
We use scrollNext here to get the first page of the results. We assume that the relevant company will be at the top of the search results, so we then destructure the first company for each request.
Searching for our target audience
Based on all the information we have gathered so far, we can now search for the most relevant people to help us find that ideal job:
countryCodeThe LinkedIn country code for Israel.networkTypeThe LinkedIn constant for defining 2nd connections.companyIdsA list that contains the IDs of the relevant companies
Note: Currently, the library does not supply the functionality for getting LinkedIn country codes; however, it will support this in the future. Meanwhile, you can check out the network requests on the LinkedIn platform to figure out what the relevant country is for your needs.
Sending Invitations
The next step is to scroll through the search results and start sending connection invitations to expand our network.
We start by first demonstrating that on the first page of the results:
- We’ve created a utility function so that we won’t make requests too fast. This is a good practice since we don’t want to pop up on the LinkedIn monitoring processes.
- We fetch the first 10 search hits by calling
peopleScroller.scrollNext(). - We iterate through the search hits and send an invitation to each profile.
- We wait 3 seconds between each invitation to avoid the account being blocked by LinkedIn.
The next step is to scale it up a bit and send invitations to more than just 10 profiles.
We need to be cautious here and not send too many invitations in too short a period. We send invitations to the first three pages (30 people), and then we need to wait half an hour, and then can continue. We repeat this process until we have processed all the search results (if that’s possible).
- We created an iterations
counterto help us determine when we should pause for 30 minutes. - While the result returned from the Scroller is not empty, we continue to iterate over the search hits.
- We send the invitations, as outlined above.
- If we did three iterations (i.e., processed 30 people), we reset the counter and wait 30 minutes. If not, we increment the counter and wait 10 seconds before we fetch the next page.
Fetching approved connections
Now we have finished with the first part of our bot, the next step is to send some messages to the people who have accepted my invitation.
This can actually run in parallel to the logic we’ve created so far. You can write it on a different job or just as another async function.
To fetch the accepted invitations profiles, we can just take the arguments we passed to client.search.searchPeople and use them on client.search.searchOwnConnections
Filtering only new connections
Since we don’t want to send messages to connections that we’ve already sent messages to, we need to filter only the new connections that haven't got messages from me before.
We can do that by using the client.conversation.getConversations method.
If a conversation does not exist, it means that the connection is new and we can then send them a message.
- We fetch the first page of connections.
- We iterate over the connections and try to fetch the conversation using the
profileId. - If a previous conversation does not exist (meaning this connection is new) we can send them a message.
Build the message
The next step will be to build the message. There is nothing too complicated about this step as we already have the required data to do that.
Sending the messages
Great! We now have everything set up to finish the last part of our bot and send some messages.
Sending a message is quite easy. We have profileId and we have the message content. All that left is to call client.message.sendMessage:
And the message was sent:
Now, let’s wrap up the messages bot. We should end up with this piece of code:
- Here, we created a separate function for the “send messages bot” that will be called from the main function along with the “send invitations bot.”
- Similar to the “send invitations bot”, we iterate through the pages of the connections. We send a message only to the new connections.
- Here, we wait 10 minutes between each page.
- Note that here we increment the counter only when we send a message. There might be many connections that we have already sent a message to and we don’t want to wait 10 minutes before we’ve sent a message to at least 30 people.
Bringing it all together
So far, we’ve created two independent “jobs” that can run in parallel:
- Send invitations job
- Send messages job
All that’s left is to control them from the main function. The send invitations job can run 24/7. It will just process pages and wait 30 minutes between each page until it has finished processing all the search results.
Please note: I highly recommend not sending invitations to too many connections in one day! You probably want to pause after a couple of hundred invitations. This functionality is not covered in the scope of this tutorial. The send messages job can run every couple of hours since this is dynamic data that depends on how many invitations approvals you get.
Orchestrating all jobs from the main function will look like this:
Summary
That’s it! We’ve created an awesome bot that should hopefully get you some interviews with the big companies, while you can concentrate on doing a bunch of useful stuff like preparing for the upcoming interviews.
Of course, you can always go to recruitment companies and they can help you a lot as well but, as I already mentioned, that’s just too banal.
Resources
If you enjoyed this post, make sure to follow me on:
Medium: https://medium.com/@eilonmor1
Github: https://github.com/eilonmore
Twitter: https://twitter.com/moreilon
LinkedIn: https://www.linkedin.com/in/eilon-mor-990736150/