How to build a visual recognition mobile app in 2 days with React-Native and Clarifai

Two months ago, I went to the very first AixJS meetup of the new season which had talks relating to Javascript. The first one was about the (super) awesome React framework by François de Campredon (who used to passionately and frequently talk about React at well known React conferences). While the second talk was about Angular and libraries industrialisation by my technical lead and Developer Philippe Beroucry.
It was at this meetup where I was given the opportunity to give a presentation about React-Native at their next meetup.I was so happy and motivated that I couldn’t wait to share what I had learned in these past few months with this amazing mobile and cross-platform technology.

From sharing why I felt in love with React Native to how it made building a mobile application with native performance so much easier, I was ready to help other eager devs learn more about this topic.
1 — The idea
I really wanted to blow away the audience with a great application. To-do lists, weather apps and other generic examples have been overdone, so that’s when Silicon Valley came to mind. It seemed like the perfect mix of tech and fun.
Remember the episode with Jian Yang demonstrating his mobile SeaFood app with “Hot dog, not hotdog” ?
https://www.youtube.com/ACmydtFDTGs
2 — Challenges and constraints
I faced a few challenges and constraints when I started to build SeePizz:
- I had to keep my code easy to understand, the topic of my talk would be an introduction to React Native. That’s why I wanted to use included components only. It was a huge challenge to introduce the framework and also to explain the deeper parts of my app to my intermediate audience.
- I couldn’t get too far in the machine learning part. As I’m far from being an expert in this area, I had to choose the right visual recognition algorithm for what I had to build. So, I was really happy to use Clarifai as I get an easy API to use, with few code lines to wrote to get the expected result.
- Time was also a huge constraint to me. I’m used to always increase my productivity, but this time, the challenge was to build it in a way that everyone could understand the code I wrote. I only get less than a week to prepare my talk, to build my app, and to make my presentation slides. Did I mention that I am actually working full-time too?

Ok guys! I just have my week-end to build my awesome mobile SeePizz app…
3 — Technical choices
I knew the base of this app needed to have visual recognition so that the app could identify the uploaded pictures from the user. When I googled for resources, I came across multiple options and companies offering computer vision… But then I stumbled upon Clarifai!
Clarifai is not just another AI company…
Clarifai is an artificial intelligence company headquartered in New York City. It was founded in 2013 by Matthew Zeiler who wanted to helps developers (like me) with real-world problems. He is a foremost expert in machine learning, that’s why Clarifai excels in visual recognition and offers a lot of features that can literally give eyes to your virtual projects.

If you already visited Clarifai website, you know that it already won the top five places in image classification at the ImageNet 2013 competition. The number of predictions that Clarifai is capable of is really incredible:
That’s more than three billion concepts in photos and videos every month!
Based on the most advanced machine learning systems, Clarifai makes accessible this technology by a clean API that I easily used to build my SeePizz app. I also noticed they had a very well-thought out and well documented API, which really grasped my attention — and trust me, I don’t often say this about documentation!
If you are asking for a proof of seriousness, you would be glad to know that a lot of companies already used Clarifai, from Fortune 500 companies to startups and small dev teams. Another great feature was the fact that Clarifai offered a free plan for developers like me! With 5,000 free operations per month, 10,000 free inputs (I haven’t used it yet) and 10 free custom concepts that I could train, it gave me the ability to test out their tech before investing more into it. Their Custom Training also blew my mind away and the fact that you can customize their tech to suit my needs gave me the freedom to mold my app to the way I saw fit.
Did I mention that Clarifai is awesome yet?
There’s so many great ideas for awesome projects and use-cases that you can easily build with Clarifai, but for now I’ll walk you through how I built this app.
4 — What I am going to build
When I start to work on a new project, I used to analyze the app features I have to build, then I define a task for each of them. This way, I can keep my work organized (more or less…) and properly track my progress.
Home Screen

When the user is at the home screen, he can pick a picture to analyze. When the user touch the button, it will display a native image picker to select the picture from albums, or from camera.
Components
- Custom header
- Image
- Button
Analyze Screen

When the user has selected the picture, the analyze screen will be displayed while the mobile app is sending a request to the visual recognition web service. Nothing fancy here!
Components
- Image
- Loader
- Text
Result Screen

As soon as the app has received prediction result, it will display a response notification. User can share the result (screen capture and native sharesheet) or come back to the homescreen.
Components
- Text
- Button
- Image
5 — It’s time to work, sir!
Notes: I’m using Node 6.11.2 and npm 5.3.0
A) Dependencies
- React Navigation: Easy navigation solution
- Image picker: Camera and albums native picker
- Share: Native sharesheet
- View Shot: Screen capture with saving options
- Clarifai: Visual recognition becomes easier than ever
- Prop-types: Type checking for React props
B) Single entry file for both platforms
I love the fact that React-Native offers double file extension for each platform, but I really prefer to get a single entry file, so I add a new app entry file /src/App.js and I import this file in the root index files.
Note that since React Native 0.49, a new project has a single entry file only.
index.android.js / index.ios.js
import './src/App'src/App.js
import { AppRegistry } from 'react-native'import { StackNavigator } from 'react-navigation'import HomeScreen from './screens/HomeScreen'import PredictScreen from './screens/PredictScreen'
const App = StackNavigator({  Home: { screen: HomeScreen },  Prediction: { screen: PredictScreen }})AppRegistry.registerComponent('seepizz', () => App)
I’m creating a new root component which will load my two screens using the navigation library. Documentation will help to know what you can do with React Navigation :)
C) Home Screen
First, I need to import React to create my HomeScreen class. In this screen, I will use the native Alert, View, Statusbar, and the ActivityIndicator (loader) components. I added prop-types lib to check the class props. Also, I’m importing my own custom components I will explain later. Finally, I need to import my style file.
import React, { Component } from 'react'import { Alert, View, StatusBar, ActivityIndicator } from 'react-native'import PropTypes from 'prop-types'import ImagePicker from 'react-native-image-picker'import Header from '../../components/Header'import BackgroundImage from '../../components/BackgroundImage'import XPButton from '../../components/XPBouton'import styles from './styles'
The header is handled by the React Navigation library. I’m passing a custom component instead of using options properties as I wanted to use a custom component.
static navigationOptions = {
  header: <Header
           title='seepizz'
           subtitle='"The Shazam for Pizza"'
          />,
}
Then I’m gonna initialize my states class, fix context for my click method, and define my picker options.
constructor() {  super()  this.state = {    loading: false, // initializing loading state  }  this._onClick = this._onClick.bind(this) // fix _onClick context
  // Defines picker options
  // See documentation for details  this.options = {    title: 'Sélectionner une image',    takePhotoButtonTitle: 'Prendre une photo',    chooseFromLibraryButtonTitle: 'Choisir depuis la galerie',    cancelButtonTitle: 'Annuler',    cameraType: 'back',    mediaType: 'photo',    storageOptions: {      skipBackup: true,      path: 'Seepizz'    }  }}
When user is touching button, the picker will appears to ask for using camera or pick a picture from albums, handled by the _onClick method.
_onClick() {  this.setState({loading: true}) // set loading state to true
  // It will display picker passing my defined options  ImagePicker.showImagePicker(this.options, response => {    if (response.didCancel) {
      // If user cancel the picker      this.setState({loading: false})    } else if (response.error) {       // If an error occurred during picking/taking a picture, display a native Alert that the user cannot cancel      Alert.alert('Erreur', 'Vérifiez vos permissions aux albums photos et à la caméra.', {cancelable: false})      this.setState({loading: false})    } else {       // Everything is fine, go to predict screen passing response (the picture however user has selected it)      const { navigate } = this.props.navigation      navigate('Prediction', { image: response })      this.setState({loading: false})    }  })}
Finally, the render method will display everything you see on the screen capture : Background image, button and native loader if loading state is true.
- StatusBar is required in order to hide the platform statusbar. Feel free to unhide it if you prefer.
- BackgroundImage is just a custom component I’ve created, it displays an image in full screen mode and takes children components to render.
- XPButton is a custom component I’ve built too (XP is for Cross-Platform). This component displays a button with native platform styles.
- ActivityIndicator: In case of loading state is true, I hide the button and show a native loader for user feedback.
render() { return ( <View style={styles.container}> <StatusBar hidden /> <BackgroundImage source={require('../../assets/bkg.jpg')}> { !this.state.loading ? <XPButton title='Analyser une image' onPress={this._onClick} /> : <ActivityIndicator size="large" color="#e74c3c" /> } </BackgroundImage> </View> )}
Files: HomeScreen
D) Predict Screen
The visual recognition part is now! I’ve splitted this screen in two different screens: Analyze & Result.
One more time, I import everything I need:
import React, { Component } from 'react'import {
  ActivityIndicator,
  View,
  TouchableOpacity,
  Text,
  Image,
  Dimensions,
  StatusBar,
  Alert } from 'react-native'import { NavigationActions } from 'react-navigation'import { CLARIFAY_KEY } from 'react-native-dotenv'
import Clarifai from 'clarifai'import BackgroundImage from '../../components/BackgroundImage'
import AnswerNotification from '../../components/AnswerNotification'
import CaptureAndShare from '../../components/CaptureAndShare'
import XPButton from '../../components/XPBouton'import styles from './styles'
Clarifai requires an API key, here I am loading it from my environment variables with a Babel preset. I’ve published source code on a public Github repository, so I didn’t want to share it publicly. Usually, you would define a constant containing your API_KEY.
static navigationOptions = { header: null,}
As I don’t want any header, in navigationOptions I set header property to null. Back navigation will be handled later by catching user actions.
constructor(props) { super(props) this.state = { loading: true, result: '', } this._cancel = this._cancel.bind(this)}
Again, I’m defining the loading state. Result state is the string I will pass to my toast-like notification component.
Now, the important part will be in the componentDidMount method.
componentDidMount() {  const clarifai = new Clarifai.App({    apiKey: CLARIFAY_KEY  })  process.nextTick = setImmediate // RN polyfill  const { data } = this.props.navigation.state.params.image  const file = { base64: data }  clarifai.models.predict(Clarifai.FOOD_MODEL, file)    .then(response => {      const { concepts } = response.outputs[0].data      if (concepts && concepts.length > 0) {        for (const prediction of concepts) {          if (prediction.name === 'pizza'
                && prediction.value >= 0.99) {            return this.setState({
              loading: false,
              result: 'Pizza'
            })          }          this.setState({ result: 'Not Pizza' })        }      }      this.setState({ loading: false })    })    .catch(e => {      Alert.alert(       'Une erreur est survenue',       'Désolé, le quota est peut-être dépassé, réessaye plus tard !',       [{ text: 'OK', onPress: () => this._cancel() },],       { cancelable: false }     )   })}
Let me explain all this in the next part.
Initialize Clarifai
First of all, I initialize Clarifai library using Clarifai.App() method and passing my API_KEY to it.
Clarifai library is using the nextTick() method, which is unavailable with React Native. I went through the not-so-famous “process.nextTick is not a function” error. That’s why I needed to use the setImmediate method here.
const clarifai = new Clarifai.App({ apiKey: CLARIFAY_KEY})process.nextTick = setImmediate // RN polyfill
Notes: The best place to set this polyfill would be in the entry file /src/App.js.
Getting image data from props
Remember that when the user switched of screen, I’ve passed the picker response to my PredictScreen? I’m going to use the image base64 data here, so I’m setting a new constant variable file which I will send to the Clarifai API.
const { data } = this.props.navigation.state.params.imageconst file = { base64: data }
Notes: As far as I know, it’s impossible to send raw file over the network with React-Native, you have to use blob file, but hopefully Clarifai API supports base64 data, so we can easily make ours API calls.
Predict call using trained model
To get predicted results, you have to submit a picture, and to use a model. Ask for Clarifai predicted results based on a requested image and using an already trained model is as simple as this code below :
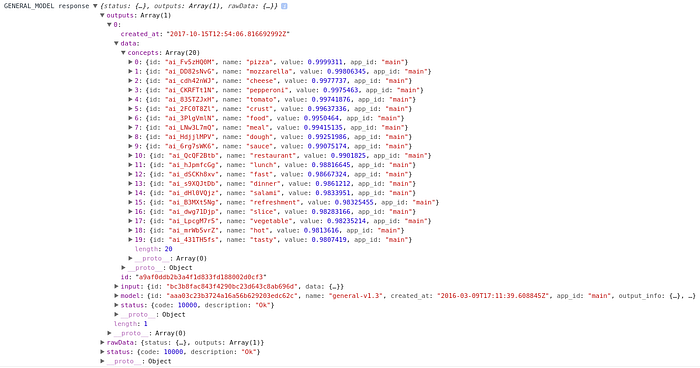
clarifai.models.predict(Clarifai.FOOD_MODEL, file)Using the predict() method, we have to choose a model to work with. This visual recognition API offers a lot of models to play with. I’ve started using the GENERAL_MODEL but as I only wanted to know if my picture was a pizza, or was not a pizza, the result seemed not useful enough for me.
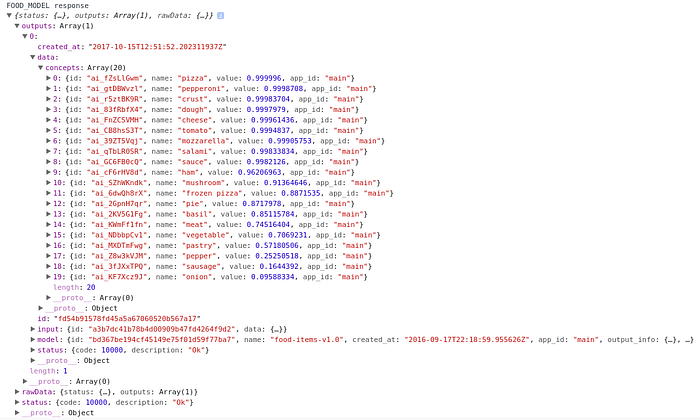
As soon I’ve used the FOOD_MODEL, results was more focused on food types.
That’s why it’s important to use the good model to get the results you are waiting for. If there isn’t any model useful enough for your application, Clarifai offers to create and train your own model! Check this Getting started with training models page if you’re interested in.
Filter the predict response from Clarifai API
Now that we have our results response, we can now use it to display a notification to the user. I’m going to check in the response I’ve received if I got a pizza prediction, and if the value is high enough to be acceptable. You’ve already noticed that the value is an interpolation with the percentage of the Clarifai algorithm thinks it is. In my case, 0 is not a pizza at all. 1 is totally a pizza to eat :)
I was playing with values a few minutes before to find the right percentage value. I’ve started at 0.75 as I though that would be enough, I wouldn’t think of the result will be so accurate!
But Clarifai is, again and again, very awesome and impressive and then I’ve finally used a 0.99 value without being worry of missing valid result.
The predict() method returns a Promise, so it’s very easy to filter our response when we get the results.
clarifai.models.predict(Clarifai.FOOD_MODEL, file)
.then(response => {
  // Targeting concept results  const { concepts } = response.outputs[0].data
  if (concepts && concepts.length > 0) {    for (const prediction of concepts) {      if (prediction.name === 'pizza' && prediction.value >= 0.99) {
        // Yummy! It's a pizza, set result state and stop loading        return this.setState({ loading: false, result: 'Pizza' })      }      this.setState({ result: 'Not Pizza' })    }  }  this.setState({ loading: false })})
Then, when I got the result I set the loading state to false. That would display the result screen!
Handling errors and go back to HomeScreen method
I also used a catch method, as I was using a free plan quota, it may have exceeded, for example. Whatever, I’m just displaying a native alert to inform the user that something wrong happened. He will go back to HomeScreen when touching the Ok button of the modal using this following method :
_cancel() { const backAction = NavigationActions.back() this.props.navigation.dispatch(backAction)}
I am using the React Navigation library to navigate to the previous screen. Nothing fancy here! Again, you can read the React Navigation documentation.
Rendering Analyze Screen & Result Screen
Once again, I’m getting image data from the navigation props to use it in the same BackgroundImage component I used before. Then, I’m hiding the status bar of the device, and showing a screen depending of my component state.
When the component has no result yet, it will display the Analyze Screen which is a background image and a native loader with centered text.
Else, it will show the result screen, with a coloured notification (green is valid, red is not), and two buttons. One to capture and share the result, the other to go back to the HomeScreen.
render() {  const { type, data } = this.props.navigation.state.params.image  const sourceImage = `data:${type};base64,${data}`  return (    <BackgroundImage source={{uri: sourceImage}} resizeMode='cover'>      <StatusBar hidden />      {        this.state.loading ?
        // display Analyze Screen        <View style={styles.loader}>          <ActivityIndicator size={75} color='#95a5a6' />          <Text style={styles.loaderText}>Analyse en cours...</Text>        </View> :
        // Display result screen        <View style={styles.container}>        <AnswerNotification answer={this.state.result} />        <CaptureAndShare         title='Partager'         color='#3498db'         image={sourceImage}         onCancel={this._cancel}        />        <XPButton         title='Non merci'         color='black'         textOnly         onPress={this._cancel}        />      </View>    }    </BackgroundImage>  )}
Files: PredictScreen
Let’s focus on the last custom component I created. To share the result, I needed to capture the user screen before. So yes, bad practice here, but I wrote my code in a separated component which will handle everything for me. If you’re interested in seeing the code behind, you can check my component file.
And voila, job done! Pretty easy, ain’t it?
Fork my project on Github https://github.com/leonardoballand/seepizz
6 — Conclusion
Using React-Native to build awesome mobile application is more than a pleasure for me. And I was really surprised by Clarifai. See how it helped me a lot a get my project done :
- I get a working mobile app faster because of clear documentation and well-though API (that’s rare enough to bold the entire sentence…). Also, the library is easy to use!
- My mobile app still reactive even with API calls over the network because I got Clarifai responses quicker than ever. It is important to not lose the advantages of using React-Native.
- My users are not annoyed by fake results, Clarifai algorithm is very accurate and can handle a lot of different data types.
As I told you in the beginning, I got a lot of ideas to do with visual recognition. There are a lot of needs that we could care with it, and I’m going to use Clarifai again as I can work faster and better with it.
Imagine you could analyze in real-time the user environment and show relevant informations to him…
Imagine you could send a notification for each publication about your new clothes collection…
Imagine you could securize your application using face recognition…
Imagine you could add road sign recognition to your embedded car application…
Imagine you could say to blind people what they cannot see…
Don’t imagine anymore, just build!
Thank you for taking time out to read my first Medium article.
To read more more posts, visit leonardoballand.com. And everyday, I remain addict on my Instagram, Twitter and Linkedin accounts.
If you’d enjoy more detailed articles/tutorials about React Native, click the 💚 below and feel free to leave a comment below.
A BIG thanks to Shirley and Isabelle who helped me alot correcting this english article :)
