How to create an Alexa skill with Node.js and DynamoDB
At the end of this article you will know the overall anatomy of a skill, how to build the code that powers it, how to configure it in AWS, and how to immediately install it on your own Echo device.
I enjoy my Echo Dot. Having one in our kitchen hasn’t been revolutionary for us, but my wife and I have benefited from how it has streamlined everyday tasks like adding items to our shopping list as we peruse the fridge or letting us know our commutes as we’re racing out the door. And most importantly, it makes for a pretty cool voice-activated music player.
AI voice assistant technology is still in its infancy, but it’s clearly evident that it has the potential to fundamentally change the way we interact with our devices. For that reason, I felt it was time that I took a look at how it works and what it would take to build my own Alexa skill.
Before we dive into code, let’s first go over what exactly a skill is and build an understanding of the terminology involved.
Your skill will require either an AWS Lambda ARN (Amazon Resource Name) or a publicly available endpoint that supports the Alexa JSON interface. The recommended option is to use Lambda and that is what we are going to use in this article. AWS offers a free tier that should be more than adequate for building a simple skill to play around with and it’s what I used for creating this skill. For more information, check out https://aws.amazon.com/free/
The anatomy of a skill
An Alexa skill is Amazon’s version of an app that runs on Echo devices. It communicates with the Alexa voice service and follows a particular interaction pattern. Skills can be submitted for publication and potentially earn developers money.
Skills are free to create and developers can install their unpublished skills on their own devices. They can also easily grant anyone with an Echo access to their unpublished skill by simply adding their email to the list of allowed testers. I will go over that process at the end.
Invocation Name
When a user opens your skill he uses the invocation name. This is generally just your skill’s name. He can ask to open your skill or he can provide an instruction along with the invocation name. For instance, if your skill was named “Hello World” he can say “Alexa, open Hello World” and you would generally have Alexa greet the user and give a list of the commands available. The other option is for him to say “Alexa, ask Hello World to say hello”. Assuming that you had a “say hello” command or a “say” command that accepted a parameter that “hello” satisfied, the handler would be triggered directly. Which brings us to the next topic…
Intents
What I’ve just described are two intents for your skill. An intent is basically an event handler for a skill that can be triggered by the user saying a command that Alexa recognizes. If you’ve done any Android programming, the term intent will be very familiar to you and it applies the same way here.
“Alexa, open Hello World” will trigger your LaunchRequest intent. This is a pre-configured intent that you don’t have to wire-up when you configure your skill’s intents. There are a few other intents that are baked in such as AMAZON.HelpIntent, AMAZON.CancelIntent and AMAZON.StopIntent.
Utterances
Continuing on our example of the “say” intent being triggered by the phrase “Alexa, ask Hello World to say hello”, the phrase triggering “say” is what Alexa calls an utterance and when you configure your intent, you map it to one or more utterances that will trigger it. You can add different permutations of this phrase to ensure that your users can trigger it casually as if they were talking to a real person.
Slots
In the phrase “Alexa, ask Hello World to say hello” we could be doing two things — asking Alexa to give us a canned welcome greeting or asking it (her?) to literally say the word “hello”. Let’s go with the latter. A user-supplied parameter for an intent is called a slot and a slot within an utterance will be interpolated into the string. So instead of our utterance being “to say hello”, our utterance is “to say {message}” and it accepts a parameter that is mapped to the message slot.
Note that the “Alexa, ask Hello World” part is not included in the utterance — that is picked up as the Invocation Name.
Slot Types
A slot has a slot type that you assign to it. You can select a built-in slot type provided by Amazon such as Amazon.Color, Amazon.Author, Amazon.Country or you can elect to create a custom slot type. Slot types have a list of values that can be matched. For example, Amazon.Color would have acceptable values of Red, Green, Blue, etc. If your slot needs values that don’t fit the mold of one of the built-in slot types, then you can easily create a custom type and supply possible values. If the slot is ambiguous like our message slot, then you can just add a couple of possible values and Alexa will still map what she understood the user to say as the slot value.
Dialogs
Another way an intent can receive a slot value is by prompting the user. So we could change our utterance to just “to say” and drop the interpolated message slot and have Alexa fire what is called an elicitSlot action, with a phrase to say such as “What message would you like me to say?” and the slot to fill, message. This is the approach I took when building my skill because I found that Alexa would often timeout if I tried to give a long command, so having it prompt me for slot values made my commands more concise.
What are we going to build?
Now that we have the overall mental model in our heads, let’s build something! The skill that I opted to build is a simple CRUD example that uses some dialogs. The app itself is a simple recipe organizer. My wife and I have recipes in so many different locations and we constantly forget where particular ones are. Sometimes it’s a web bookmark, other times it’s in a cookbook and other times it may be something we ripped out of a random magazine. So I felt that this is something we could actually use. The user can ask to add a recipe and state where the recipe is located and specify if it is a quick or long recipe to make. The recipes he adds will be stored in DynamoDB and associated with his userId so only he can view and delete these recipes.
The following video gives a quick demo of what the finished product will be:
Let’s code!
The code we are going to create relies on some modules that we will be installing via NPM. If you’re unfamiliar with NPM, it’s a JavaScript package manager. Go here if you need to install it.
If you’d like to skip these steps, the full source code can be found on github.
- Create a new folder somewhere and open it in your favorite JavaScript IDE. I am going to be using Visual Studio Code, which is a free download.
- Add an index.js file to the folder.
- Open a terminal and cd to the folder you created. Type
npm initin your terminal. Answer the questions that NPM asks you with whatever you like. - Type
npm i alexa-sdk aws-sdk es6-promisify --savein your terminal. This will add the Alexa SDK and AWS SDK to your project. The AWS SDK is only necessary because we are going to be using DynamoDB. I’ve also added the es6-promisify library because the AWS SDK’s DynamoDB client uses a callback-style API and I wanted my code to be a little cleaner. - Add the following code to index.js:
Ok, that’s a lot of code…Let’s go over it.
Starting from the beginning, we are importing the Alexa SDK, the AWS SDK, and then the es6-promisify library. We then wrap some of the DynamoDB client’s methods in promises. In the handlers object (line 20), we wire up our intents. Let’s skip over these for a second. At the bottom, we export a handler function and within that we register the handlers object with the Alexa SDK. Now let’s go over the handlers.
LaunchRequest
This is fired when the user says “Alexa, open Recipe Locator”. We then tell Alexa to list the available commands and prompt the user to choose one. We have emitted an “ask” action that indicates to Alexa to speak the provided string and then wait for a response. Note the <break strength=”medium” /> This causes Alexa to do a short pause before continuing. While Alexa will automatically pause slightly for periods and commas, the break tag offers us finer control over the pause duration.
The break tag is part of the Speech Synthesis Markup Language (SSML) specification. SSML is a markup language that provides a standard way to mark up text for the generation of synthetic speech. The Alexa Skills Kit supports a subset of the tags defined in the SSML specification. You can read more about the supported tags here: https://developer.amazon.com/public/solutions/alexa/alexa-skills-kit/docs/speech-synthesis-markup-language-ssml-reference
AddRecipeIntent
When a user says “Alexa, ask Recipe Locator to add a recipe”, the AddRecipeIntent will be fired. After saving our userId and slots to local variables for conciseness, we then enter our first dialog. We first check if we have a value for the RecipeName slot and if not, prompt the user for it. Emitting an elicitSlot action notifies our skill to instruct the user with the provided speech output to give us a value for one of the needed parameters. Once we have successfully obtained a value, we now can confirm that we’ve understood what the user said correctly. This is not a necessity but I felt this was a good measure for this particular skill. Once we get through the confirmation phase, we then move on to the next slot. When all of the slots are filled, we add the record to the db.
You may have noticed the console.log statements. You can view these statements and your error logs in Lambda by opening your function and going to Monitoring -> View logs in Cloud Watch.
All other intents
The rest of the intents follow a similar pattern and should be pretty straight-forward once you’ve grasped how AddRecipeIntent works. Also, note that we are using the built-in intents that were mentioned earlier, AMAZON.HelpIntent, AMAZON.CancelIntent, and AMAZON.StopIntent. These will be triggered if the user asks for help or says to cancel or stop, respectively.
Configuring your skill
So now that we’ve discussed the code, it’s time to go over how to create a skill and have it run this code on your device.
Creating a skill on the Amazon Developer Portal
The first step in creating our skill is setting it up on the Amazon Developer Portal. This is where you configure your skill’s details such as its invocation name, utterances, slots, and point it at your Lambda function or your web service.
Rather than me regurgitating the many fine guides out there on how to create and configure a skill, please open the tutorial “Build an Alexa Skill in 6 Steps” and complete steps 1 through 8, noting the following:
- For the name and invocation name fields, use “Recipe Organizer”.
- Once your skill gets created it will be assigned an application id that is visible on the first tab, “Skill Information”. Copy that and update the string “‘REPLACE WITH YOUR SKILL APPLICATION ID” in your index.js file with it.
When you get to step 9, return to here and I will detail how to set up the intents we will need. Go ahead, I’ll wait…
Interaction model
You should now be on the “Interaction Model” configuration screen. It should look like this:
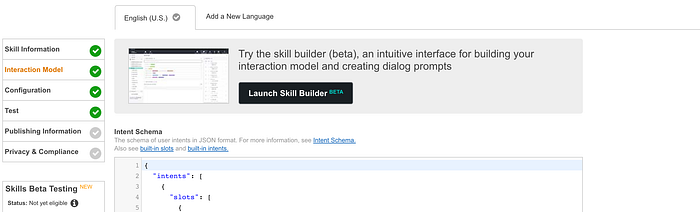
The Skill Builder tool
Click on the button that reads “Launch Skill Builder”. This is basically a UI for generating your intent schema. I highly recommend using this tool instead of typing out a couple hundred lines of JSON. Once it loads, you’ll see something like this:
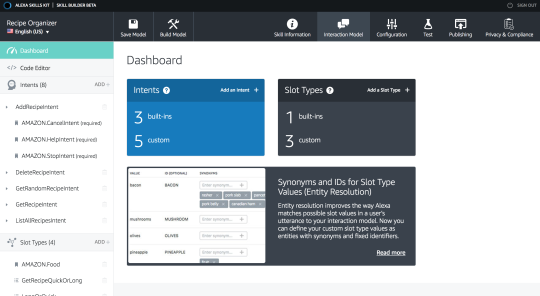
Adding our first intent
For our first intent, make the name of it “AddRecipeIntent”. Once you’ve added it, you’ll be taken to a screen where you can add the utterances that trigger it and its slots. For the utterance, add “Add a recipe”.
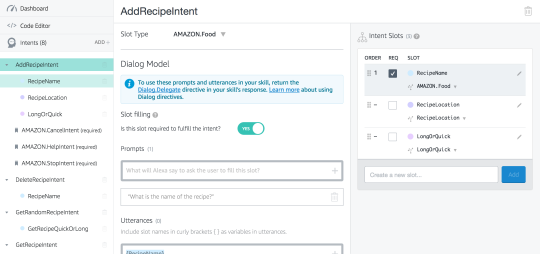
Adding our first slot
Now on the right-hand side there is a list of intent slots. Create a new one called “RecipeName”. After you add it you will see it appear in the list and underneath the slot name it will say “Choose a slot type…” Click that and select “Amazon.Food”.
Using Dialog Models
Next we are going to set up a dialog for this slot. This allows us to prompt the user for slot values and we will use it to obtain the RecipeName slot’s value.
In our code, there are 2 ways to prompt the user for slot values using a dialog. One is to delegate Alexa to prompt for it and indicate when it’s been filled by updating the dialogState of the request. The other way is to explicitly handle the prompting and confirmation for the slot. I chose to go with the latter so I didn’t have to create all of the dialogs in the Skill Builder and I also felt it made my code a little bit more transparent and thus easier to follow.
Since we are not using the first approach, we don’t have to create a dialog for all of our intents that need them. However, we do need to set up at least one or our app won’t support dialogs at all. So for that reason, set the RecipeName slot to be required and add a prompt of “What is the name of the recipe?” and an utterance the user will say to pass the slot. The utterance will just be “{RecipeName}”. It should look this below:
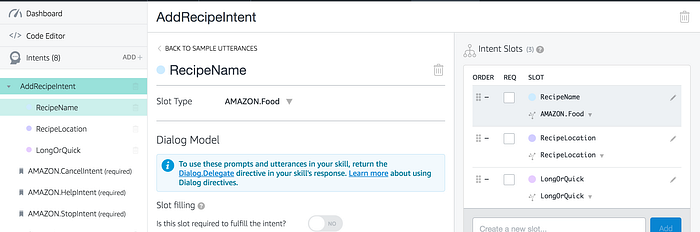
RecipeLocation slot
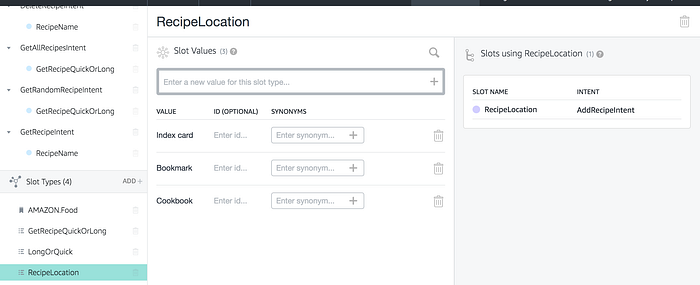
Next, create a slot called “RecipeLocation”. For its slot type, this time we are going to create a custom slot type. Enter “RecipeLocation” in the box that says “Create a new slot type…”
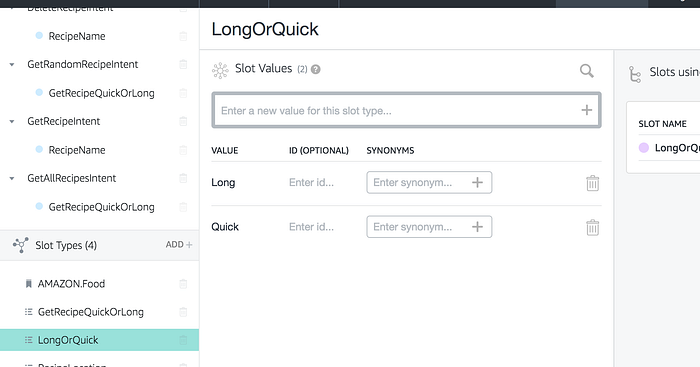
For the last slot, create one called “LongOrQuick” and give it a custom slot type of “LongOrQuick” by entering that into the box that says “Create a new slot type..”.
Your final intent should look like this:
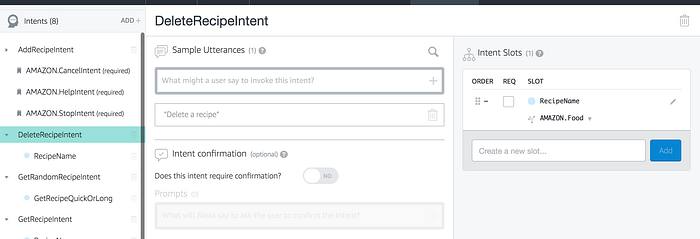
DeleteRecipeIntent
This intent has an utterance of “Delete a recipe” and a RecipeName slot:
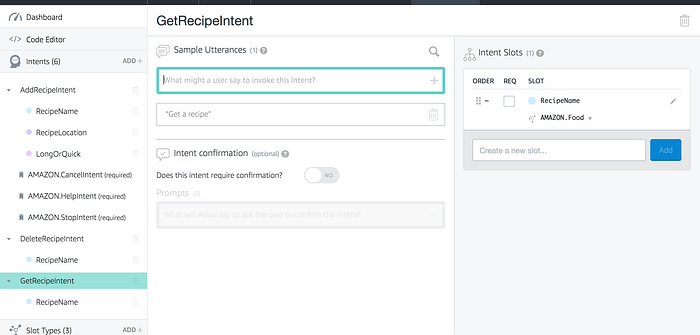
GetRecipeIntent
This intent has an utterance of “Get a recipe” and RecipeName slot:
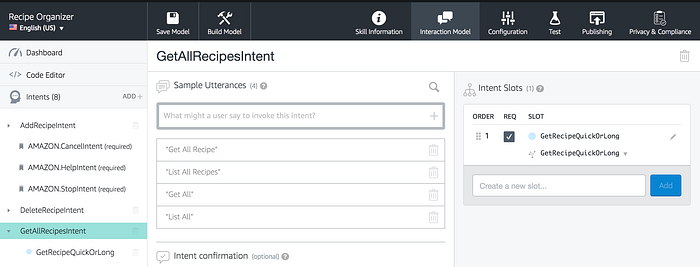
GetAllRecipesIntent
This intent has multiple utterances mapped to it such as “Get all”, “List all” and a few more. For the slot, GetRecipeQuickOrLong is the only one and it has a custom slot type of the same name:
GetRandomRecipeIntent
This intent has 2 utterances: “Get random” and “Get a random recipe”. It has a GetRecipeQuickOrLong slot which has a custom slot type of the same name. It should look like below:

Now for our custom slot types, we need to add some acceptable values.
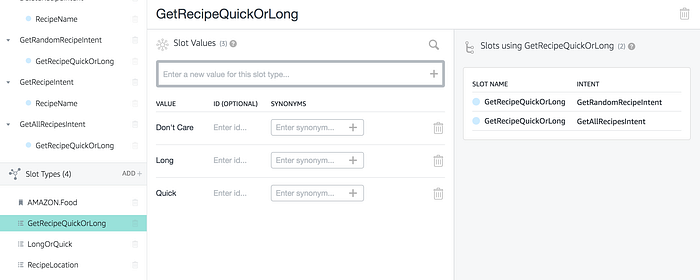
GetRecipeQuickOrLong slot values
On the bottom left of the screen, click on the GetRecipeQuickOrLong slot. Add “Don’t Care”, “Long” and “Quick”:
LongOrQuick slot values
This slot has values of “Long” and “Quick”:
RecipeLocation slot values
And finally for RecipeLocation, add “ “Bookmark”, “Cookbook”, and “Index Card”:
Now click on the “Save Model” button up top and once that’s completed click on the “Build Model” button. Your interaction model is now ready to be used by your skill. If you’re curious, you can view your generated JSON by clicking on the “Code Editor” on the left-hand sidebar above your intents.
Setting up your Lambda function
We just built the Voice User Interface (VUI) for our Alexa skill. Next we need to set up the Lambda function to run our skill’s code. AWS Lambda lets you run code without provisioning or managing servers. You can configure your code to be triggered by other AWS services or call it directly from the web.
There are some steps involved to set it up and once again I am going to delegate to one of the official tutorials for that. Starting at step 2 of the tutorial from earlier (https://developer.amazon.com/alexa-skills-kit/tutorials/fact-skill-2). Follow all of the steps on that page with the following exceptions:
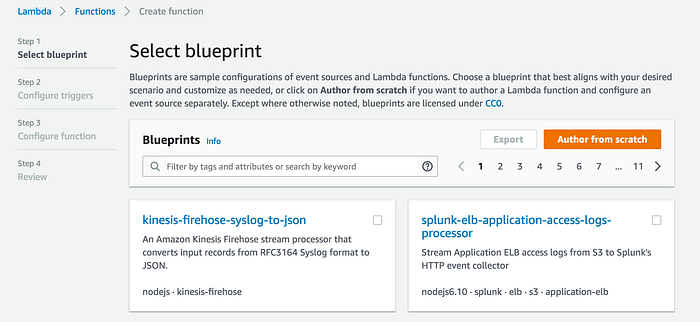
- For part 5, instead of choosing the blueprint they recommend, click the “Author from Scratch” button instead:
- For part 7, enter “Recipe-Organizer” and choose the latest version of Node.js as the runtime. For me that was version 6.10.
- Once step 2 is completed, click the “Next” button at the bottom of the page and move on to step 3. Complete all parts of step 3 and then stop and return here.
Setting up DynamoDB
Before you can run your code, we need to set up the database. Back on https://console.aws.amazon.com/ where you created your Lambda function, click the “Services” button at the top and search for “DynamoDB”. Create a table called “Recipes” with a primary partition key of “Name” and a primary sort key of “UserId”. This is going to be essentially our composite primary key.
Now we need to grant access to DynamoDB for our Lambda function. Click the “Services” button again and search for “IAM” or just click here https://console.aws.amazon.com/iam/. Click on the lambda_basic_execution role. Under permissions, click “Attach Policy” and add AmazonDynamoDBFullAccess. You can of course choose to grant the role less permissions if you’d like.
Deploying to Lambda
Ok, we are now ready to deploy our code and test it on our Echo. Lambda gives you a few ways to do that. You can edit it inline in their web editor, upload a zip package, or use either the AWS CLI or the new Skills CLI. One important thing to note is that editing your code inline means that you will be forced to use the version of the Alexa SDK that is installed on Lambda and that is generally behind the latest version and may be lacking some major features. Therefore, I recommend zipping up your index.js and node_modules folder which should include a more recent version of the SDK pulled down from NPM.
- First create the archive of your code. Again, it should only contain your index.js file and your node_modules folder.
- Return to Lambda and click on your function.
- Under the first tab choose “Upload a .ZIP file”. Select your zip and click the save button. Or if you’re using the AWS CLI, you can deploy it by issuing the following command, provided that your zip is named Archive.zip:
aws lambda update-function-code --function-name Recipe-Organizer --zip-file fileb://Archive.zipTesting on your Echo
- Now that your code is ready, return to the Developer Console (https://developer.amazon.com) and click the “Publishing Information” menu option. Fill out all of the fields that aren’t marked as optional. You will need to upload 2 icons as well. Make sure you click the “Next” button at the bottom and fill out the required fields on that page as well.
- Once you have filled out all of the necessary fields you will notice that the “Skill Beta Testing” box’s button on the left sidebar is now enabled. Click on that and on the next page add your Amazon email that is associated with your Echo.
- Now open the Alexa app on your phone and go to “Skills” and then click on the “Your Skills” button. You should see your skill in the list there and you can enable it. To share your skill with a friend or colleague, you just have to add their email to the list of testers.
- Now go try your skill out! You can say “Alexa, open Recipe Organizer” or “Alexa, ask Recipe Organizer to add a recipe” to add your first recipe.
Conclusion
I hope you found this tutorial helpful. If you get stuck on anything, please feel free to contact me. There is also a dedicated Alexa Slack channel and a forum, which I’ve added links to in the resources section below.