The Founder’s Guide:
How to Install the Jupyter Notebook Server in WSL2
The expanded tutorial with concise explanations and screenshots

“The condensed version of this article uses copy and paste code to help you get the outcome ASAP ⚡”
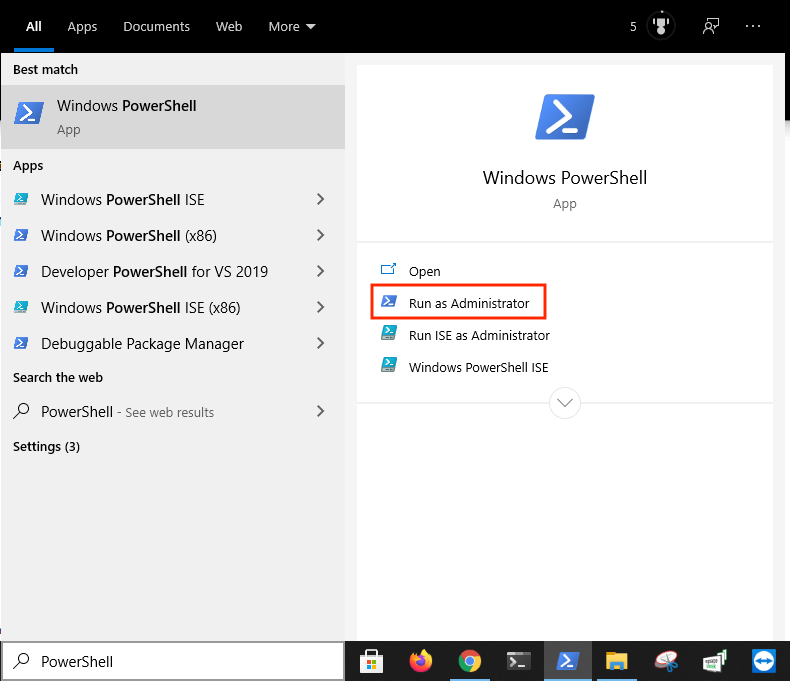
Open PowerShell:
PowerShell is a command-line shell and object-oriented scripting language that’s used to automate administrative tasks and configure system settings It can be used to automate practically anything in the operating system. It also replaced Command Prompt as the default system shell for Windows 10.
- Press “⊞ Windows”
- Enter “PowerShell” into the search bar
- Click “Run as Administrator”
Open WSL2:
Windows Subsystem for Linux 2 (WSL2) is a Windows 10 feature that allows users run Linux on Windows without using dual-boot or a virtual machine. It has full access to both filesystems, GPU support, and network application support. It also provides access to thousands of Linux command-line tools.
- Copy the command from below these instructions
- Paste the command into PowerShell
- Press “Enter”
wsl
Install Jupyter Notebook:
Jupyter Notebook is a program that’s used to create, modify, and distribute notebooks that contain code, equations, visualizations, and narrative text. It provides an interactive coding environment that runs in the web browser. It also has become a preferred tool for machine learning and data science.
- Copy the command from below these instructions
- Paste the command into PowerShell
- Press “Enter”
python -m pip install jupyter
Install the WebSocket Extension:
WebSocket Protocol is a protocol that’s used to establish and maintain the connection between the web browser and server without being blocked by the same-origin policy. It passes HTTP traffic through the designated port which allows the web browser to access the hardware over the internet.
- Copy the command from below these instructions
- Paste the command into PowerShell
- Press “Enter”
python -m pip install jupyter_http_over_ws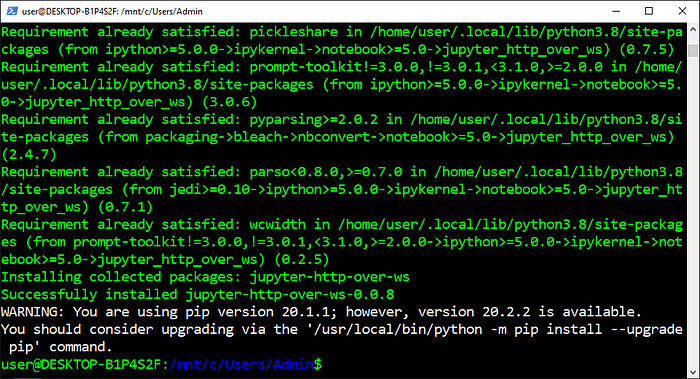
Create the Configuration File:
The Configuration File is a Python file that’s used to customize the Jupyter Notebook server. It gets generated with every possible server parameter, option, and setting already included but they’re commented out by default. It also gets stored in the hidden .jupyter subdirectory of the home directory.
- Copy the command from below these instructions
- Paste the command into PowerShell
- Press “Enter”
jupyter notebook --generate-config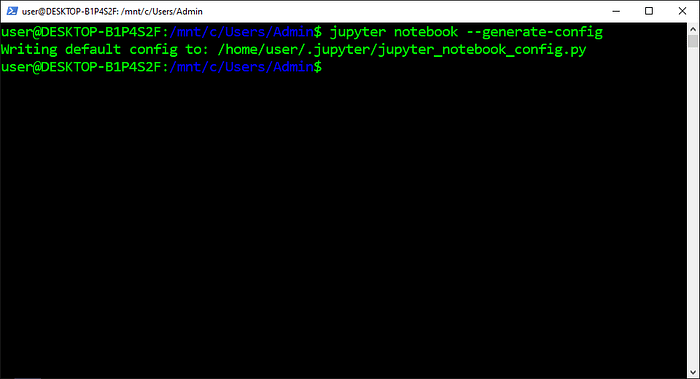
Open the Jupyter Directory:
The Change Directory (cd) command is used to change the current working directory to the specified directory. It can navigate to absolute and relative paths that start from the root and current working directory, respectively. It can also navigate to paths stored in variables and environment variables.
- Copy the command from below these instructions
- Paste the command into PowerShell
- Press “Enter”
cd $HOME/.jupyter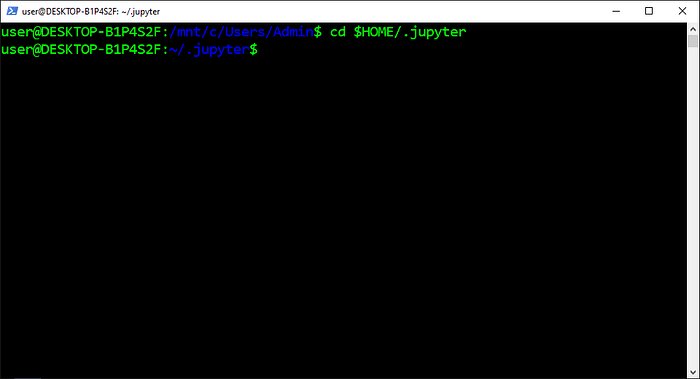
Create the SSL Certificate:
The Req command is used in OpenSSL to generate and process certificate requests. It can be combined with the x509 command to produce a self-signed certificate. It can also be used to produce a non-encrypted private key with maximum strength encryption that’s valid for up to 825 days.
- Copy the command from below these instructions
- Paste the command into PowerShell
- Press “Enter”
- Enter “US” into “Country Name”
- Press “Enter”
- Enter “.” into the remaining fields
- Press “Enter”
openssl req -x509 -nodes -days 365 -newkey rsa:2048 -keyout mykey.key -out mycert.pem
Create the JSON File:
The Echo command is used to print text it receives from an argument to the screen or to a computer file. It can be used in shell scripts and batch files to print the output of other commands or as part of other commands to insert text. It can also save over the text in an existing file or append it at the end.
- Copy the command from below these instructions
- Paste the command into PowerShell
- Press “Enter”
echo "" > $HOME/.jupyter/jupyter_notebook_config.json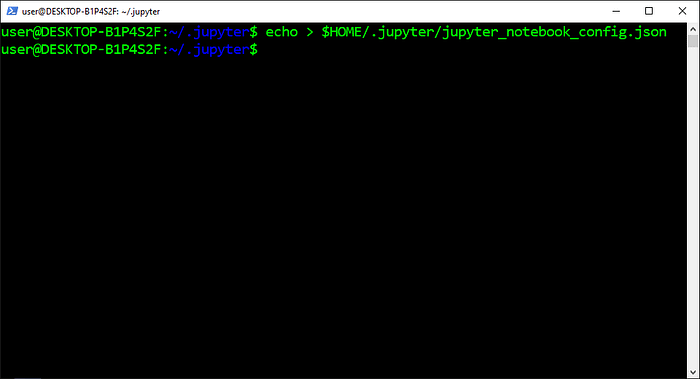
Open the JSON File:
JavaScript Object Notation (JSON) is a file format that’s used to store and transfer data on the internet. It can convert data into human and machine-readable text that’s parsable by most programming languages. It can also contain key-value pairs of strings, numbers, booleans, arrays, and objects.
- Copy the command from below these instructions
- Paste the command into PowerShell
- Press “Enter”
notepad $HOME/.jupyter/jupyter_notebook_config.json
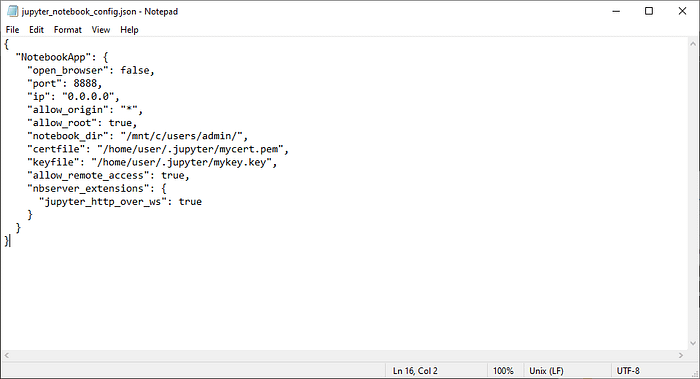
Edit the JSON File:
The Configuration File is a JSON file that’s used to customize the Jupyter Notebook server. It only contains server parameters, options, and settings that are specified by the user which receive priority over the Python file. It also gets stored in the hidden .jupyter subdirectory of the home directory.
- Copy the JSON from below these instructions
- Paste the JSON into Notepad
- Change “Admin” to the Windows username
- Change “User” to the Unix username
- Click the “File” menu
- Click “Save”
Create the Password:
Jupyter Notebook uses token-based authentication to restrict access to the server. This creates a problem because the server runs in the background at startup so the token isn’t visible. It also alternatively uses password-based authentication which provides a secure way to access the server remotely.
- Copy the command from below these instructions
- Paste the command into PowerShell
- Press “Enter”
jupyter notebook password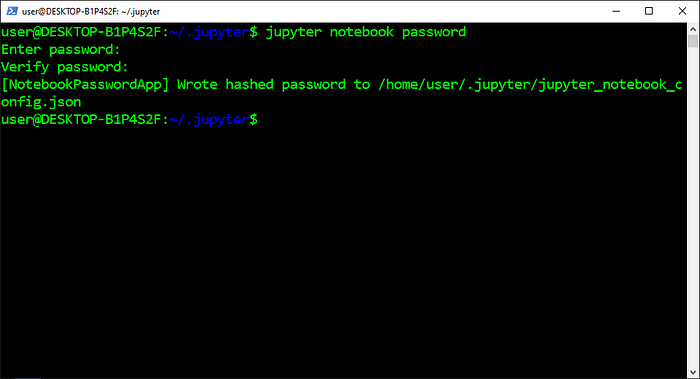
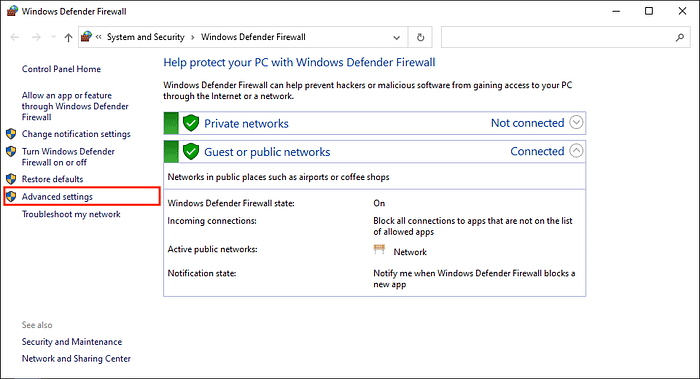
Open the Firewall Settings:
Windows Firewall is an application that’s used to protect computers against attacks from the local network and the internet. It filters traffic based on IP address and port information. It permits all outbound traffic but it restricts inbound traffic to the sources that are explicitly stated in the firewall rules.
- Press “⊞ Windows”
- Enter “Windows Defender Firewall” into the search bar
- Click “Windows Defender Firewall”
- Click “Advanced Settings” in the left panel
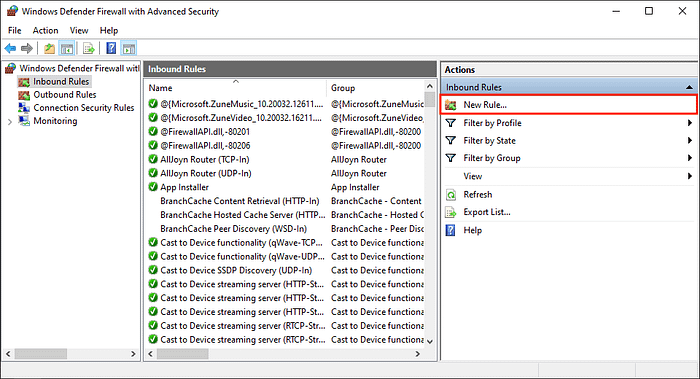
Create an Inbound Rule:
The Inbound Rule is used in Windows Firewall to determine which traffic is allowed using specific ports and programs. It protects computers from the internet, disallowed connections, malicious software, and attackers. It also protects computers from accepting connections from unknown computers.
- Click “Inbound Rules” in the left panel
- Click “New Rule…” in the right panel
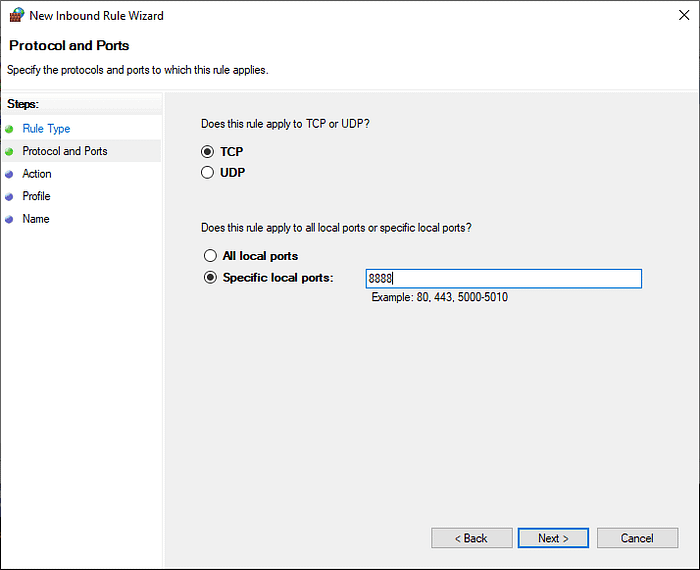
Specify the Port:
The Port is a number that’s used in networking to route traffic to a specific program, application, or service on the computer. It refers to the number that’s appended to the IP address that’s used for the program, application, or service. It also must be opened on the router to pass traffic through it.
- Select “Port”
- Click “Next”
- Select “Specific Local Ports”
- Enter “8888”
- Click “Next”
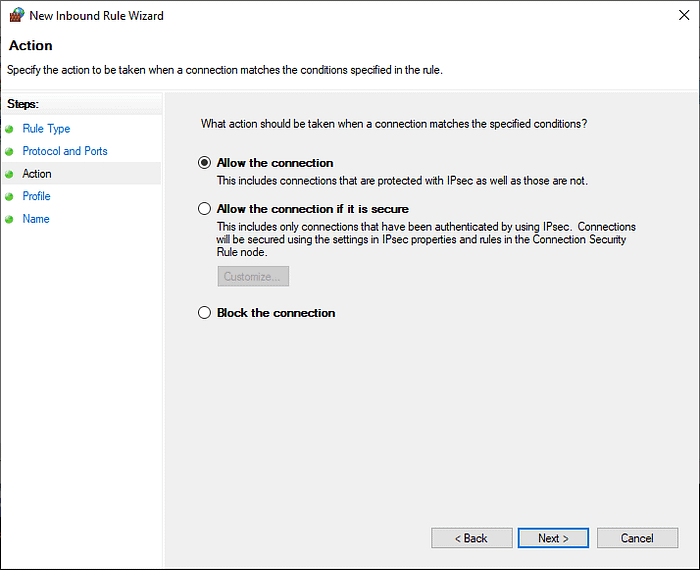
Allow the Connection:
The Allow the Connection option is used in Windows Firewall to allow the computer to transfer secure and insecure data on the specified port. It lets the computer interact with other computers using the port. It can also be required for some programs to work but it makes the computer less secure.
- Select “Allow the Connection”
- Click “Next”
Complete the Inbound Rule:
The Firewall Profile is a predefined set of firewall rules and connection security rules that determines which network traffic is allowed on the computer. It uses a different level of protection to connect to the public, private, and domain networks that ranges from very strict to very loose.
- Check “Domain”, “Private” and “Public”
- Click “Next”
- Copy the name from below these instructions
- Paste the name into the “Name” text box
- Click “Finish”
Jupyter Notebook Server (WSL2)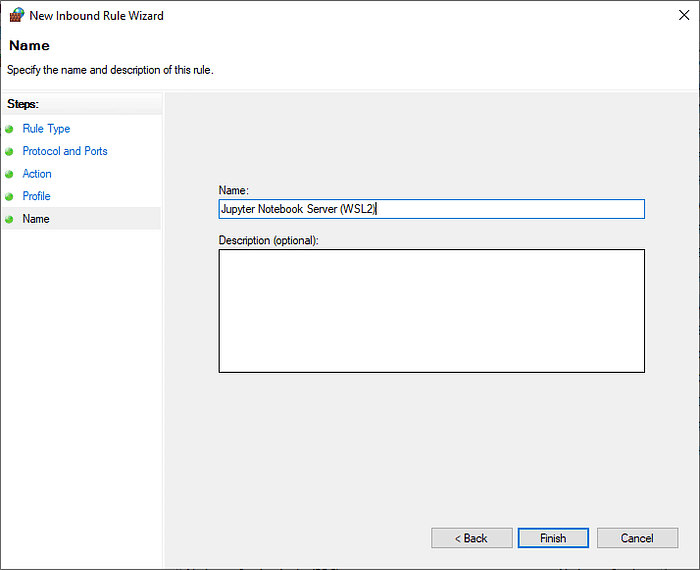
Exit WSL2:
The Exit command is used to close the current window of WSL2 without terminating its process. It reopens whichever shell was running previously and maintains the current session of WSL2 in the background. This lets users continue working right where they left off when they reopen WSL2.
- Copy the command from below these instructions
- Paste the command into PowerShell
- Press “Enter”
exit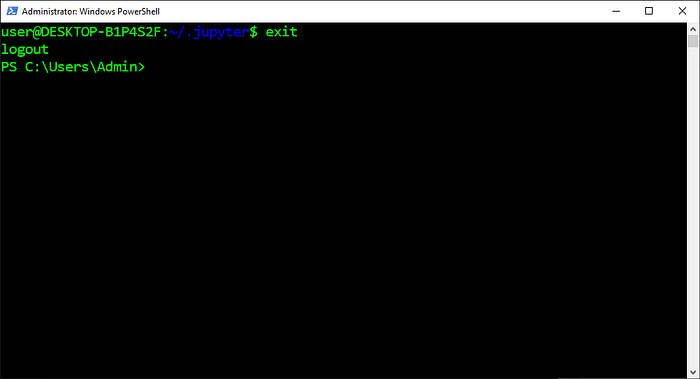
Change the Execution Policy:
The Execution Policy is a feature in PowerShell that’s meant to prevent the accidental execution of malicious scripts. It only allows the user to execute commands by default but it can be changed to load configuration files and run scripts. It can also be changed for the current session, user, or machine.
- Copy the command from below these instructions
- Paste the command into PowerShell
- Press “Enter”
Set-ExecutionPolicy Unrestricted -Force
Create the Visual Basic Script File:
The Echo command is used to print text it receives from an argument to the screen or to a computer file. It can be used in shell scripts and batch files to print the output of other commands or as part of other commands to insert text. It can also save over the text in an existing file or append it at the end.
- Copy the command from below these instructions
- Paste the command into PowerShell
- Press “Enter”
echo "" > $HOME\.jupyter\jupyter_notebook_server_wsl2.vbs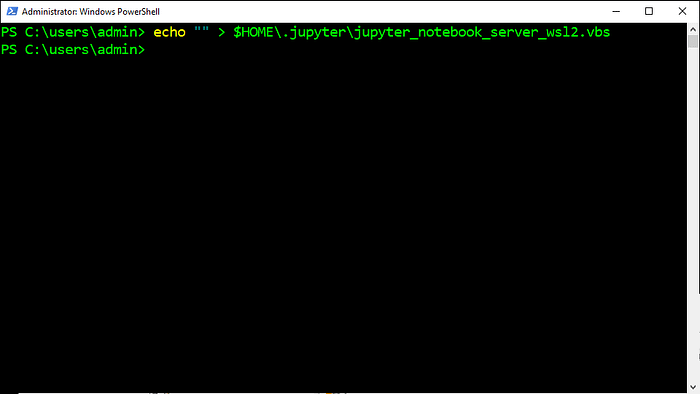
Open the Visual Basic Script File:
The Visual Basic Script File (vbs) is a script file that contains source code to be executed with a Windows Scripting Host program. It can be run using Wscript which is intended for interactive window programs. It can also be ran using Cscript which is intended for non-interactive console programs.
- Copy the command from below these instructions
- Paste the command into PowerShell
- Press “Enter”
notepad $HOME\.jupyter\jupyter_notebook_server_wsl2.vbs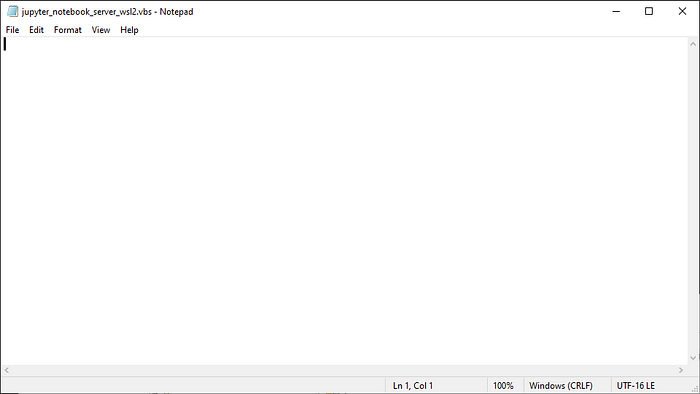
Edit the Visual Basic Script File:
Task Scheduler can’t start Jupyter Notebook properly in the background at startup because background processes are run in session zero. This causes programs that run from the command-line to start without a window. It can also be fixed with a visual basic script that controls how the process starts.
- Copy the code from below these instructions
- Paste the code into Notebook
- Click the “File” menu
- Click “Save”
set object = createobject("wscript.shell")
object.run "bash.exe -c '~/.pyenv/shims/jupyter-notebook --no-browser --config ~/.jupyter/jupyter_notebook_config.json'", 0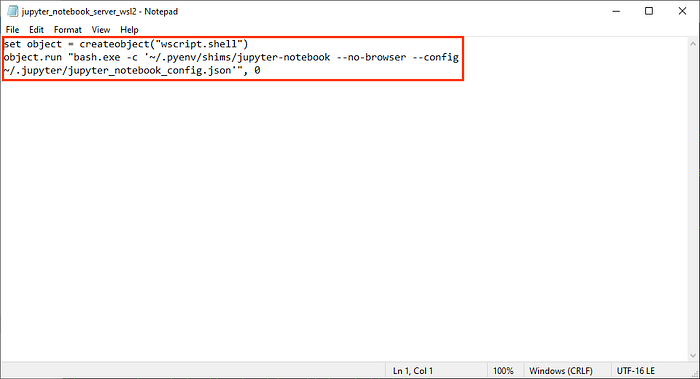
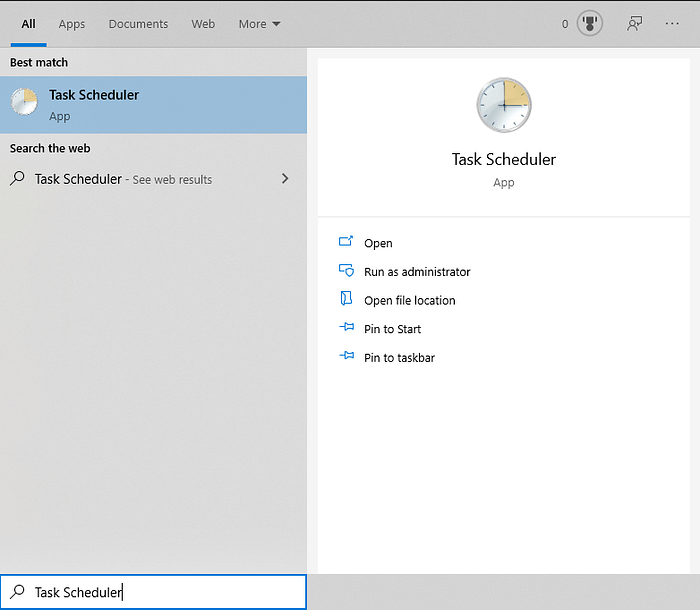
Open Task Scheduler:
Task Scheduler is a program that automatically performs tasks when certain criteria are met. It can start programs, execute commands, and run scripts at specified times or after specified time intervals and events. It can also be programmed using the graphical user interface or command-line interface.
- Press “⊞ Windows”
- Enter “Task Scheduler” into the search bar
- Click “Task Scheduler”
Create the Task:
The Task is used in Task Scheduler to accomplish an outcome according to the action, trigger, principal, and settings that are specified by the user. It performs an action using the principal account in response to the trigger. It also performs actions in response to the circumstances listed in the settings.
- Click “Create Basic Task” in the right panel
- Copy the name from below these instructions
- Paste the name into the “Name” text field
- Click “Next”
- Select “When the Computer Starts”
- Click “Next”
- Select “Start a Program”
- Click “Next”
Jupyter Notebook Server (WSL2)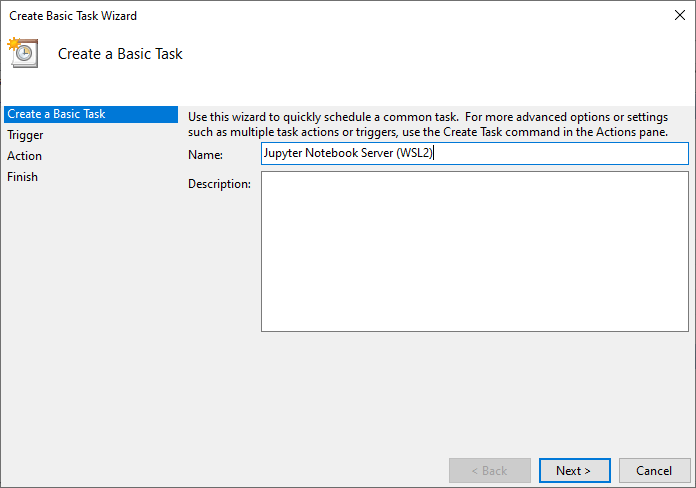
Specify the Action:
The Action is used in Task Scheduler to specify the work that’s performed when a task is triggered. I can launch programs, execute commands, run scripts, and open files. It can also perform a single action and multiple actions which can include up to 32 actions that are executed sequentially.
- Copy the path from below these instructions
- Paste the path into the “Program/Script” text field
- Click “Next”
- Check “Open the Properties Dialog…”
- Click “Finish”
%USERPROFILE%\.jupyter\jupyter_notebook_server_wsl2.vbs
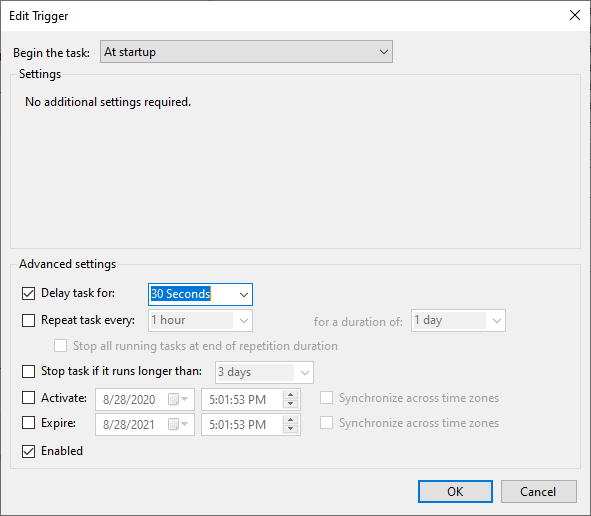
Specify the Trigger:
The Trigger is used in Task Scheduler to set the conditions that determine whether a task is performed. It can start a task using time-based triggers and event-based triggers. It can also start a task using a single trigger and multiple triggers which can include up to 48 triggers that all start the task.
- Click “Triggers” in the top tab bar
- Click “At Startup”
- Click “Edit”
- Check “Delay Task For”
- Enter “30 Seconds”
- Click “OK”
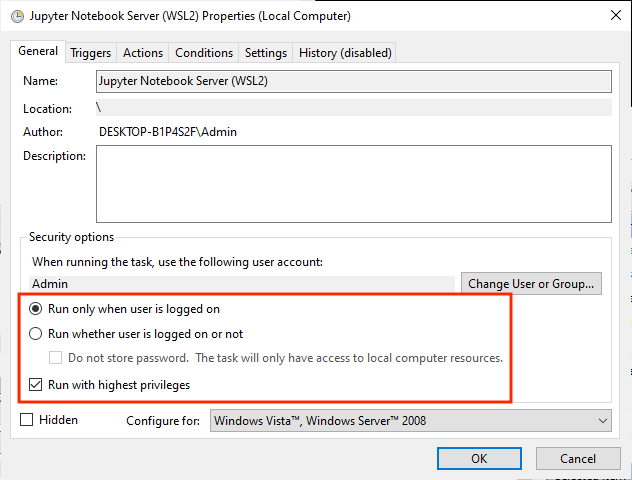
Run the Task as the User:
The Run Only When the User is Logged On option only allows the task to run when the user is logged in. It starts the task as a user that’s logged in which means it can have a user interface and it can be used interactively. It also means that any process that’s started with the task will start the same way.
- Click “General” in the tab bar
- Check “Run With Highest Privileges”
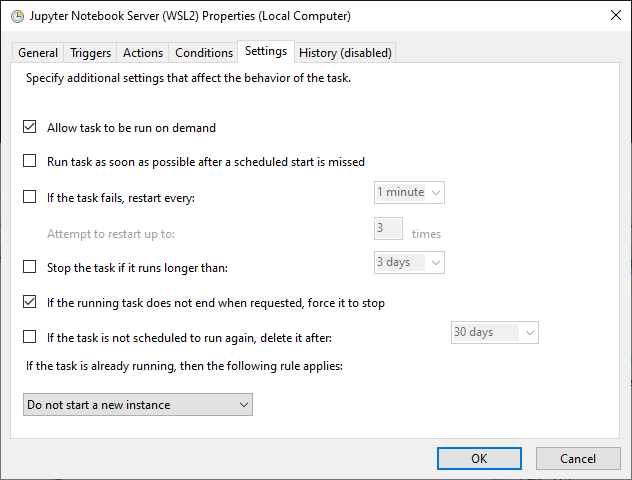
Remove the Time Limit:
The Stop the Task if It Runs Longer Than setting is used in Task Scheduler to limit the length of time that a task is able to run. It stops the task after the specified time limit is reached which prevents the task from taking too long to execute. It also prevents a frozen task from potentially running forever.
- Click “Settings” in the tab bar
- Uncheck “Stop the Task if It Runs Longer Than”
- Click “OK”
- Restart the computer
Get the Network Configuration Information:
The Internet Protocol Configuration (ipconfig) command is used to display the Transmission Control Protocol / Internet Protocol values. It prints the IPv4 address, subnet mask, default gateway, and domain name system IP addresses for all the physical and virtual network adapters on the computer.
- Copy the command from below these instructions
- Paste the command into PowerShell
- Press “Enter”
- Write down the IPv4 Address, Subnet Mask, and Default Gateway.
- Write down the DNS Servers.
powershell.exe ipconfig /all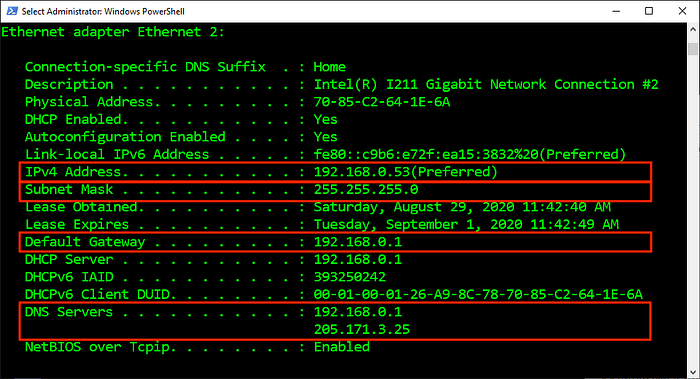
Log into the Router:
The Router is a device that’s used to transfer data between the internet and computers on the local network. It uses a firewall to protect the computers from attackers by restricting the network traffic based on the security rules. It can also be set up by visiting the router IP address which varies by brand.
- Open the web browser
- Copy the router IP address from below these instructions
- Paste the router IP address into the web browser
- Press “Enter”
- Log into the router
192.168.0.1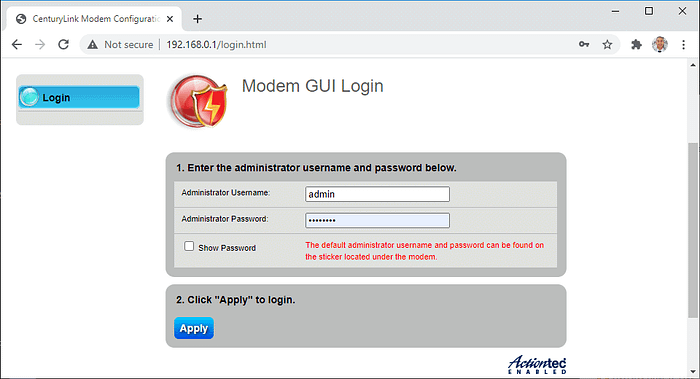
Set up Port Forwarding:
Port Forwarding is a router feature that’s used to let computers on a local network interact with other computers over the internet. It intercepts the incoming traffic on a specified port number. It also redirects the traffic to the specified private IP address and port number of a particular computer.
- Find the “Port Forwarding” page
- Paste the IPv4 address into the “Enter IP Address” text field
- Copy the port from below these instructions
- Paste the port into the “WAN Starting Port” text field
- Paste the port into the “WAN Ending Port” text field
- Select “All IP Addresses”
- Click “Apply”
8888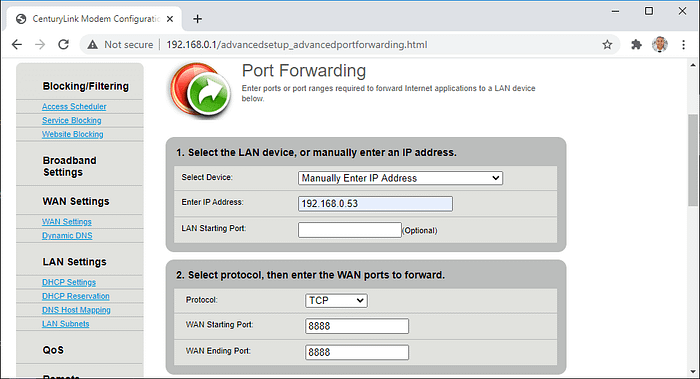
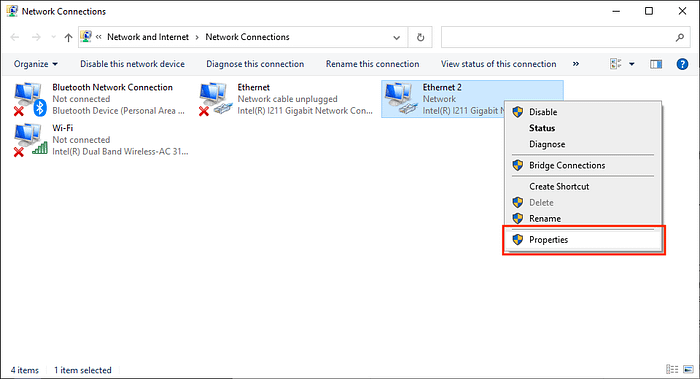
Open the Network Adapter Properties:
The Dynamic Host Configuration Protocol (DHCP) is a protocol that’s used to change networks without needing to manually set up a new IP address. It automatically assigns an IP address to each computer that connects to the network. It also assigns the subnet mask, default gateway, and DNS servers.
- Press “⊞ Windows”
- Enter “Network Status”
- Click “Network Status”
- Click “Change Adapter Options”
- Right-click the network adapter that’s connected to the internet
- Click “Properties”
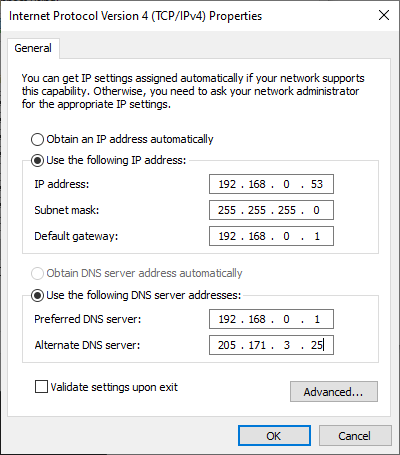
Set the Static IP Address:
The Static IP Address is an IP Address that’s used to make it easier for other computers on the local network to access the computer using the same IP address. It can be assigned to the computer and doesn’t change over time. It also needs to be manually configured in the network adapter properties.
- Select “Internet Protocol Version 4 (TCP/IPv4)”
- Click “Properties”
- Select “Use the Following IP Address”
- Enter the TCP/IP information from earlier
- Select “Use the Following DNS Server Addresses”
- Enter the TCP/IP information from earlier
- Click “OK”
Install Net-Tools:
The Exec (e) command is used to execute the specified command that’s provided as an argument. It destroys the current process and replaces it with the specified command without creating a new process. It can also restart the shell to reload the configuration file into the environment.
- Copy the command from below these instructions
- Paste the command into PowerShell
- Press “Enter”
wsl --exec sudo apt install net-tools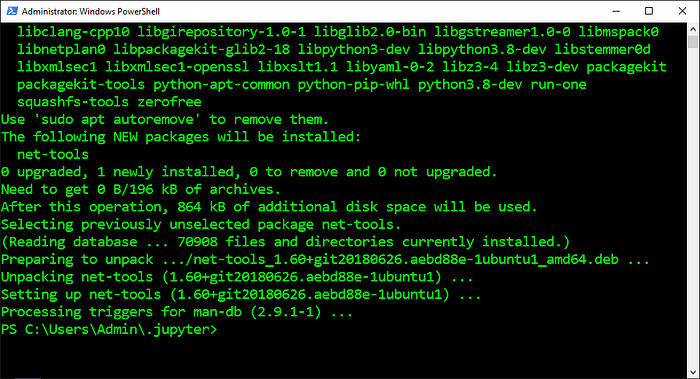
Open the Jupyter Directory:
The Change Directory (cd) command is used to change the current working directory to the specified directory. It can navigate to absolute and relative paths that start from the root and current working directory, respectively. It can also navigate to paths stored in variables and environment variables.
- Copy the command from below these instructions
- Paste the command into PowerShell
- Press “Enter”
cd $home\.jupyter
Create the PowerShell File:
The Set Content (sc) command is used to save text to a new file and append text to an existing file. It can be used to overwrite the text in the existing file or replace the specified text within the file. It can also be combined with the “Encoding” parameter to set the type of encoding that’s used for the file.
- Copy the command from below these instructions
- Paste the command into PowerShell
- Press “Enter”
Set-Content jupyter_notebook_port_wsl2.ps1 "" -Encoding ASCII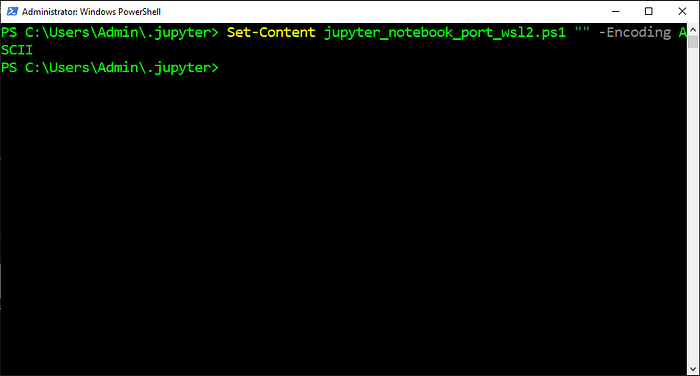
Open the PowerShell File:
The PowerShell File (ps1) is a script file that contains a series of commands where each command appears on a separate line. It uses commands that PowerShell can understand and execute in sequence to perform different actions. It also can only be run if an appropriate execution policy is enabled.
- Copy the command from below these instructions
- Paste the command into PowerShell
- Press “Enter”
notepad jupyter_notebook_port_wsl2.ps1
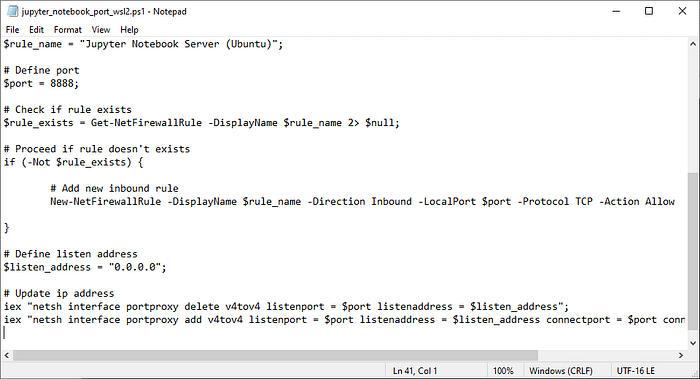
Edit the PowerShell File:
WSL2 is a virtual machine that uses its own virtual IP address which means it can’t be accessed from other computers by default. It needs a workaround script to redirect its network traffic. This can be accomplished using ifconfig to identify the virtual IP address and portproxy to pass the network traffic.
- Copy the script from below these instructions
- Paste the script into Notepad
- Click the “File” menu
- Click “Save”
Open Task Scheduler:
Task Scheduler is a program that automatically performs tasks when certain criteria are met. It can start programs, execute commands, and run scripts at specified times or after specified time intervals and events. It can also be programmed using the graphical user interface or command-line interface.
- Press “⊞ Windows”
- Enter “Task Scheduler” into the search bar
- Click “Task Scheduler”
Create the Task:
The Task is used in Task Scheduler to accomplish an outcome according to the action, trigger, principal, and settings that are specified by the user. It performs an action using the principal account in response to the trigger. It also performs actions in response to the circumstances listed in the settings.
- Click “Create Basic Task” in the right panel
- Copy the name from below these instructions
- Paste the name into the “Name” text field
- Click “Next”
- Select “When the Computer Starts”
- Click “Next”
- Select “Start a Program”
- Click “Next”
Jupyter Notebook Port (WSL2)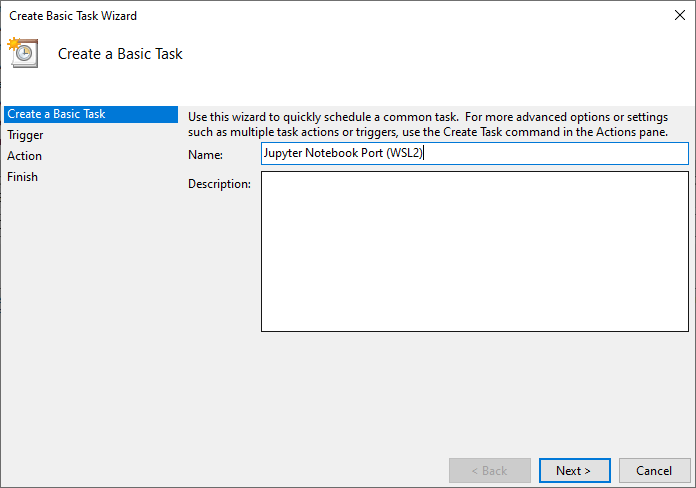
Specify the Action:
The Action is used in Task Scheduler to specify the work that’s performed when a task is triggered. I can launch programs, execute commands, run scripts, and open files. It can also perform a single action and multiple actions which can include up to 32 actions that are executed sequentially.
- Copy the path from below these instructions
- Paste the path into the “Program/Script” text field
- Click “Next”
- Click “Yes”
- Check “Open the Properties Dialog…”
- Click “Finish”
powershell.exe -File %userprofile%\.jupyter\jupyter_notebook_port_wsl2.ps1
Specify the Trigger:
The Trigger is used in Task Scheduler to set the conditions that determine whether a task is performed. It can start a task using time-based triggers and event-based triggers. It can also start a task using a single trigger and multiple triggers which can include up to 48 triggers that all start the task.
- Click “Triggers” in the top tab bar
- Click “At Startup”
- Click “Edit”
- Check “Delay Task For”
- Enter “30 Seconds”
- Click “OK”
Run the Task in the Background:
The Run Whether User Is Logged in or Not option is used in Task Scheduler to run a task even if the user is logged out. It runs the task in the background without a window which can’t be used interactively. It also causes processes that are started by the task to operate in the background without a window.
- Click “General” in the tab bar
- Select “Run Whether User Is Logged On or Not”
- Check “Run With Highest Privileges”
- Click “OK”
- Restart the computer

Access the Server From the Local Network:
The warning appears in the web browser because the SSL certificate isn’t verified by a certificate authority. It warns users to proceed with caution because it can’t confirm the identity of the website owner. This happens because the certificate is self-signed but it offers the exact same protection.
- Log into a different computer or laptop
- Connect to the same WiFi network
- Enter the IPv4 Address into the web browser
- Prepend “https://” to the IP address
- Append “8888” to the IP address
- Press “Enter”
- Type “thisisunsafe”
- Enter the password
- Click “Log In”
Get the Public IP Address:
The Public IP Address is a unique IP address that’s assigned to the router by an internet service provider. It gets shared between the computers on the local network which allows them to access the internet. It also gets used to access computers on the local network from computers over the internet.
- Copy the URL from below these instructions
- Paste the URL into the web browser
- Write down the public IP address
https://www.google.com/search?q=whatsmyip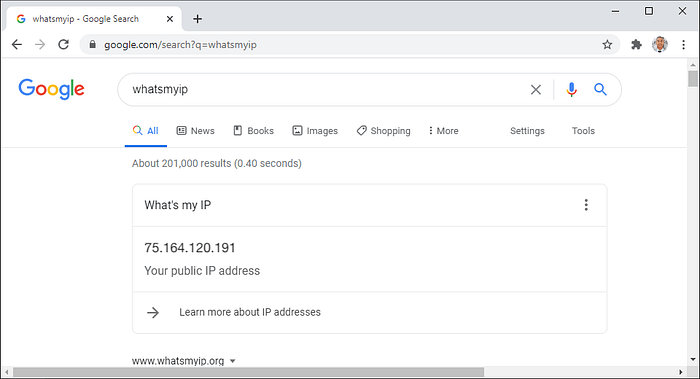
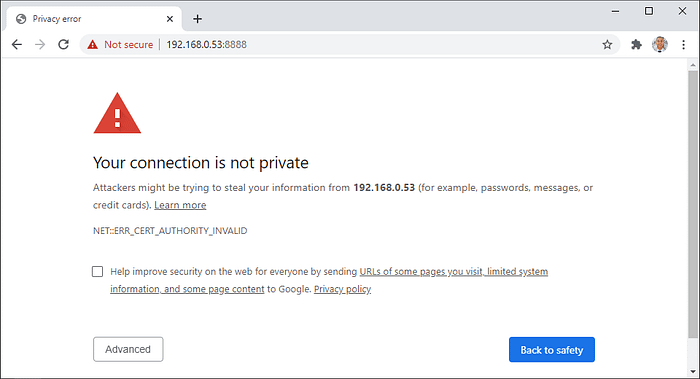
Access the Server From a Remote Network:
The warning appears in the web browser because the SSL certificate isn’t verified by a certificate authority. It warns users to proceed with caution because it can’t confirm the identity of the website owner. This happens because the certificate is self-signed but it offers the exact same protection.
- Log into a different computer or laptop
- Connect to a different WiFi network
- Enter the public IP address into the web browser
- Prepend “https://” to the IP address
- Append “8888” to the IP address
- Press “Enter”
- Type “thisisunsafe”
- Enter the password
- Click “Log In”
“Hopefully, this article helped you get the 👯♀️🏆👯♀️ remember to subscribe to get more content 🏅”
Next Steps:
This article is part of a mini-series that helps readers set up everything they need to start learning about artificial intelligence, machine learning, deep learning, and or data science. It includes articles that contain instructions with copy and paste code and screenshots to help readers get the outcome as soon as possible. It also includes articles that contain instructions with explanations and screenshots to help readers learn about what’s happening.
Linux:
01. Install and Manage Multiple Python Versions
02. Install the NVIDIA CUDA Driver, Toolkit, cuDNN, and TensorRT
03. Install the Jupyter Notebook Server
04. Install Virtual Environments in Jupyter Notebook
05. Install the Python Environment for AI and Machine LearningWSL2:
01. Install Windows Subsystem for Linux 2
02. Install and Manage Multiple Python Versions
03. Install the NVIDIA CUDA Driver, Toolkit, cuDNN, and TensorRT
04. Install the Jupyter Notebook Server
05. Install Virtual Environments in Jupyter Notebook
06. Install the Python Environment for AI and Machine Learning
07. Install Ubuntu Desktop With a Graphical User Interface (Bonus)Windows 10:
01. Install and Manage Multiple Python Versions
02. Install the NVIDIA CUDA Driver, Toolkit, cuDNN, and TensorRT
03. Install the Jupyter Notebook Server
04. Install Virtual Environments in Jupyter Notebook
05. Install the Python Environment for AI and Machine LearningMac:
01. Install and Manage Multiple Python Versions
02. Install the Jupyter Notebook Server
03. Install Virtual Environments in Jupyter Notebook
04. Install the Python Environment for AI and Machine Learning
Glossary:
The Shell is an interpreter that presents the command-line interface to users and allows them to interact with the kernel. It lets them control the system using commands entered from a keyboard. It also translates the commands from the programming language into the machine language for the kernel.
[Return]
The Interpreter is a program that reads through instructions that are written in human-readable programming languages and executes the instructions from top to bottom. It translates each instruction to a machine language the hardware can understand, executes it, and proceeds to the next instruction.
[Return]
The Command-Line Interface (CLI) is a program that accepts text input from the user to run commands on the operating system. It lets them configure the system, install software, and access features that aren’t available in the graphical user interface. It also gets referred to as the terminal or console.
[Return]
The Kernel is the program at the heart of the operating system that controls everything in the computer. It facilitates the memory management, process management, disk management, and task management. It also facilitates communication between the programs and hardware in machine language.
[Return]
The Same-Origin Policy is a security feature that’s used in web browsers to stop websites from running malicious scripts on other websites. It disables cross-domain communication over HTTP which also blocks web browsers from accessing the hardware on the computer that’s running the server.
[Return]
The Variable is the container that’s used to store different types of values. It can assign or update a value by placing an equals sign between the specified variable name and value without a space around it. It can also reference the stored value by placing a dollar sign in front of the existing variable name.
[Return]
The Environment Variable is a variable that’s automatically created and maintained by the computer. It helps the system know where to install files, find programs, and check for user and system settings. It can also be used by graphical and command-line programs from anywhere on the computer.
[Return]
OpenSSL is a program that’s used to implement the Secure Socket Layer. It can generate private keys, create certificate signing requests, produce self-signed certificates, and validate certificate information. This can be used to help identify website owners and protect sensitive user data from attackers.
[Return]
The Secure Socket Layer (SSL) is the security protocol that adds a layer of protection to sensitive data using key pairs. It stores the private key on the server and distributes the public key to web browsers. It uses the keys to establish an encrypted connection between the web browser and the server.
[Return]
The Self-Signed Certificate is a certificate that’s used to identify the owner of a website. It can be signed by the same person or company that produced the certificate instead of a certificate authority. It can also provide the same level of protection as certificates that are signed by a certificate authority.
[Return]
Token-based Authentication is a practice that’s used to authorize users that attempt to access the server using a token that’s provided by the server. It creates a token and only grants access to users that have that token. It also allows web browsers to store and reuse the token until the server is reset.
[Return]
Password-based Authentication is a practice that’s used to authorize users that attempt to access the server using a password that’s provided by the user. It hashes and stores the password and only grants access to users that have that password. It also lets web browsers store and reuse the password.
[Return]
Hashing is a process that’s used to perform a transformation to a password that can’t be reversed. It turns the password into a short string of letters and numbers using a hashing algorithm. This makes it harder for an attacker to use a hashed password because they still must decode it for it to be useful.
[Return]
The Public Profile is a profile that’s used in Windows Firewall when the computer connects to the network at a coffee shop, library, restaurant, airport, or other public location. It imposes the most restrictions of the profiles because the security on this network type is usually uncontrolled.
[Return]
The Private Profile is a profile that’s used in Windows Firewall when the computer connects to the network at a home or small business using a router or hardware firewall. It imposes more restrictions than the domain profile because the security on this network type is only slightly controlled.
[Return]
The Domain Profile is a profile that’s used in Windows Firewall when the computer connects to the network at a government workplace, corporate office, or educational institution. It imposes the least restrictions of the profiles because the security on this network type is usually well controlled.
[Return]
Visual Basic Script (VBScript) is a scripting language that’s based on Visual Basic. It was created for developing web pages but it has become a popular language for writing batch files on Windows. It can also be executed using Windows Scripting Host to interact with the Windows operating system.
[Return]
Create Object is a function in Visual Basic Script that creates an instance of a Component Object Model object. It specifies the programmatic identifier to access the methods and properties in the component object model. This lets users launch and control external programs that have a program identifier.
[Return]
The Instance refers to the distinct identity of a particular object that exists among zero or more objects that belong to the same class. It has the same attributes as the other objects but the attribute values are usually different. It can also have the same values but it would still be a different instance.
[Return]
The Component Object Model (COM) is an object model and programming standard that allows objects to interact with other objects using different programming languages and operating systems. It defines one or more sets of related functions that can be used to start and control other programs.
[Return]
The WScript object is used in Visual Basic Script to create an instance of Windows Script Host. It runs scripts in multiple programming languages that use object models to perform tasks. It also has access to programs, shortcuts, environment variables, the registry, and the operating system.
[Return]
The WshShell object is used in Visual Basic Script to allow users to interact with the Windows operating system. It has access to environment variables, system folders, and the registry. It can also create shortcuts, display pop-up windows, and run programs with command-line arguments and keystrokes.
[Return]
The Run method is used in Visual Basic Script to run programs. It can run graphical programs, command-line programs, and scripts using command-line arguments and keystrokes. It can also run programs with or without a window, activate program windows, and pause programs temporarily.
[Return]
The Transmission Control Protocol / Internet Protocol is an internet protocol suite that enables computers to exchange information over the internet. It defines how the information is broken down into packets, addressed, sent, routed, received, and reassembled successfully without errors or omissions.
[Return]
The Transmission Control Protocol (TCP) is a protocol that’s used to break data into packets to be sent over the internet. It numbers the packets and reassembles them in order before handing them to the recipient computer. It also checks for errors, omissions, and requests missing data to be resent.
[Return]
The Internet Protocol (IP) is a protocol that’s used to deliver packets over the internet to IP addresses. It assigns a unique IP address to each device that’s connected to the internet which lets them send and receive packets. It also routes the packets from the source IP address to the destination IP address.
[Return]
The Packet is a small piece of data that’s been broken down to be sent over the internet. It contains two portions which includes the actual data that’s being sent and the metadata that’s used to send, receive and reassemble it. It also gets sent through whichever routes and file orders are most efficient.
[Return]
The IPv4 Address is a unique IP address that’s used to access the internet and computers on the local network. It can be used as a public IP address which provides access to the internet. It can also be used as a private IP address which provides access to other computers on the local network.
[Return]
The Subnet Mask is a four-octet number that’s used in the TCP/IP protocol to determine whether a computer is on a local or remote network. It shows the computer which portion of an IP address is used to represent a network and which part is used to represent the other computers on the network.
[Return]
The Default Gateway is an IP address that’s used in the router to receive the outgoing traffic from computers on the local network. It transfers traffic between the computer and other computers on different networks. It also transfers traffic between the computer and computers on the local network.
[Return]
The Domain Name System (DNS) is a service that converts human-readable domain names into public IP addresses. It stores domain names and public IP addresses in databases on servers. It looks up the domain names that are requested by users and uses the public IP address to route them to the site.
[Return]
The Wide Area Network (WAN) is a network that’s used to transmit data between computers on different networks that are separated by great distances. It contains a network of local area networks that spans across large geographic areas like cities, states, countries, and even the world.
[Return]
The Local Area Network is a network that’s used to transmit data between computers on the same network that are located in the same physical area. It contains a network of computers and peripheral devices that are limited to geographic areas like homes, schools, laboratories, and office buildings.
[Return]
The Interface Configuration (ifconfig) command is used in Linux to display the transmission control protocol / internet protocol information. It prints the IPv4 address, subnet mask, default gateway, and domain name system addresses for all the physical and virtual network adapters on the computer.
[Return]
The PortProxy command is used to forward traffic between networks and applications. It listens for traffic on the specified IP address and port and redirects the traffic to the other specified IP address and port. This allows the network or application to be accessed from the local or remote network.
[Return]