How to Make Your Web Page Interactive with jQuery: Web Animations with jQuery (Part 2)

Table of Contents
- Introduction
- How to link jQuery file to HTML Page
- How to Use jQuery Effects
Part One: https://medium.com/@ndubuisi/how-to-make-your-web-page-dance-with-jquery-part-one-dcfc8a51e003
Welcome to the next half of the series.
If you have made it this far, you are one soldier!
In this section, we will be applying what we have learned so far about jQuery. We are going to be animating a (very ugly) website template I made.


I made this template using HTML and CSS, and it is important you download it and follow every step in this tutorial.
How to link jQuery file to HTML Page
In the first section, we learned about the jQuery syntax: event listeners, selectors, and actions. But I never mentioned how we can add jQuery to our web page.
To do this we have to first link the jQuery library in our HTML file, almost the same way we link a CSS stylesheet.
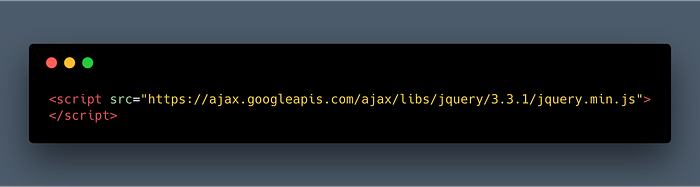
When linking or referencing a CSS stylesheet, we use the <link> tag, however, for a JavaScript file such as jQuery we use the script tag. Notice that the script tag isn’t a special tag like the link tag? You have to always terminate the element with a closing tag </script>
After linking the jQuery library, we have to create a jQuery file that will contain the methods we want to use. Since jQuery is basically a JavasScript library, our jQuery file will have the .js extension. We also have to link this file — the same way we did the jQuery library — in our HTML
<script src=”assets/main.js”></script>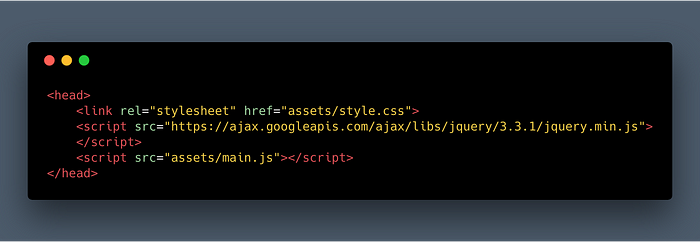
You can read more about linking jQuery to your web page here.
How to Use jQuery Effects
Now we have everything all set up, we can start animating the content in the template. The website template is divided into four main parts: the hero image, the text block, and the image gallery.
Here is what we want to achieve for this tutorial:

fadeIn()effect on the hero imagehide()effect on the block of text when the “hide text” button is clickedslideUp()effect on the first thumbnail when the “Animate me!” button is clickedslideUp()effect when the mouse hovers on the second thumbnailfadeOut()effect on the third thumbnail when the “Me too!” button is clicked
Now we have everything planned out. We can start coding.
The first thing to do is type out:
$(function({
  ...
});
From the first section of this series, you can recall that this function detects the state of readiness of our web page. It is important because jQuery cannot safely manipulate our web page until it has loaded completely. You can think of it as the opening and closing jquery tag just like the ones you have in HTML. Every other thing goes in it!
Next, we want to start creating our jQuery methods.
There are a few things to consider when creating a jQuery method:
- the event to listen for
- the action we want to perform
- and what element we want to perform this action on
For the hero image, we want the image to fadeIn every time the web page is loaded, but “loading” is an automatic event that happens in every webpage so there is no fancy event listener required.
The fadeIn() effect is added to an HTML element to make it appear gradually. So before an element can fade in, it needs to be hidden. Therefore, after selecting our hero image, we need to add two actions: hide() and then fadeIn()
$(function({
  $(".hero-image").hide().fadeIn();
});
Next, we want to add an event when the “Hide text” button is clicked.
$(function({
  $(".hide-text").click(function() {

  });
});
Inside this event listener, we want to select the text block and add the hide() action.
$(function({
  $(“.hide-text”).click(function() {
    $(".text").hide();
  });
});
I’ll leave you to do the method for the first and third thumbnail.
For the second thumbnail, we are using themouseenter event listener. The method(s) inside this event listener is triggered when a user hovers their mouse on whatever element we select.
$(function({
  $(“.image-two”).mouseenter(function() {
    $(“.image-two”).slideUp();
  });
});
Here is a list of some commonly used event listeners:

This is what your complete main.js file should look like:

If your code looks like this and you correctly linked the jQuery file and library, you are all set. You should have sweet animation effects on your website now!
You can download the full source code for this tutorial here.

✉️ Subscribe to CodeBurst’s once-weekly Email Blast, 🐦 Follow CodeBurst on Twitter, view 🗺️ The 2018 Web Developer Roadmap, and 🕸️ Learn Full Stack Web Development.