How to set up a full-stack .NET web development environment on Mac OS

It is an interesting time if you are a Mac OS user with a development background in .NET. The lines between the technologies used by an application and the environment it is hosted in are now blurred. Until now, my development workflow always involved a Remote Desktop session to some Windows Server where I would host the .NET-based server-side components of my system. But as Microsoft announced that .NET was going open-source, and with the advent of containerized environments, you can now have your entire development environment running on your Mac!
In this article, I wanted to share the concepts and setup steps that can be used to set up a full-stack, modern, .NET-based web development environment, fully hosted on Mac OS. Specifically, we want to be able to setup an environment with the following technology components:
- A modern, front-end web development environment that facilitates single-page application (SPA) style development. Specifically, we will be setting up and configuring Webpack, Babel, React, and Hotmodule replacement.
- ASP.NET Core to develop a RESTful service layer. Within this layer, we will be using Entity Framework Core as our object-relational mapping (ORM) framework.
- Microsoft SQL Server for our relational database. You could easily use MySQL, SQLite, etc., but I’m getting a kick out of seeing SQL Server running on my Mac, and I hope you will too! We’ll also install Microsoft SQL Operations Studio (Preview). This is a free tool that runs on Mac OS and allows us to manage our SQL Server objects.
As for an integrated development environment (IDE), this article will use Visual Studio Code. In the future, if you plan to write any server-side rendered views using ASP.NET MVC, I do recommend using Visual Studio for Mac, as you will appreciate its support for Razor syntax. This does not exist in Visual Studio Code as of this writing. But for our purposes, Visual Studio Code will work just fine.
Well, that’s a lot of technology that we are going to be pulling in. But don’t worry if you haven’t used one or more of these, or don’t understand some of the buzzwords or concepts mentioned. This article is comprehensive, and will explain the concepts and technologies as we pull them in.
We will build our development environment in a back-end-to-front-end fashion, beginning with our relational database. Once we have that in place, we will build out a Movies API to return a simple list of movie titles to a caller. Finally, we will build some simple React components that call the API and render the list of movie titles.
Microsoft SQL Server
What? Microsoft SQL Server running on my Mac? Cats and dogs living together and such? Well these sorts of things are possible now as the push to separate applications from infrastructure gains momentum. For those of you new to the concept, think of a time where you had an application that ran fine in one environment, and then you push it to another environment that you swear is an exact mirror of the one the app runs successfully on, only to find that it doesn’t work. Then you go looking for a needle in a haystack, trying to determine what configuration setting you may have missed. When you think about it, we usually nail application configuration stuff like connection strings and file paths. But environment configuration involves things like server software configuration, OS settings, environment variables, etc. Missing any of these can really derail a deployment process.
You may have heard of Docker. Think of Docker as a platform that you can run on your Mac (or Windows or Linux) that can run images of software in a somewhat isolated environment. Like if Microsoft had a SQL Server image, you could run it within Docker on your Mac. That’s exactly what we will use, because Microsoft indeed has a SQL Server image. Let’s begin by installing Docker, and then we will install SQL Server.
Begin by downloading the Docker Community Edition for Mac installer. You will need to create your free Docker Store account in order access the download page. Installation is the same as any other .dmg-based installation.
Upon launching Docker, you will see it appear in your menu bar.

Docker has a command line interface that allows you to do things like download container images into Docker, start and stop them, check on running images, etc. To download the latest SQL Server image, run the following Docker command from Terminal:
sudo docker pull microsoft/mssql-server-linux:2017-latestThe pull command will download the image from Docker Hub (a repository of images) and register it with your Docker installation. To run it, you run the following Docker command from Terminal:
sudo docker run -e 'ACCEPT_EULA=Y' \
-e 'SA_PASSWORD=Passw0rd!' \
-p 1433:1433 \
--name mssql \
-d microsoft/mssql-server-linux:2017-latest
In my experience, the installation will fail if you do not provide a password that meets the default security requirements of SQL Server. Also, note that the —- name option allows you to give your container a friendly name. You will use this name in many other commands, so provide one that is short, sweet and recognizable.
To confirm that your container exists and is running, use the following command:
docker ps -aThis will list all of the containers you have installed, and the STATUS column will tell you whether the image is running (or when the image last exited). By default, the container will not automatically start up when you reboot your Mac, so if you find that your container is not running, use the following command (substituting the friendly name that you used for your SQL Server container):
docker start mssqlSo how do we interact with our SQL Server? Well, there is a way to launch a bash shell within the container which essentially puts you into that environment. From there, you could use sqlcmd (located in the image’s /opt/mssql-tools/bin/ directory). But if you are familiar with SQL Server Management Studio, you will want to check out Microsoft Operations Studio. It will provide you with a GUI to interact with your server. Download it for free. Currently, the download is a zip archive. You double click on the zip archive to get the SQL Operations Studio.app, which you will want to move into your Applications folder. After that, simply launch the application.
If you’ve used Visual Studio Code before, you’ll find the SQL Operations Studio looks and feels very familiar. The SQL Operations Studio team is using the same extensibility model as Visual Studio Code, allowing developers to create all kinds of useful extensions.
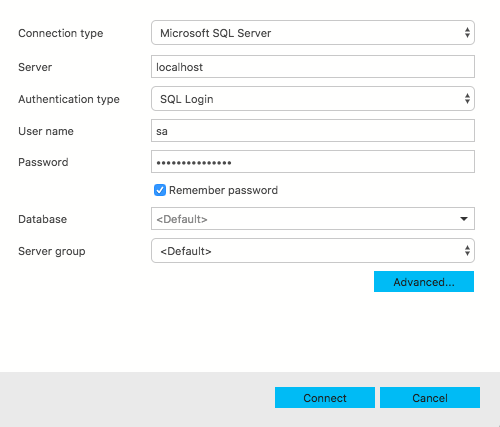
From within SQL Operations Studio, you have to define a connection to your database. You can do this by clicking the New Connection icon at the top of the Servers pane. Enter the credentials that you used when you first ran the SQL Server image.
Compared to SQL Management Studio, you’ll find that many context menu options like Create Database, etc. are missing, but you can always open a query window and use your T-SQL commands to create and delete database objects. In this article, we will rely on Entity Framework Core to handle all database object creation for us. For now, behold — Microsoft SQL Server running on Mac OS!
.NET Core SDK
Next, we need to download and install .NET Core. If you are not familiar with .NET Core, it is a subset of .NET Framework that is built upon smaller, NuGet packages, and runs on Windows, Linux, and Mac OS. With .NET Core, we get to select exactly the functionality our application needs by pulling in just the NuGet packages that we need. It’s a more flexible approach to selecting functionality, and we don’t end up paying a performance penalty for features we don’t need, as we do when we use the monolithic .NET Framework.
Go to the .NET Core download page, and download the .NET Core SDK for Mac OS. As of this writing, .NET Core is at v2.1.300. Be sure to download and install the SDK, and not just the runtime. The SDK comes with useful command line utilities that will allow us to create a .NET Core project, as we will be doing later in this tutorial. You can verify installation by typing the following dotnet command at the Terminal:
dotnet --versionYou should see the version of dotnet installed.
Visual Studio Code
Now that we have the .NET Core SDK installed, it’s time to think about what editor we can use to create our web application. You are free to use any editor you choose. It is helpful if your editor has an integrated command shell, and has an extension library that allows you to work with C#. In this tutorial, we will use Visual Studio Code.
Visual Studio Code is a free, open-source text editor with an extensibility model that allows third parties to augment it’s functionality. For example, while Visual Studio Code has built in support JavaScript, TypeScript, and Node.js, you can actually use an extension to add support for C#, Java, etc. Extensions aren’t necessarily just about language support either. You can find extensions that do nifty things like lint your code, customize folder and file icons, add alternate themes to your editor, etc.
You can download Visual Studio Code here. After you have launched it, we just need to enable C# support via an extension. The de facto extension for this “C# for Visual Studio Code”. From the Extensions view (⇧⌘X), search for ‘C#’, and it will be one of the first search results. Install the extension and you will be all set.
ASP.NET Core API With Entity Framework Core
Let’s now build a simple RESTful API project within Visual Studio Code by using ASP.NET Core and Entity Framework Core. One of the nice things about Visual Studio Code is the integrated Terminal from which we can manage folders and issue dotnet commands.
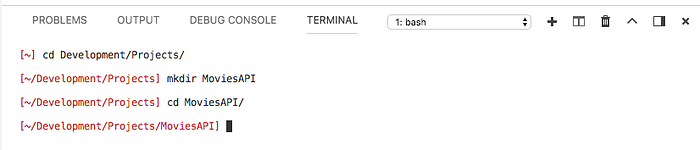
Toggle the Terminal by typing ⌃`. From there, create a folder anyplace in your file system where you want to keep your project’s files. On my system, I have a Projects folder that contains all my code projects. Create a folder named “MoviesAPI”. We’re just going to create a very simple API that allows a caller to retrieve a list of movies.
From within the directory, type the following command:
dotnet newThe dotnet new command provides you with a list of project templates that come with the .NET Core SDK. Of particular interest is the ASP.NET Core with React.js template. This is a fairly robust template that will create a full React project complete with JavaScriptServices, which is a collection of client-side technologies for ASP.NET Core. It’s definitely something you will want to check out after getting your feet wet. But this article is more about setting up a specific development environment and understanding how to do that from scratch. As such, we will continue by creating a barebones ASP.NET Core project, and pulling in the pieces one by one so that we can understand how to build up to a customized environment.
From within the MoviesAPI folder, type the following in Terminal:
dotnet new webThis will create an empty ASP.NET Core project with minimal configuration.
The C# extension that you installed into your Visual Studio Code environment will detect the files that were created by the SDK, and recognize this folder as containing a .NET project. You should see a dialog like this:
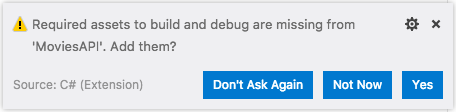
Click “Yes”, as this will pull in Visual Studio Code assets that will allow you to build and debug the application from within the editor environment. Once this is complete, validate that this application is working. From the command line, type the following command:
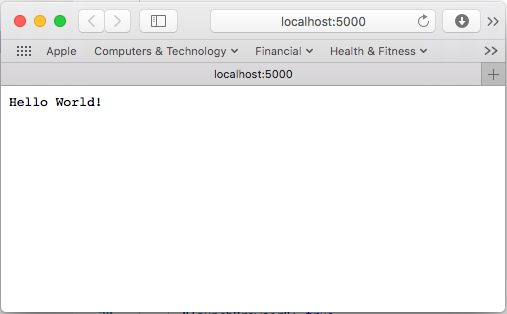
dotnet run.NET Core will launch a development web server listening on ports 5000 (HTTP) and 5001 (HTTPS). Launch a browser and navigate to http://localhost:5000 and you should see some “Hello World” text.
You can press Ctrl+C to stop the application process and use the dotnet run command to run it again.
So how do we turn our barebones application into an API? There are several steps that we need to take. First, we need to set up a reference to the Entity Framework Core NuGet package. Second, we need to configure Entity Framework Core to work with our SQL Server instance. Third, we will take a code-first approach to setting up entity classes. As an ORM, Entity Framework will take care of building our database for us. Lastly, we will set up our web application to use the MVC design pattern to route inbound HTTP requests to the an appropriate controller that will work with Entity Framework Core to retrieve data from the database, and send the data back to the caller in JSON format.
Entity Framework Core uses a provider model that enables ORM functionality with many different data sources. You could use MySQL, SQLite, or even an in-memory database provider. In our case, since we’ve invested time to set up SQL Server, let’s use Entity Framework Core with the SQL Server provider. By setting a reference to the Microsoft.EntityFrameworkCore.SqlServer NugGet package, all the necessary package dependencies will get pulled in. From within the project folder, type the following at the command line:
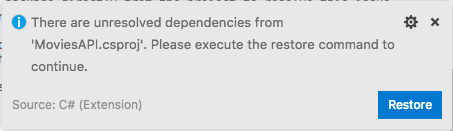
dotnet add package Microsoft.EntityFrameworkCore.SqlServer --version 2.1.0Once the package has been downloaded, the C# extension in Visual Studio Code kicks in once again, prompting you to run the Restore command to pull in dependencies. Go ahead and click the Restore button to restore these dependencies.
Now that our ORM is installed, we should begin by creating any entity classes that we will work with when interacting with our database. Create a folder in the project named “Entities”, and within it, create a new class named “Movie”.
Using attributes from the System.ComponentModel.DataAnnotations namespace, we can define an entity class that the Entity Framework Core provide (in this case, the SQL Server provider) will use to define this entity in the database.
using System.ComponentModel.DataAnnotations;
using System.ComponentModel.DataAnnotations.Schema;namespace MoviesAPI.Entities
{
     public class Movie
     {
          [Key]
          [DatabaseGenerated(DatabaseGeneratedOption.Identity)]
          public int Id { get; set; }          [Required]
          [MaxLength(100)]
          public string Name { get; set; }          [Required]
          public int Year { get; set; }
     }
}
Now that our entity class is defined, we need to create a DbContext and register it with the built-in dependency injection system in our application. Create a folder named Services, and create a new class named MoviesDbContext.
using Microsoft.EntityFrameworkCore;
using MoviesAPI.Entities;namespace MoviesAPI.Services
{
     public class MoviesDbContext : DbContext
     {
          public DbSet<Movie> Movies { get; set; }          public MoviesDbContext(
               DbContextOptions<MoviesDbContext> options)
               : base(options)
          {
               Database.EnsureCreated();
          }
     }
}
For convenience, we’ll also need a way to seed our database with some preliminary data. Unfortunately, the current version of Entity Framework Core doesn’t support this, but it’s simple enough to implement. Create a class called MoviesDbContextExtensions, and place the seeding code within it:
using System.Collections.Generic;
using System.Linq;
using MoviesAPI.Entities;namespace MoviesAPI.Services
{
     public static class MoviesDbContextExtensions
     {
          public static void CreateSeedData
               (this MoviesDbContext context)
          {
               if (context.Movies.Any())
                    return;               var movies = new List<Movie>()
               {
                    new Movie()
                    {
                         Name = "Avengers: Infinity War",
                         Year = 2018
                    },
                    new Movie()
                    {
                         Name = "Thor: Ragnarock",
                         Year = 2017
                    },
                    new Movie()
                    {
                         Name = "Black Panther",
                         Year = 2018
                    }
               };               context.AddRange(movies);
               context.SaveChanges();
          }
     }
}
To register the DbContext with the dependency injection system, we simply add it to the IServicesCollection within the ConfigureServices() method of the Startup class. Here is what our Startup class looks like so far. In subsequent steps, we will be adding additional configuration.
using System;
using System.Collections.Generic;
using System.Linq;
using System.Threading.Tasks;
using Microsoft.AspNetCore.Builder;
using Microsoft.AspNetCore.Hosting;
using Microsoft.AspNetCore.Http;
using Microsoft.EntityFrameworkCore;
using Microsoft.Extensions.DependencyInjection;
using MoviesAPI.Services;namespace MoviesAPI
{
     public class Startup
     {
          public void ConfigureServices(IServiceCollection services
          {
               var connectionString =
"Server=localhost;Database=MoviesDB;User Id=sa;Password=Passw0rd!";               services
                 .AddDbContext<MoviesDbContext>(o =>
                   o.UseSqlServer(connectionString));
          }          public void Configure(IApplicationBuilder app,
               IHostingEnvironment env,
               MoviesDbContext moviesDbContext)
          {
               if (env.IsDevelopment())
               {
                    app.UseDeveloperExceptionPage();
               }               app.UseStaticFiles();               moviesDbContext.CreateSeedData();               app.Run(async (context) =>
               {
                    await context
                           .Response
                           .WriteAsync("Hello World!");
               });
          }
     }
}
For brevity’s sake, the connection string is being hard-coded, but in a real-world application, we would drive this string from an encrypted entry in a configuration file or consider keeping this information in an environment variable.
Also notice that in the Configure() method, our MovieDbContext is being injected, and with our extension method in place, we call the CreateSeedData() method to generate some initial data if it doesn’t already exist. We are also calling UseStaticFiles(). This middleware component allows our application to serve static assets from the wwwroot folder. You may have noticed this folder was created by the project template, but currently, it is empty. Eventually, we will be adding our client-side assets to this folder.
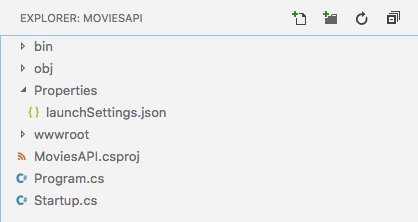
At this point, your Explorer window should look like this:

Now when the application starts up, ASP.NET Core will call the Configure() method, which in turn will construct an instance of our MoviesDbContext class. We see that during the construction of that object, a call is made to ensure that the database is created. The SQL Server provider will create a database according to the connection string that we specified in the ConfigureServices() method. Our connection string indicated that the database should be called MoviesDB. Then, with the call to our extension method, CreateSeedData(), the provider will use our entity class definition to construct a table. By convention, the name of the table will be Movies, as our entity class was named Movie. All of this happens when we start the application, so let’s give it a try.
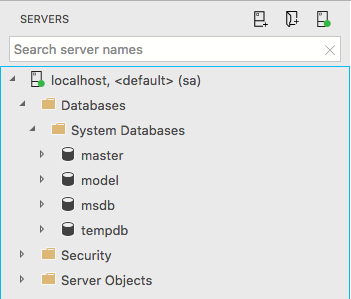
First, make sure your SQL Server container is running within Docker. We saw how to do that earlier. Next, launch SQL Operations Studio and establish a connection to the the SQL Server instance. If you expand the Databases node, you should only see a category of System Databases.
OK, now , from Visual Studio Code, using the integrated Terminal, use the dotnet run command. You should see output such as the following:
[~/Development/Projects/MoviesAPI] dotnet runUsing launch settings from /Users/nealpatel/Development/Projects/MoviesAPI/Properties/launchSettings.json...
info: Microsoft.EntityFrameworkCore.Infrastructure[10403]
      Entity Framework Core 2.1.0-rtm-30799 initialized 'MoviesDbContext' using provider 'Microsoft.EntityFrameworkCore.SqlServer' with options: None
info: Microsoft.EntityFrameworkCore.Database.Command[20101]
      Executed DbCommand (722ms) [Parameters=[], CommandType='Text', CommandTimeout='60']
      CREATE DATABASE [MoviesDB];
info: Microsoft.EntityFrameworkCore.Database.Command[20101]
      Executed DbCommand (228ms) [Parameters=[], CommandType='Text', CommandTimeout='60']
      IF SERVERPROPERTY('EngineEdition') <> 5
      BEGIN
          ALTER DATABASE [MoviesDB] SET READ_COMMITTED_SNAPSHOT ON;
      END;
info: Microsoft.EntityFrameworkCore.Database.Command[20101]
      Executed DbCommand (6ms) [Parameters=[], CommandType='Text', CommandTimeout='30']
      CREATE TABLE [Movies] (
          [Id] int NOT NULL IDENTITY,
          [Name] nvarchar(100) NOT NULL,
          [Year] int NOT NULL,
          CONSTRAINT [PK_Movies] PRIMARY KEY ([Id])
      );
info: Microsoft.EntityFrameworkCore.Database.Command[20101]
      Executed DbCommand (6ms) [Parameters=[], CommandType='Text', CommandTimeout='30']
      SELECT CASE
          WHEN EXISTS (
              SELECT 1
              FROM [Movies] AS [m])
          THEN CAST(1 AS BIT) ELSE CAST(0 AS BIT)
      END
info: Microsoft.EntityFrameworkCore.Database.Command[20101]
      Executed DbCommand (4ms) [Parameters=[@p0='?' (Size = 100), @p1='?' (DbType = Int32)], CommandType='Text', CommandTimeout='30']
      SET NOCOUNT ON;
      INSERT INTO [Movies] ([Name], [Year])
      VALUES (@p0, @p1);
      SELECT [Id]
      FROM [Movies]
      WHERE @@ROWCOUNT = 1 AND [Id] = scope_identity();
info: Microsoft.EntityFrameworkCore.Database.Command[20101]
      Executed DbCommand (1ms) [Parameters=[@p0='?' (Size = 100), @p1='?' (DbType = Int32)], CommandType='Text', CommandTimeout='30']
      SET NOCOUNT ON;
      INSERT INTO [Movies] ([Name], [Year])
      VALUES (@p0, @p1);
      SELECT [Id]
      FROM [Movies]
      WHERE @@ROWCOUNT = 1 AND [Id] = scope_identity();
Hosting environment: Development
Content root path: /Users/nealpatel/Development/Projects/MoviesAPI
Now listening on: https://localhost:5001
Now listening on: http://localhost:5000
Application started. Press Ctrl+C to shut down.
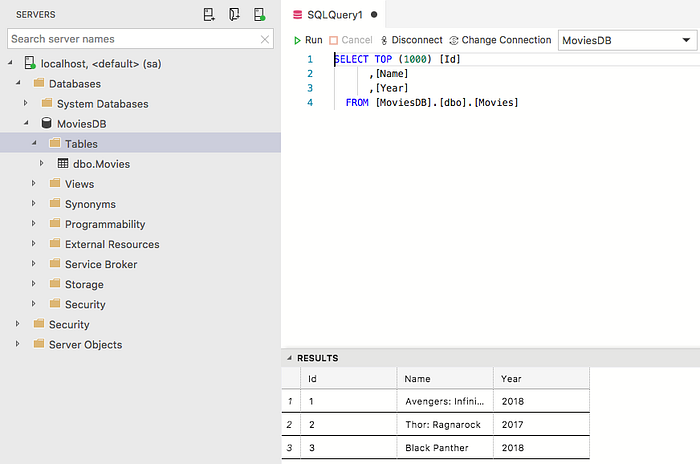
This looks pretty good, as we can see that not only was our database created, but the initial seed data was placed within the database. Using SQL Operations Studio, refresh the list of databases, and you should see the new MoviesDB!.
ASP.NET Core MVC
Now that we have the data in place, let’s configure out application to use the MVC pattern for routing inbound HTTP requests. In this simple example, we want to create a controller action that will return the list of movies in our database to the caller. By default, we’ll use the JSON data format.
At the top of the Startup class, add a using directive to reference the Microsoft.AspNetCore.Mvc namespace. Next, add a line to ConfigureServices() to register the MVC service with the framework. Your method body should look like this:
public void ConfigureServices(IServiceCollection services)
{
     var connectionString = "Server=localhost;Database=MoviesDB;User Id=sa;Password=Passw0rd!";     services.AddDbContext<MoviesDbContext>(o =>
          o.UseSqlServer(connectionString));     services.AddMvcWithDefaultRoute();
}
Now that the service is registered, we can configure the middleware to use MVC to route requests to the controller action that we will create. Make a call to the UseMvc() extension method of the IApplicationBuilder in the body of the Configure() method. Your method body should look like this:
public void Configure(IApplicationBuilder app,
               IHostingEnvironment env,
               MoviesDbContext moviesDbContext)
{
     if (env.IsDevelopment())
     {
          app.UseDeveloperExceptionPage();
     }     app.UseStaticFiles();     moviesDbContext.CreateSeedData();     app.UseMvc();
}
To finish up our API, we will create a new controller class that will service requests for movie data. Create a new folder named Controllers, and within it, create a new class MoviesController.
using Microsoft.AspNetCore.Mvc;
using MoviesAPI.Services;namespace MoviesAPI.Controllers
{
     [Route("api/[controller]")]
     public class MoviesController : Controller
     {
          private MoviesDbContext _context;          public MoviesController(MoviesDbContext context)
          {
               _context = context;
          }          public IActionResult GetMovies()
          {
               return Ok(_context.Movies);
          }
     }
}
This simple class uses attribute-based routing to route requests that match “/api/movies” to this controller class. Using our MoviesDbContext class (injected into our constructor by the ASP.NET Core), we can fetch the Movie records from the database, and return them to the caller, wrapped within a 200 status code response.
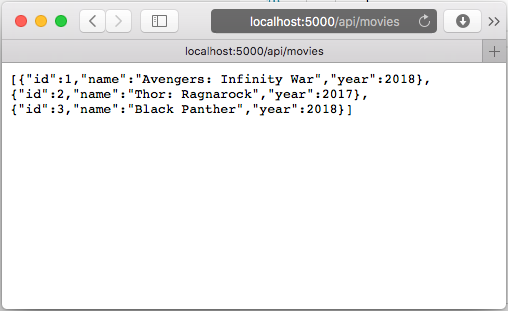
We could use a tool like Postman to issue a GET request to our API, but using a web browser is just as good. Run the application and point your browser to http://localhost:5000/api/movies, and you should see that our API is working!
And with that, the server-side to our development environment is complete! With just these configuration steps, you have a data persistence technology (Microsoft SQL Server), an ORM (Microsoft Entity Framework Core), and a RESTful API application. Onto the client-side where we will now set up a modern web development environment.
Basic ASP.NET MVC View
We will start by getting a basic HTML page to render. For this, create a new class, HomeController, and place it in the Controllers folder. Note that this class will handle URL requests that match “/home”.
using Microsoft.AspNetCore.Mvc;namespace MoviesAPI.Controllers
{
     [Route("/home")]
     public class HomeController : Controller
     {
          public IActionResult Index()
          {
               return View();
          }
     }
}
Next, we create the default view for this controller action. Create a file named Index.cshtml at /Views/Home/.
<!DOCTYPE html>
<html>
  <head>
    <meta name="viewport" content="width=device-width" />
    <title>Movies API</title>
  </head>  <body>
    <h1>Movies API</h1>
    <div id="container"></div>
  </body>
</html>
Now if you start the application, a request for http://localhost:5000 will result in an HTML view. Meanwhile, a request for /api/movies will still result in a JSON response.
wwwroot
You may have noticed that when we created the web application, the project template automatically created a folder named wwwroot. This will be the root folder from which our application will serve assets such as stylesheets, scripts, images, etc. You may have noticed that in our Index.cshtml view file, we created a div element that will serve as the node that we will mount our React component onto.
Create a folder named source within the wwwroot folder. Within this source folder, let’s create a minimal app.js file. We will modify our view to include a script reference to app.js.
<!DOCTYPE html>
<html>
  <head>
    <meta name="viewport" content="width=device-width" />
    <title>Movies API</title>
  </head>  <body>
    <h1>Movies API</h1>
    <div id="container"></div>
    <script src="~/source/app.js"></script>
  </body>
</html>
Node.js and Node Package Manager (npm)
So far, we’ve managed our package dependencies in the project by using NuGet package manager. This is fine, as we’ve been setting up project dependencies on .NET Core packages, and NuGet is well suited for this. However, when it comes to client-side code, and particularly sophisticated JavaScript frameworks like React and Angular, it’s better to use a different package manager that is more suitable for managing client-side dependencies. In this article, we will use Node Package Manager (npm), but other options include Bower and Yarn.
npm is installed with Node.js. To check if you have node installed, type node -v at the command line. To check if you have npm installed, type npm -v at the command line. If you don’t have these, download and install Node.js.
npm uses a file named package.json to store references to packages that are in play for a project. Create a file named package.json in the root application folder with these contents:
{
  "name": "moviesapi",
  "version": "1.0.0",
  "private": true,
  "devDependencies": {
  },
  "dependencies": {
  }
}
Webpack
The first feature we want to pull into our client-side development process is a bundler. Webpack is a popular development tool that takes the JavaScript modules that we write, figures out their interdependencies, and produces one or more bundles. For example, if we have 20 JavaScript modules, some of them depending on others, we can use Webpack to create a single bundle that we will reference from our HTML file. The result is less HTTP overhead, as only a single request is made from the browser for all of the JavaScript code, and we as developers don’t need to worry about the order in which we include our scripts, as Webpack sorts that out for us.
To install webpack, type the following command:
npm install webpack@3.8.1 --save-devAll we need to do from there is to create a configuration file that indicates to Webpack what we want it to bundle, and where it should place that bundle. By default, Webpack will look for a webpack.config.js file for configuration information. Create a file by that name in the root of the application, and give it the following contents:
const path = require('path');module.exports = {
  entry: './wwwroot/source/app.js',
  output: {
    path: path.resolve(__dirname, 'wwwroot/dist'),
    filename: 'bundle.js'
  }
};
This configuration file will find the entry point we specified (app.js), figure out the dependencies on other modules transitively, and create a bundle.js at /wwwroot/dist/. Before executing this process, we need to add a script to package.json.
{
  "name": "moviesapi",
  "version": "1.0.0",
  "private": true",
  "scripts": {
    "wbp": "webpack"
  },
  "devDependencies": {
  },
  "dependencies": {
  }
}
With that in place, you can simply run npm run wbp. Webpack will use our configuration file and produce a dist folder under wwwroot, with a file named bundle.js. All we need to do is update our HTML to reference this file instead of app.js.
Babel
While Webpack will bundle our modules together, it isn’t responsible to for making sure that the browsers that execute the bundled code can interpret that code. That means that if we were to write our modules using new features from ECMAScript 6 (ES6), Webpack would bundle our modules up just fine, but it still up to the browsers upon which our code runs to be able to interpret that code. Some older browsers do not fully support ES6 syntax, so this can become a problem if we do was to use ES6 syntax. Babel is what is known as a transpiler that will take ECMAScript 6 (or later) syntax and transform that code into ES5 code that older browsers can interpret. By offloading this responsibility onto Babel, we can write script code using the latest features of the ECMAScript standard and not worry about supporting older browsers.
To install Babel, we use Webpack’s support of “loaders”. Loaders apply transformations upon the source code. We can configure Webpack to use Babel’s loader and apply it to the .js files that are being bundled. Type the following command, which essentially installs 3 Babel packages:
npm install --save-dev babel-loader@8.0.0-beta.3 @babel/core @babel/preset-envOnce installed, we need to modify webpack.config.js to configure the loader:
const path = require('path');
module.exports = {
  entry: './wwwroot/source/app.js',
  output: {
    path: path.resolve(__dirname, 'wwwroot/dist'),
    filename: 'bundle.js'
  },
  module: {
    rules: [
      { test: /\.js?$/,
        use: {
          loader: 'babel-loader',
          options: {
            presets: ['@babel/preset-env']
          }
        }
      }
    ]
  }
};
React
React is a JavaScript library that allows us to build component-based user interfaces using only JavaScript. The SPA-style is trending heavily towards the use of React. As an aside, it was after I got ramped up on React that the motivation for writing this article came up. Once I got familiar with React and started building sophisticated component hierarchies, I wanted to tie it all together with my experience with Entity Framework Core and ASP.NET Core to build full stack applications.
Let’s add React and ReactDOM to our environment.After we add it, we’ll write up some simple React components to make sure everything is working properly.
Using npm, we can run the following command:
npm install react react-dom --save-devWhen writing React components, we will be using JSX syntax. It isn’t necessary, but it does reduce the amount of code we have to write and keep things a bit more readable. This means we will need to use a Babel preset to transpile the JSX code. Run the following command to install the preset:
npm install @babel/preset-react --save-devOnce the preset is installed, we can add it into our webpack loader configuration. We have to change the test so that the loader kicks in for .jsx files, and also include the new preset in the array of presets. The changes appear in bold below:
const path = require('path');
module.exports = {
  entry: './wwwroot/source/app.js',
  output: {
    path: path.resolve(__dirname, 'wwwroot/dist'),
    filename: 'bundle.js'
  },
  module: {
    rules: [
      { test: /\.jsx?$/,
        use: {
          loader: 'babel-loader',
          options: {
            presets: ['@babel/preset-react', '@babel/preset-env']
          }
        }
      }
    ]
  }
};
With React in place, we are going to build two components. The first component is going to be a simple container component called MovieList. It essentially will be just a heading for the list of movies, but it is also the container for multiple instances of a Movie component. Each Movie component will render a single Movie record from our database.
Within wwwroot/source, create a file named movie.jsx. This will be our Movie component. Our Movie component will simply render the name and year of the movie.
import React from 'react';class Movie extends React.Component{
     render() {
          return (
               <div>{this.props.movieName} ({this.props.movieYear})</div>
          );
      }
};export default Movie;
Now, within wwwroot/source, create a file named movieList.jsx. This represents the container component that will fetch data from our API, store it in state, and map this data to a collection of Movie components.
import React from 'react';
import Movie from './movie.jsx'class MovieList extends React.Component {
     constructor(props) {
          super(props);
          this.state = { data: [] };
     }     loadMovies() {
          const xhr = new XMLHttpRequest();
          xhr.open('get', this.props.url, false);
          xhr.onload = () => {
               const data = JSON.parse(xhr.responseText);
               this.setState({ data: data });
          };
          xhr.send();
     }     componentWillMount() {
          this.loadMovies();
     }     render() {
          const movies = this.state.data.map(movie => (
          <Movie key={movie.id} movieName={movie.name} movieYear={movie.year} />
          ));          return (
               <div>{movies}</div>
          );
     }
};export default MovieList;
And finally, we modify our app.js file. It will use ReactDOM to mount an App component to the DOM.
import React from 'react';
import ReactDOM from 'react-dom';
import MovieList from './movieList.jsx';class App extends React.Component {
     render() {
          return (
               <div>
                    <MovieList url="/api/movies" />
               </div>
          );
     }
}ReactDOM.render(
     <App />,
     document.getElementById('container')
);
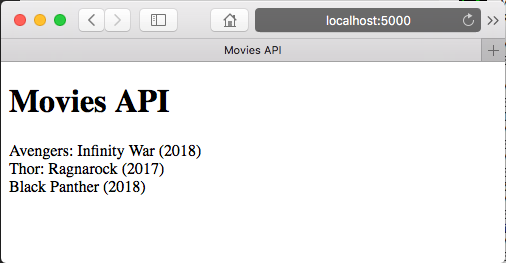
We need to run our wbp script, npm run wbp, in order to bundle these three modules into bundle.js. Re-launch the application, and point your browser to http://localhost:5000, and you should see that our React components are rendering the list of Movies!
Hotmodule Replacement
To cap off this (lengthy) article, we will want to include Hotmodule Replacement. With this functionality, we will be able to make changes to our JavaScript code and not have to rebundle the code each time. In fact, with proper configuration, you don’t even have to reload your browser window, as any changes you make will automatically show up.
In order to get this to work in our ASP.NET Core environment, we will need to do some configuration on the server, and some on the client.
Begin by installing the webpack-hot-middleware and aspnet-webpack packages:
npm install webpack-hot-middleware@2.20.0 --save-dev
npm install aspnet-webpack@2.0.1 --save-dev
Back in our Startup.cs class, we need to configure this middleware. We modify it as such (changes in bold):
public void Configure(IApplicationBuilder app,
     IHostingEnvironment env,
     MoviesDbContext moviesDbContext)
{
     if (env.IsDevelopment())
     {
          app.UseDeveloperExceptionPage();          var options = new WebpackDevMiddlewareOptions()
               {
                    HotModuleReplacement = true
               };
          app.UseWebpackDevMiddleware(options);
     }     app.UseStaticFiles();
     moviesDbContext.CreateSeedData();
     app.UseMvcWithDefaultRoute();
}
We will need to modify our webpack.config.js because Hotmodule replacement does require a “main” entry point and a “publicPath” value in the output settings (changes in bold):
const path = require('path');
module.exports = {
  entry: { 'main': './wwwroot/source/app.js' },
  output: {
    path: path.resolve(__dirname, 'wwwroot/dist'),
    filename: 'bundle.js',
    publicPath: 'dist/'
  },
  module: {
    rules: [
      { test: /\.jsx?$/,
        use: {
          loader: 'babel-loader',
          options: {
            presets: ['@babel/preset-react', '@babel/preset-env']
          }
        }
      }
    ]
  }
};
Modify app.js to let Hotmodule Replacement to accept updates:
import React from 'react';
import ReactDOM from 'react-dom';
import MovieList from './movieList.jsx';class App extends React.Component {
     render() {
          return (
               <div>
                    <MovieList url="/api/movies" />
               </div>
          );
     }
}ReactDOM.render(
     <App />,
     document.getElementById('container')
);module.hot.accept();
That’s it! Rebuild the bundle one more time, stop and start the web application, and you’ll once again see the list of movies. If you make some change to the JavaScript, it will instantly show up in the DOM with no refresh required!
Conclusion
Well that was a lot of steps, and I hope you were able to follow along. You’re now set to extend your server-side functionality using NuGet packages, or client-side development using npm to specialize for the tools and technology that you like to use! I hope you found this article helpful and enjoy full-stack, .NET-based web development on Mac OS!