How to setup a VPN on Windows for free in 5 minutes

In this tutorial, we will set up a VPN and override our DNS to protect our privacy.
Linux Version:
You will need the following:
* Windows operating system ( I’m using 8.1 ) with admin privileges
* Basic computer skills
* Knowledge of what a VPN is ( I assume you have some idea of what a VPN is since you’re here )
* You may need access to your router
Make sure you follow all steps and make backups when necessary.
Tools
Here are the tools we will be using.
* VPN Book — VPN config
* DNSLeakTest — Testing our setup
* IPLeak — Another testing site
* OpenVPN — VPN Application
* OpenDNS — Changing our DNS
* Google DNS — Alternative to OpenDNS
If you want to see what information is available before using a VPN then look at dnsleaktest and ipleak from the above links.
Part 1: Changing Domain Name Servers
Your DNS can leak some information and there are other reasons to change it.
1. There are a few options, we will be looking at OpenDNS and Google public DNS. Choose which one you prefer ( both are good ) I’ll be using Open DNS in this tutorial.
Open DNS: 208.67.222.222 | 208.67.220.220
Google DNS: 8.8.8.8 | 8.8.4.4
2. Decide if you only want to change your computer’s DNS or for every device on your network. I will cover both.
Changing DNS on your computer
This will vary depending on your version of Windows, but it’s mostly the same.
1. Navigate to “Network and Sharing Center” — search for it or find it in your control panel.


2. Open your connection by clicking on it. In my case, I only have one connection. ( I click Ethernet ) Then click properties, you may need admin rights for this.

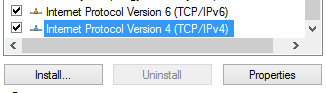
3. Under the networking tab find “Internet Protocol Version 4 (TCP/IPv4)” Click it then hit properties once more.
Optionally you can disable IPv6 here by unchecking it. Some VPNs don’t cover IPv6 so keep that in mind in case you have a leak later.
4. Tick “use the following DNS server addresses” to override your current DNS. This is where you’ll enter your chosen addresses from above. ( OpenDNS, Google DNS, or something else )

5. From the same properties menu click advanced then go to the DNS tab. Once again add the addresses. Click add, copy/paste the address, click add again. Put them in the same order as the previous ones we added.
This time we’re going to add a 3rd option that is unlikely to be used but will be used as a fallback if needed. I used the Google DNS 8.8.8.8

6. Click ok for everything. We’re done here just make sure it all saves.
At this point, you may need to reset your computer and possibly your router. If you’re going to set up the DNS on your router then it can wait. If you reset and the DNS isn’t working then your router may be the cause or the settings didn’t save.
Changing DNS on your router
This will use the DNS on all devices connected to your router ( wired or WiFi )
1. Go to your router’s settings. If you don’t know how then follow these steps otherwise go to step 2.
Open the command prompt by pressing windows/command key + R then type “cmd” enter or click the start button and search for cmd.
In the command prompt type, ipconfig/all and press enter. Look for the address labeled “Default Gateway” and copy the numbers. ( it should look like xxx.xxx.x.x — and not this kind of address fe90:b211:a115 )
Paste that address into your browser. In my case, it’s 192.168.0.1 then login with your username / password. If you didn’t make one try “admin” for the user and “password” for the password. If that fails Google the name of your router and the user/pass.
2. Find the DNS settings. This can vary from router to router and you may have to Google how to do this for your particular router. You’ll want to find something like DNS Override, there should be 2–3 inputs for DNS addresses. Put the addresses you want to use here.

3. Save your settings and reset your router by unplugging it for 10 seconds then plugging it back in. ( a soft reset may not be enough )
Part 2: Setting up a VPN
In this part, we will install and use OpenVPN and config for it.
1. Download and install OpenVPN — download page ( just follow the installer )

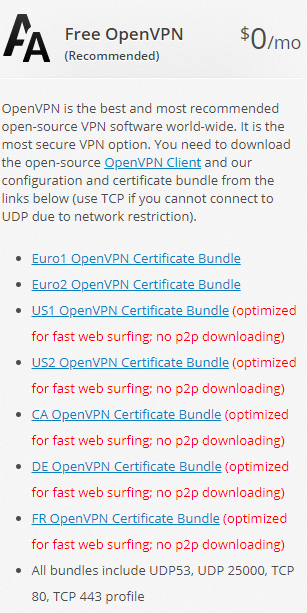
2. Download the VPN config of your choice from VPNBook. Simply click the link for the setting you want. ( you can choose any country regardless of where you are )
3. Navigate to your OpenVPN config folder. If you didn’t change where it’s installed then it’s probably: C:\Program Files\OpenVPN\config
4. Extract the config into this folder ( you may need a program like 7zip, Winrar, or similar )

5. With all that done you can close everything.
Fixing Browser Leaks
There is a browser feature called WebRTC that will leak your information, here’s how to fix it in some browsers.
Firefox
1. In Firefox type “about:config” in your address bar and press Enter.
2. On the config page search for: media.peerconnection.enabled
3. Change it to false by double-clicking on it.
4. Restart Firefox.
Google Chrome
Unfortunately, there are no settings for it and you’ll need to install WebRTC Network Limiter extension by Google.
Opera
1. Type “about:config” in the address bar and press Enter.
2. Find “WebRTC” and select “Disable non-proxied UDP”.
Moment of Truth
Finally, we try out the VPN.
1. Open OpenVPN GUI. An icon should appear on your taskbar by the date and time. Right-click it, hover over the config you want and click connect. ( make sure all browsers/connections are closed before doing this )

2. Run some tests head to dnsleaktest.com and ipleak.net to spot any leaks.
If everything worked then your DNS should be the one you changed it to, your IP address should be different, no personal info, etc.
Further Reading
Thanks for reading! Leave a clap if it helped you or comment below if you need help.

✉️ Subscribe to CodeBurst’s once-weekly Email Blast, 🐦 Follow CodeBurst on Twitter, view 🗺️ The 2018 Web Developer Roadmap, and 🕸️ Learn Full Stack Web Development.