Introduction to Docker with a simple ‘Dockerized’ Node.js application

Docker and Kubernetes are picking up the trend right now in the web development communities and that’s for some valid reasons. “Security & Scalability” are the foremost requirements when deploying an application on the Internet. These aren’t stressed when you’re just trying out new frameworks or deploying some simple application on freemium cloud solutions.
The need for a robust system architecture that provides management, scaling & automation comes into the picture when you’re creating your webserver or assuming complete access & control to your entire application. Here is where Docker and Kubernetes come in (sort of).
Kubernetes is an open-source container-orchestration system for automating application deployment, scaling, and management. It was originally designed by Google, and is now maintained by the Cloud Native Computing Foundation. Source: Wikipedia

Why Docker? 🤷
Kubernetes is out of the topic for this article but let’s discuss Docker. Docker is an open-source containerization platform that makes it easier to create, deploy and manage applications through containers. Containers are the standard unit which can be initialized and deployed on the run. Docker Container operates in an isolated environment on the host system and serves your application on an OS of your choice.
But, how is it different from a VM?
Performance-wise Virtual Machines are typically slow to boot and take up a lot of storage and RAM to serve an application. The entire OS needs to be booted in the VM, so running multiple VMs to serve multiple apps along with the images of their respective OS on a single host system is a heck of burden.
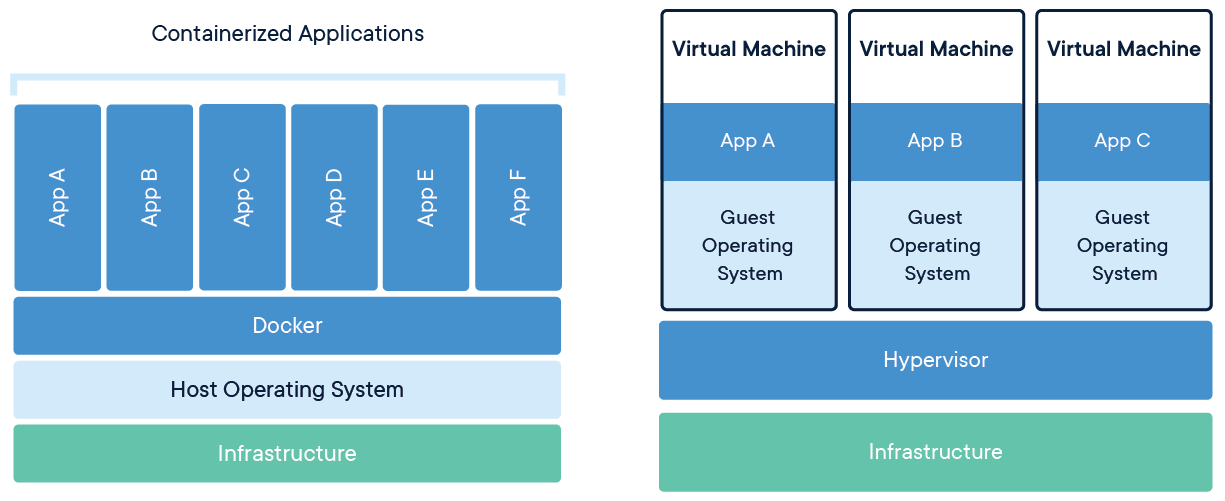
On the other hand, Docker Containers can be loaded with any environment of choice. It could be an Ubuntu, Debian or CentOS Container or application-oriented like Node.js, Python or Tomcat. These containers run isolatedly, thus changes in other containers in the cluster or other resource requirements do not affect the current container. Moreover using slim or alpine versions further reduce the storage occupied by your docker image.
A Docker image or an image, in general, is an execution ready implementation of your application built using all the instructions and dependencies. So when a Docker “runs” an image it is running an instance of that image in one or multiple containers isolatedly. To put it simply, Docker images act as a blueprint to what has to be built and executed in the containers.
All the Official and Community Docker images for different environments and frameworks can be found at https://hub.docker.com/.
Docker containers exhibit the same behavior in Development, Staging and Production builds. Thus you can run the same image in different environments without having the trouble of platform constraints & sharing dependencies.
For further understanding about Docker and Kubernetes go through this amazing article by Joyce Lin.

Where them code at? 🤔
Enough jibber-jabber. Let’s get into the fun part (or so they say :3)
Docker Containers can be spun up with any framework of your preference as long as there is an image available in the community for them. I’ll be walking you through a simple Node.js CRUD app. Moreover, I’ll be using node:8-alpine to make the image as small as possible.
Note: This is a simple Express + MongoDB app. I’m working on a Windows env but the choice is yours. Make sure that you’ve installed MongoDB and DockerHub/Docker Toolbox. I used Postman to make RESTful API calls.
Assuming that you’ve already setup DockerHub or Docker Toolbox, create and get into the working directory of your choice & let’s create a simple Node.js app.
$ npm init && npm install express mongoose nodemon --saveInstall express and mongoose if you haven’t already. nodemon helps in the dev process and reloads your application whenever there are any changes.
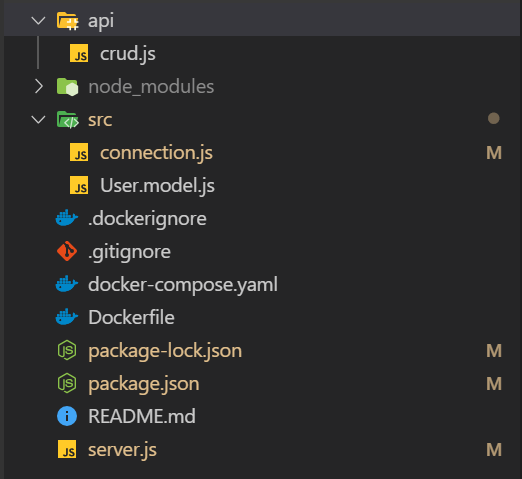
Create server.js and modify package.json to serve it when the app starts.
Before rushing into the server code let’s create a simple schema for our DB. Open up User.model.js in /src folder and add this.
This is a simple model with username, age, and hobbies. The logic to establish a connection with MongoDB when the app starts is in /src/connection.js
Let’s implement simple CRUD to retrieve all the users in the collection and insert a new one.
Finally, server.js to connect all the dots into a single entry point.
I’ve exposed 8080 but you can use any port of your choice. Start the server by running npm run dev in your terminal.
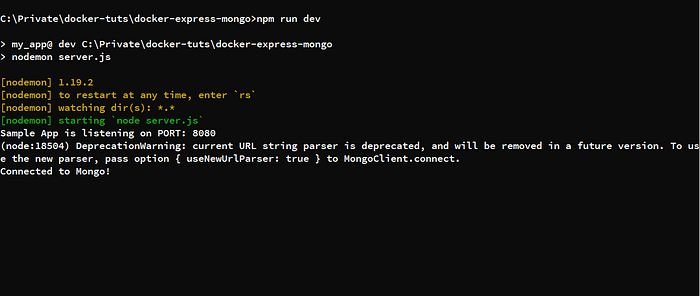
Try sending a POST request to localhost:8080/insert and then a GET request to localhost:8080/users. I used POSTMAN but you can do the same in any other application or browser of your preference.

Make sure that you’ve followed through so far because things are gonna get interesting from here.
So far we just created a simple CRUD app that runs perfectly in our local system. To create an image for this application let’s make a Dockerfile that grabs all the required dependencies. It goes as follows,
This is a pretty simple Dockerfile. Let’s break it down.
FROM node:8-alpineis to grab the alpine image of node v8. Here you could either specify the OS likeUbuntu:18.04or mention specific framework as we did here.WORKDIR ...is to set the working directory once the framework is set up in the Docker container. Hereusr/src/appserves as the working directory.- We’ll be copying the
package.json & package-lock.jsoninto the container rather than copying entire/node-modulesinto the directory. RUN npm installinstalls all the required dependencies such as express mongo & express. Feel free to remove nodemon frompackage.jsonbecause it is no longer required.COPY . .copies all the contents of your project into the image. This is where.dockerignorecomes into the image (no pun intended). You might want to omit any directories or files that aren’t related to the application or that are redundant. In this scenario,/node-modulescomes under the ‘unnecessary’ category. So create a.dockerignorefile in your working dir and add /node-modules and other unnecessary directories’ path to omit them.- Almost there.
EXPOSE 8080, as it suggests, exposes port 8080 for external sources to communicate with our application. Basically we’re pointing the port 8080 of the running container to the port 8080 that application listens to (8080:8080).CMD ["npm","start"]starts the server. Plain and simple.
About that database though…
MongoDB needs to be persistent i.e., Mongo needs to be running simultaneously with our Express app to serve our requests. This is an example of a 2-tier architecture where two containers are running simultaneously and communicating with one another. Docker composer comes handy in this case to run a multi-container Docker application. First, we compose a YAML that specifies two dockers, one for our express app which describes the build & the endpoints and another for the mongo expressing the same as the previous one.
Microservices benefit from Docker because of the above reasons. Docker containers, in general, are stateless since they do not store or cache any information. In docker-compose, we’re describing two containers and specifying how they communicate with each other. For instance, the web part (express) of our application depends on mongo as mentioned in the yaml file.
Create a docker-compose.yaml in your directory and add the following.
Well, on paper, the web part is supposed to communicate with mongo by using that service’s name. For this to work go back to connection.js and change connection URI to "mongodb://mongo:27017/my-test" .
You can find the entire source code here.
Phew, Almost there…
Now that we’ve done with everything let’s build the image and run docker.
Spin up the Docker terminal and run $docker build -t my-app . to create the docker image. Docker defaults to IP 192.168.99.100. After running the above command you should see something like this.

Now run $docker-compose up to run the two containers. The command output is all gibberish but you can find that mongo starts listening to port 27017 and our application to 8080, just like they’re meant to.
To see that our application works, try sending GET and POST requests like before but to http://192.168.99.100:8080/.

Well, that’s pretty much the application we planned to build! A Node.js application running in a Docker Container simultaneously with a Container running mongo client.
Closing Words…
If this small and simple Node.js application running in a Docker container seems like overkill, well, yes it is. Docker lets you run multiple instances of same applications in different containers isolatedly i.e., you can run different versions of the same app at a time to either compare them or for other purposes like data migrations and so on.

To compare our application with a VM implementation, running 3 containers of our express app and one container for the mongo takes up merely 600–700MB of total disk space and out of ~1GB RAM allocated to each container, they’re using approx ~200MB out of ~4GB when idle.

When it comes to VMs you’ll be running a Guest OS on each VM isolatedly so running multiple VMs bears the trouble of Virtualization overhead. Whereas, Docker containers share the resources with the host OS. We can keep going on and on about Pros and Cons of VMs vs Docker Containers but this is where the article ends.
Also, the major trade-off between serverless architecture and Docker (or orchestration systems as such) is that developers need not worry about nuts and bolts of the server systems and focus on deployment only rather than on scaling, management, etc (Google App Engine, AWS Lambda). Whereas Docker provides full access to management and scaling opportunities such as the number of containers running, setting policies, security and so on.
If you find this article useful click the 👏 and spread the word 😊. Also, I might start a series on Docker, Kubernetes and move on to building and deploying a scalable application with this orchestration system so keep an eye on this space 😉.

