Part 2: JWT to authenticate Servers API’s
What is JWT? (Recap)
As per openid
JSON Web Token (JWT) is a means of representing claims to be transferred between two parties. The claims in a JWT are encoded as a JSON object that is digitally signed using JSON Web Signature (JWS) and/or encrypted using JSON Web Encryption (JWE).
In simple terms, it is just another way of encoding JSON object and use that encoded object as access tokens for authentication from the server.
This is the second part of the series of two shorts post regarding the practical application of JWT.
- JWT for downloading the files at the client.
- JWT for the server to server authentication (current blog post).
This blog post includes the below topics in detail:
- Parts of JWT token.
- How to authenticate servers API’s (producer and consumer concept).
Let’s break JWT 🔨

There are generally three parts in JWTs as shown in the above picture.
1st part is HEADER:
{
 "alg": "HS256",
 "typ": "JWT"
}
alg: We have two main algorithms(HS256/RS256) to sign our JWT 3rd part (Signature) which we mention in the headers so that the producer and consumer(you will understand this soon in the next section) both should use the same algorithm to verify the token on each end. HS256 indicates that this token is signed using HMAC-SHA256.
typ: Define the type of the token which is JWT obviously in our case.
When we base64UrlEncode the above header data we will get eyJhbGciOiJIUzI1NiIsInR5cCI6IkpXVCJ9 the first part of our JWT token.
2nd part is PAYLOAD:
It mostly contains the claims (custom data) and some standard claims as well. We can use standard claims to identify a lot of things i.e exp: the expiry of the token,iat: time at which token issued etc.
{
 "email": "John Doe",
 "xyz": "abc"
}
When we base64UrlEncode the above payload data we will get eyJuYW1lIjoiSm9obiBEb2UiLCJhbW91bnQiOjUwMCwieHl6IjoiYWJjIn0 the second part of our JWT token.
Following are some standard claims: Wikipedia
Issuer (
iss) - identifies principal that issued the JWT;Subject (
sub) - identifies the subject of the JWT;Audience (
aud) - The "aud" (audience) claim identifies the recipients that the JWT is intended for. Each principal intended to process the JWT must identify itself with a value in the audience claim. If the principal processing the claim does not identify itself with a value in theaudclaim when this claim is present, then the JWT must be rejected.Expiration time (
exp) - The "exp" (expiration time) claim identifies the expiration time on or after which the JWT must not be accepted for processing. The value should be in NumericDate[10][11] format.Not before (
nbf) - Similarly, the not-before time claim identifies the time on which the JWT will start to be accepted for processing.Issued at (
iat) - The "iat" (issued at) claim identifies the time at which the JWT was issued.JWT ID (
jti) - case sensitive unique identifier of the token even among different issuers.
3rd part is SIGNATURE:
It is calculated by base64url encoding of header and payload and concatenating them with a period as a separator. Then encrypt it with HMAC-SHA256 along with the secret key and the result of the first step.
key           = 'secretkey';
unsignedToken = encodeBase64Url(header) + '.' + encodeBase64Url(payload);
signature     = HMAC-SHA256(key, unsignedToken) // As mentioned in header section.
When we perform the above steps we will get 54W-Y-Xz6xKgSnbQ7Se7tK5hcbXIvjsZ47u6CnQxjag the third part of our JWT token
Do check out JWT.IO for the creation of JWT token online.
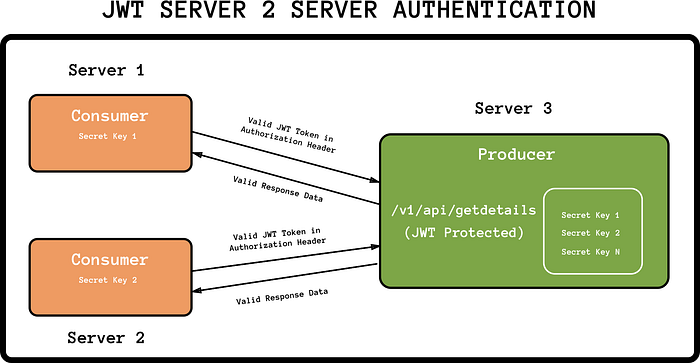
Producer and Consumer concept of API’s 😎
There are two parties involved, one party who gives a service, and the other party who uses the service.
Producer is the one who gives a service. It will be the provider(Server) of the API(s) which are JWT protected.
Consumer is the one who uses it. It will be the customer(Server/Mobile App/ Web App/ Client) who will be providing the valid JWT token to consume the API(s) being provided by the Producer.
In server 2 server authentication both the parties need to share the custom contract for specific API based or for all the API(s). This contract can consist of any custom clause that you want to introduce. For example here is the below custom contract that we will be using for our example
1. Share the SECRET: This is the responsibility of the Producer side to share the mutual secret. This secret will be required to verify the token at the Producer end and the same secret will be used to create the token at the respective consumer side.
2. Prepare the PAYLOAD: Consumer should encode all the data (body or query or params) in the payload of the JWT token (you can choose specific fields that need to be present in the payload of JWT but I would suggest to wrap all the data). We will exact this at producer end to verify that the data is the same in the token payload and the request API.
i.e: GET call to `/v1/api/getdetails?email=rachitgulati26@gmail.com` should have JWT payload
{
   email: 'rachitgulati26@gmail.com'
}
and the request.query is also the same as above.
3. GET the TOKEN: The token should be present in the header with name jwt-token (you can choose your custom name or send it in authorization header after all it’s custom contract). Also, the best practice is to send it via Authorization Bearer scheme.
The best HTTP header for your client to send an access token (JWT or any other token) is the
Authorizationheader with theBearerauthentication scheme.
4. Idenitify the CONSUMER: We just need one last thing and that is to identify our consumer. This we can do it in either way by setting iss: CONSUMER_NAME standard claim in the payload or by sending another header jwt-consumer: CONSUMER_NAME. We will be using the latter one.
CONSUMER’S JOBS:
import axios from 'axios'; // npm install axiosconst jwt = require('jsonwebtoken'); // npm install jsonwebtoken
const PRODUCER_URL = 'https://<BASE_URL>/v1/api/getdetails';/************KEEP IT SAFE ******************/
// Keep it in ENV and get it like process.env.(secret|clientName) ;
const secret = 'hello-reader';
const clientName = 'consumer-1-erx97812'
/**************END****************/const getUserDetails = (email) => {
const params = {
};
// Sign everything here for be body(POST, PUT etc) or params(GET, POST, etc).
/***************TOKEN CREATION ***************/
const token = jwt.sign({...params}, secret);
// BODY as well: ex: jwt.sign({...params, ...body }, secret);
/****************END**************/
const options = {
params,
headers: {
'jwt-token': token, // Setting token in header
'jwt-consumer': clientName, // Consumer identity
},
};
// Anyway you like to call external API. I prefer axios.
const response = axios.get(PRODUCER_URL, options);
return response.data;
}
PRODUCER’S JOBS:
import _ from 'lodash'; // npm install lodashconst router = express.Router();
const jwt = require('jsonwebtoken'); // npm install jsonwebtokenexport const API_HEADERS = {
  JWT_TOKEN: 'jwt-token',
  JWT_CONSUMER: ' jwt-consumer'
};const MESSAGES = {
 NOT_FOUND: 'Valid headers not present ',
 TOKEN_EXPIRES: 'Download token expired',
 USER_NOT_FOUND: 'User with given email doesn\'t exist',
 NOT_VALID_CLIENT: 'Not a valid client',
};
/***************SECRETS***************/// I would prefer to keep in database if it is more than > 5. Else // keep it in environment.const SECRETS = {
  'consumer-1-erx97812': 'secret1',
  'consumer-2-i32eecx2': 'secret2',
}
/***************END***************/// Middleware for JWT Verifierexport const JWTVerifier = async (req, res, next) => {
  const jwtToken = req.headers[API_HEADERS.JWT_TOKEN];
  const jwtConsumer = req.headers[API_HEADERS.JWT_CONSUMER];
  const payload = {};
  if (!jwtToken || !jwtConsumer) {
    return res.status(400).json({ message: MESSAGES.NOT_FOUND });
  }try {
    const secret = SECRETS[jwtConsumer];
    if (!secret) {
      return res.status(403).json({ message: MESSAGES.NOT_VALID_CLIENT });
    }
    _.merge(payload, req.query, req.body);
    try {
      jwt.verify(jwtToken, secret);// Verify only token not data.
      const decoded = jwt.decode(jwtToken, { complete: true });
      // Verifying the data sent inside the token should be same as payload.
      if (!_.isEqual(decoded.payload, payload)) {
        return res.status(403).json({ message: MESSAGES.NOT_VALID_PAYLOAD });
      }
      return next();
    } catch (err) {
      return res.status(403).json({ message: MESSAGES.NOT_FOUND });
    }
  } catch (error) {
    return next(error);
  }
};router.get('/v1/api/getdetails', JWTVerifier, (req, res, next) {
  var customData = {
    'abc@gmail.com': {
      name: 'rachit',
      dob: '26/07/1993'
    },
    'xzy@gmail.com': {
      name: 'suchit',
      dob: '09/09/1996'
    }
  }
  const user = customData[req.query.email];
  if(user) res.json({ user });
  res.json({ message: MESSAGES.USER_NOT_FOUND})
})
Now we understand what is JWT and how we can use it to authenticate our Server-Server communication 🙌. Thanks to our <JWT>.
Wanna check the first blog post for this series ?.
Please feel free to tweet me @squiroid with any questions, feedback, etc :)
If you like my post and want me to write more, please click on 👏 to give me some appreciation and love ❤️.