Let’s Build a CRM using Laravel Passport — Installing Passport
Today we’re going to install Laravel and Laravel Passport. Then take a look at configuring them to our needs.
Welcome to lesson one, as with every series we need to do some set-up. In this lesson we’re going to install a new Laravel project and then install Laravel Passport. After that we’re going to do some configuring so that everything is ready for the next lesson.
So, let’s get down to it and install Laravel with a simple command. (Official docs)

We’ve all done this time and time again, so we’ll cover the basics nice and quick. Before we go much further, we’re going to pull in Laravel Passport and then install our node modules in one go.
In the current version of the Laravel framework, there are a number of post-install commands that are run for us. This includes copying the .env.example file to .env and then running php artisan key:generate. If these did not run automatically for you, then you will need to do this step before proceeding.

Great, now that that’s done we can actually get into the files and do some setup.
The authentication structure
First of all, like every SaaS out there, we’re going to need to have users that have authentication. Time to build the whole registration / login / authentication system…

Setting up our database connection
Now that that gruelling task is over, let’s take a look at getting our environment variables set up to connect to our local database. To do this, we need to open up the .env file that was created when we first made the new project.
I have set my file up to connect at my local database with the default for WAMP, root and no password. Obviously, you should connect this to the default for your development environment.
Now that we’ve done that, Vanilla Laravel is all set up and we can start the fun part, setting up Laravel Passport. There are many ways to go through this, you can go through the docs (strongly recommended), listen to what I have to say (recommended), or just wing it (not recommended for someone new to OAuth2.0, but a good source dive).
Migrating our database tables
The first thing we’re going to need to do is migrate our database tables. Passport will provide you with a number of tables for the OAuth2.0 server to work, including tables for authorised clients, tokens etc.


As you can see above, we have our basic Laravel user database table created, along with a number of tables prefixed with oauth_ which will be used by Passport.
Installing Passport
Now that we have some database tables, we need to actually install Passport so that we can interact with it and it can do all of its security. To do this, we need to run one more command.

By running the above command, Passport will install a public and private key to your /storage directory in the root of your Laravel project and enter two OAuth clients into the respective table. Each of these clients have their own purpose which we will discuss below.
Personal Access Client
The personal access client is necessary for this tutorial as the access tokens that can be generated will allow us to interact with our API with various tools. These access tokens essentially allow you to authenticate with your API without having to go through the whole OAuth2.0 handshake with your own app and can be used in place of a username and password. This grant will not require a username and password to receive a bearer token once granted.
Password Client
The password client is utilised mainly in trusted applications that authenticate with your system, the typical use case for this client is internal consumption (covered in this tutorial) and potentially a mobile app where the user can login and interact with your API. This grant will require a valid username and password every time to receive a bearer token.
Registering Passport
Finally it’s time to do what we do best; Code.
Passport comes with a number of routes to handle the OAuth2.0 handshake, along with a JSON API to interact with your clients and tokens. We need to tell Laravel to include these in our Auth service provider. To do this, we need to navigate to our \App\Providers\AuthServiceProvider file and add the following into our boot() method:

Authenticating our users
Now that we have our routes to interact with the OAuth2.0 services, we need to tell Laravel that our users can be authenticated using these OAuth2.0 tokens that I mentioned in the previous section.
To do this there is two steps, first we will need to configure Laravel’s authentication guards for any API requests to use the driver that comes with Passport. This will allow us to use Bearer tokens for external requests and JWT tokens for requests sourcing from inside our own application.
We need to navigate to our /config/app.php file and find the guards key. You will see two key value pairs inside that, web and api. As we’re building an API in this series, we’ll look at that one. The default driver is the token driver that will look for an api_token in your requests. We need to update this so that Passport can handle the authentication for all API requests from now on.
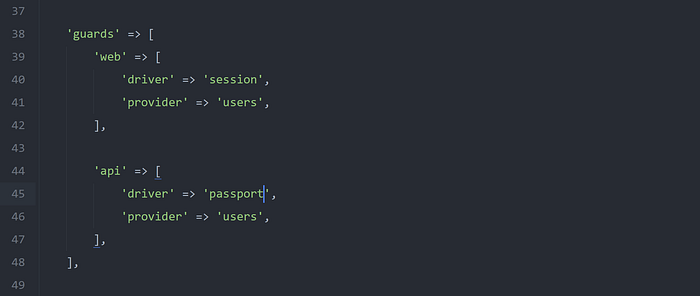
We are going to want to leave the provider key for now, this is a Laravel default configuration instructing it to use the Eloquent model for \App\User.
Secondly, the Passport driver requires a few methods to be accessible via the \App\User model so that it can properly authenticate it. As usual with a Laravel application, Taylor Otwell has thought of everything and made it nice and easy for you.
Head over to your app/User.php file and add the following trait to your User model:

Good news
You’ve reached the end of lesson one! In this lesson we have set up a fresh Laravel project and installed/configured Passport so that it is now ready to use. In the following episode we will cover how you can access your API during development.
Check out the source code for this lesson here.
Thank you for reading, we’ll pick this up again soon.
Follow me on Medium and Twitter to stay updated on the series.