Native Google Maps and Geolocation ionic
Implementing google maps in an ionic app can be very useful for a number of apps, like uber. So in this tutorial i will show you how to implement native google maps and geolocation in your ionic app.
Setting up the project
To generate a new ionic project, run the following command in the ionic cli:
ionic start googleMap blank
navigate into the project:
cd googleMap
If you check the folder you should see a src folder. Navigate into it, you should see pages, we will be using the home page inside the pages folder to display our map.
Getting API key
To load the ionic native google map plugin, we must first get an API key from google.
- Go to console.developers.google.com, sign in and create an app
2. Go to your dashboard and click on enable api

3. Click on Google Maps android Api for android and Google Maps SDK for ios

4. Click on enable

5. Click on Credentials at the side

6. Click on Create credentials

7. Click on Api Key

8. Copy the API key

Adding Google map plugin to ionic
To install the plugin run the following code on the command line and put in your api key
$ ionic cordova plugin add https://github.com/mapsplugin/cordova-plugin-googlemaps#multiple_maps --variable API_KEY_FOR_ANDROID="YOUR_ANDROID_API_KEY_IS_HERE" --variable API_KEY_FOR_IOS="YOUR_IOS_API_KEY_IS_HERE"Then we need to install the ionic native wrapper which wraps our cordova plugin

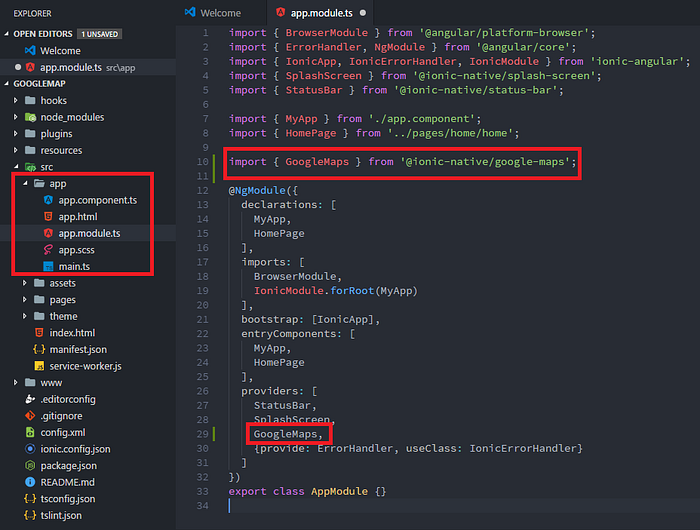
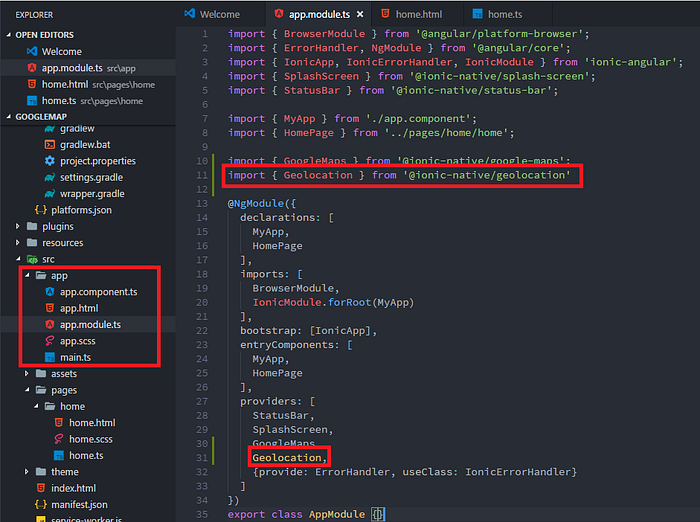
Navigate to your app.module.ts file under app folder. Import GoogleMaps from @ionic-native/google-maps and add it to the providers. As shown below
Creating the map
Now that the ionic native plugin has been set up, we can now create the map. Lets start by adding a map to the home page:
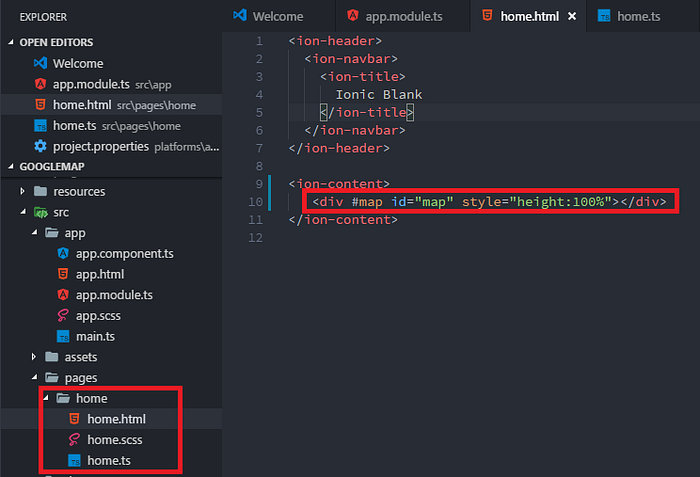
We have a div to act as the placeholder for the map with an id of map and a height of 100%, because without the height the map will not be visible. Adding #map allows us to access a reference to its ViewChild later.
We need to modify the home.ts file to generate a map :
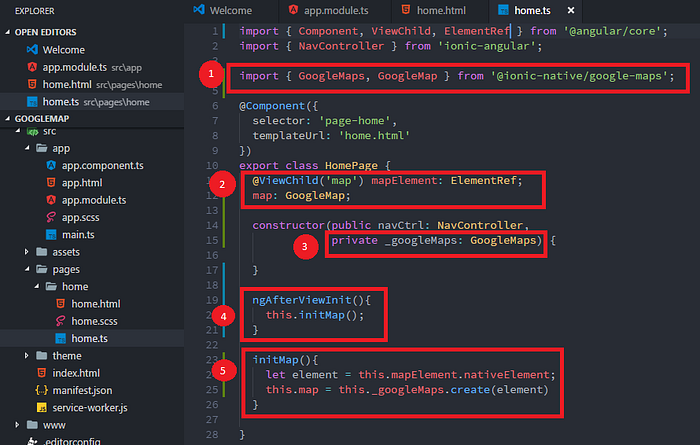
- import GoogleMaps and GoogleMap into home.ts
- Create a member variable map to hold the map and also another member variable mapElement that references the map element. Remember to import ViewChild and ElementRef from @angular/core.
- Creating google maps object
- Load the map after the view has been initialized.
- Create a google map with the element and save it in the map variable.
You should see the following when you run on device. To run the app on your device, make sure your device is connected and usb debugging is turned on. Then type the following in the cli:
ionic cordova run android
You should see the map:
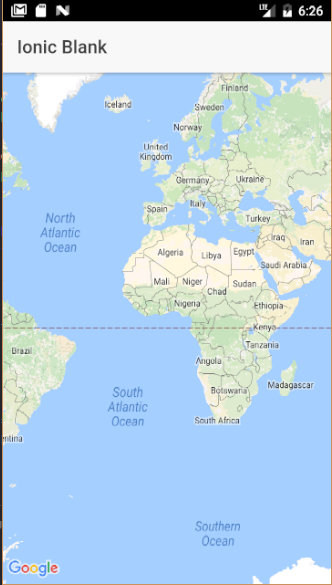
It is not currently focused at any location because we haven’t specified a location yet, hence it shows the full map.
Note:- If you have an error of this kind
error: cannot access AbstractSafePa rcelable Builder builder = LatLngBounds.builder();
Read this to fix it
Also this map will not work on the browser only on native devices.
Geolocation
This provides information about a device’s location such as the longitude and the latitude
Add Geolocation plugin
Enter the following command to install the plugin

We need to install the ionic native wrapper

Add Geolocation to providers at app.module.ts
After setting up the plugin we need to modify the home.ts file with the following code:
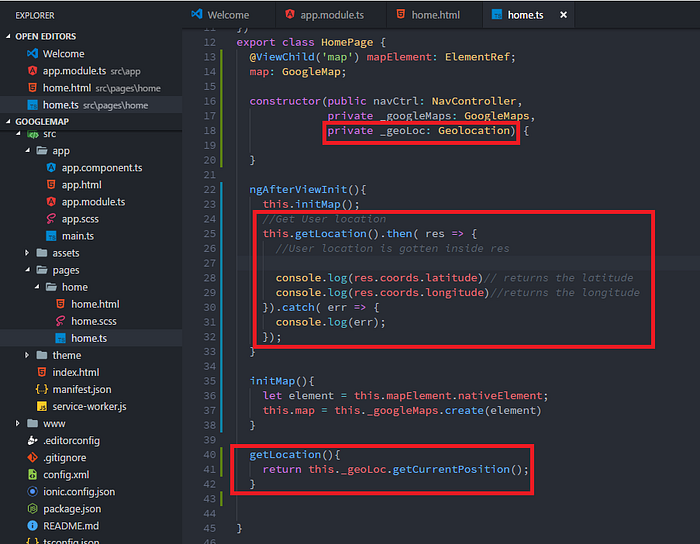
Note:- Remember to import Geolocation from @ionic-native/geolocation at the top
We first create a geolocation object called _geoLoc, we then call the function getLocation within the function we return the result of getCurrentPosition ,which returns a promise. When the promise resolves it returns an object which has the current location of the device.
Note:- Getting the location is asynchronous , hence it takes a while before it gets the location.
Change the map location
To change the view of the map we need to move Camera of the map and position it to the location we want.
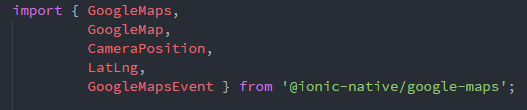
We need to add these to the import
To change the map camera view we need call a method on the map, Copy the following code into your home.ts file :
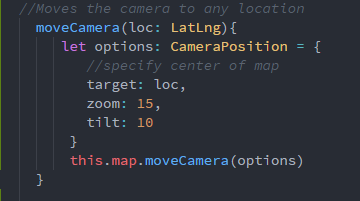
The function moveCamera moves the camera to any location specified in its parameter. The parameter is of type LatLng which is just a class that has latitude and longitude properties. The variable options contains the settings for the map like target which specifies the center of the map given a particular location, zoom specifies how far or near the map is to the viewer. We pass these settings to the moveCamera method of the map which moves the camera to the specified location.
Now add the following lines of code to ngAfterViewInit:
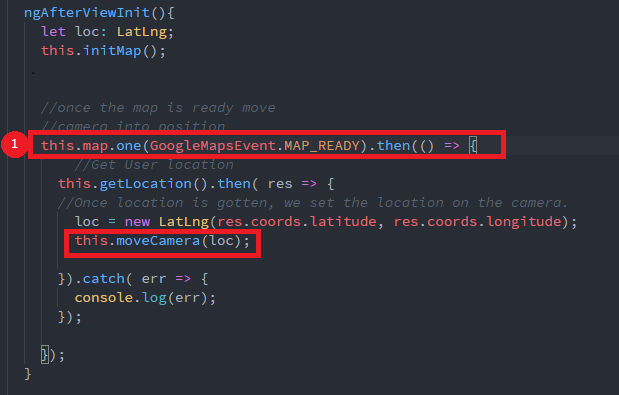
- This checks if the map is ready and returns a promise.
When the map is ready , then we get the user’s location and store the result in a variable loc which is a new instance of LatLng. We pass loc as an argument to the function moveCamera we created earlier, which moves the camera to the user’s location.
Note:- Getting the user’s location is asynchronous, hence the map will not be positioned at first but when the location is gotten it will move the camera. If you don’t want that, you can add a loader to it.
Adding Markers
Markers are very useful to highlight a spot on the map and is one of the most used features of the map. In this section i will be teaching you how to add markers to your map. We will place a marker on the user’s position we got.
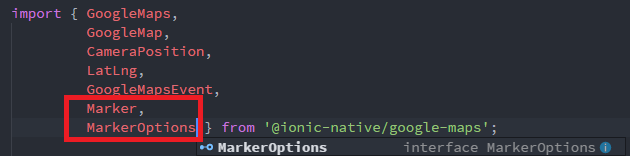
We need to add these imports :
We will create a function which will create a marker, with the following lines of code.
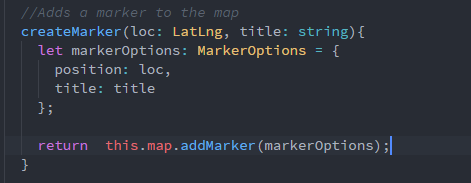
The function is taking two parameters loc and title. MarkerOptions contains all the configurations for your marker. We use the position to specify where we want the marker to show up and title to specify the message on the info window. We call addMarker on the map and pass the markerOptions to it. It will return a promise.
We will call the function when the map is ready, this is the best time to add anything to the map.
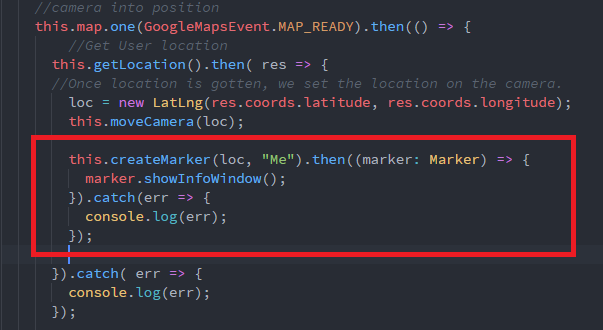
We call the function here. It returns an instance of the marker when the promise resolves. We can then call showInfoWindow to show the infoWindow on the marker.
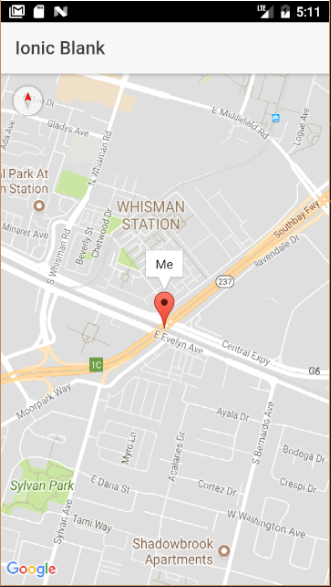
If you followed the instructions carefully you should have this result on your device:
Summary
This is a basic introduction to google maps for ionic but it covers a lot of the fundamentals e.g markers, geolocation, camera. Thank you for reading this blog, hope it helped a lot. You can access the code at the link below
Also check out my other blogpost on Styling Google Maps
https://medium.com/@falomoore/styling-native-google-maps-in-ionic-ae453326f19

