Nuxt Authentication from Scratch
I would like to name this tutorial like «Simple Nuxt Authentication» or something else with the word simple in the title, but this topic is not simple. At least, it does not go just out of the box.
For the beginner I would suggest to use the library like https://github.com/nuxt-community/auth-module, but what if some extended logic required here? That may be the social network authentication or some custom user less one-time-token access. In case of a complex application I would rather write the authentication module by myself and get extendable and customizable solution. I’ll show how to do that in this tutorial.
What we will get
We will build the simple vue/vuex/nuxt website with server side rendering that consists on 3 pages: the public page, the page with the login form and the private page, accessible only by authenticated user. Also we’ll build simple node/express/mysql backend to get everything work. We’ll add google+ authentication as the last step.
How to follow the progress
Every step fits to the appropriate commit from the repo I created specially for this tutorial. If you meet any difficulties, check out and get the working solution.
The Backend
This part does not relate to nuxt or vue, it’s about node/express/mysql simple backend to support the application. You can skip this section if you prefer to use firebase or if you are experienced enough to build the backend by yourself.
Please set up mysql server, create the user and the database and make sure you have the recent node installed (I use v9.2.0). Add this table to the database (the user password is bcrypted 123123):
START TRANSACTION;
SET time_zone = "+00:00";
CREATE TABLE `users` (
  `id` int(11) NOT NULL,
  `email` varchar(255) NOT NULL,
  `password` varchar(255) NOT NULL,
  `created_at` datetime NOT NULL
) ENGINE=InnoDB DEFAULT CHARSET=utf8;
INSERT INTO `users` (`id`, `email`, `password`, `created_at`) VALUES
(1, 'admin@test.com', '$2a$10$pyMYtPfIvE.PAboF3cIx9.IsyW73voMIRxFINohzgeV0I2BxwnrEu', '2018-01-21 00:00:00');
ALTER TABLE `users`
  ADD PRIMARY KEY (`id`),
  ADD UNIQUE KEY `email` (`email`);
ALTER TABLE `users`
  MODIFY `id` int(11) NOT NULL AUTO_INCREMENT, AUTO_INCREMENT=2;
COMMIT;
#0 Step: initial commit
Clone this repo and check out to the first commit. It has the backend folder with config.sample.js inside. Copy it to config.js and fill you database credentials, fill jwtToken string with random characters.
#1 Step: setting up the backend
We’ll use the following packages: express, body-parser (to get the response in json format), mysql, bcrypt (to obfuscate passwords, stored in the database) and jsonwebtoken (to create token that contains some public user info):
> cd backend && npm i --save express body-parser mysql bcrypt jsonwebtokenCreate index.js backend entry point with the following content:
backend/index.js:const mysql = require('mysql')
const express = require('express')
const bodyParser = require('body-parser')
const config = require('./config')const db = mysql.createConnection(config.db)
const app = express()
app.use(bodyParser.json())
app.use(bodyParser.urlencoded({
  extended: true
}))app.get('/test', (req, res) => {
  db.query('select 1+1', (error, results) => {
    if (error) return res.status(500).json({type: 'error', error})
    res.json({type: 'success', message: 'Test OK', results})
  })
})app.listen(config.port)
console.log('App is running on port ' + config.port)
Run the server with node index.js command and follow the /test url. If everything works, you should get the following result:
{"type": "success", "message": "Default API route lives here.", "results": [{"1+1": 2}]}#2 Step: backend authentication
We’ll keep the routes about authentication in the separate auth.js file. That’s how we’ll connect it to the index.js:
backend/index.js:const jwt = require('jsonwebtoken')
const bcrypt = require('bcrypt')
const auth = require('./auth')
...
app.use('/auth', auth({db, express, bcrypt, jwt, jwtToken: config.jwtToken}))
Let’s start writing auth.js. We’ll have two routes — POST request to /login should contain login and password, will check the credentials and return authentication token if success; GET to /me will check the token and return user data:
backend/auth.js:module.exports = ({db, express, bcrypt, jwt, jwtToken}) => {
  const routes = express.Router()  routes.post('/login', (req, res) => {
    const email = req.body.email
    const password = req.body.password
    if (!email || !password) return res.status(400).json({type: 'error', message: 'email and password fields are essential for authentication.'})
    ...
  })  routes.get('/me', (req, res) => {
    const token = req.headers['x-access-token']
    if (!token) return res.status(400).json({type: 'error', message: 'x-access-token header not found.'})
    ...
  })  return routes
}
We store crypted passwords in the database, and use bcrypt to check if the password is valid in /login route. If it is, we generate the token that contains user id and email with jsonwebtoken library:
backend/auth.jsdb.query('select * from `users` where `email`=?', email, (error, results) => {
  if (error) return res.status(500).json({type: 'error', message: 'db error', error})
  if (results.length == 0) return res.status(403).json({type: 'error', message: 'User with provided email not found in database.'})
  const user = results[0]
  bcrypt.compare(password, user.password, (error, result) => {
    if (error) return res.status(500).json({type: 'error', message: 'bcrypt error', error})
    if (result) {
      res.json({
        type: 'success',
        message: 'User logged in.',
        user: {id: user.id, email: user.email},
        token: jwt.sign({id: user.id, email: user.email}, jwtToken)
      })
    } else res.status(403).json({type: 'error', message: 'Password is incorrect.'})
  })
})
Here’s how we check if the token is valid in /me route:
backend/auth.js:jwt.verify(token, jwtToken, (error, result) => {
  if (error) return res.status(403).json({type: 'error', message: 'Provided token is invalid.', error})
  return res.json({
    type: 'success',
    message: 'Provided token is valid.',
    result
  })
})
We could use postman to check if everything works, that’s the example of valid request:
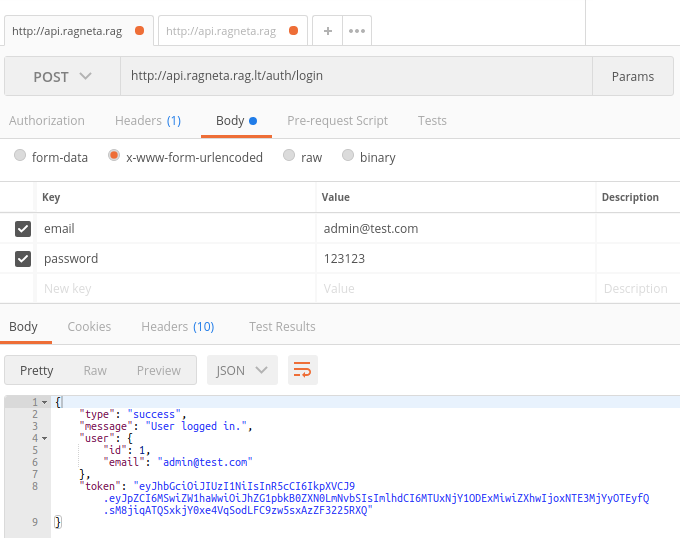
The Frontend
#3 Step: setting up the frontend
We’ll use vuetify.js for better look, let’s start with clonning Nuxt.js + Vuetify.js starter project template:
vue init vuetifyjs/nuxt frontend
cd frontend
npm i
npm run dev
We’ll keep greetings page from the starter template as it is, this will be our public page (the page that’s accessible by non-authenticated user).
#4 Step: adding login and admin pages
Let’s add nuxt-links somewhere on the main page:
frontend/pages/index.vue:<v-btn color="primary" flat nuxt to="/login">Log In</v-btn>
<v-btn color="primary" flat nuxt to="/admin">Admin</v-btn>
Admin page will just show authenticated user’s email (if the user is logged in, it should not be available for non-authenticated user, we’ll add the restriction later):
frontend/pages/admin.vue:<template>
  <v-layout column justify-center align-center>
    <v-flex xs12 sm8 md6>
      <v-card>
        <v-card-title class="headline">Admin page</v-card-title>
        <v-card-text>
          <p v-if="user">Hello, {{user.email}}</p>
          <p v-else>The user is not authenticated!</p>
        </v-card-text>
        <v-card-actions>
          <v-spacer/>
          <v-btn color="primary" flat nuxt to="/">Main Page</v-btn>
        </v-card-actions>
      </v-card>
    </v-flex>
  </v-layout>
</template><script>
export default {
  computed: {
    user () { return (this.$store.state.auth || {}).user || null }
  }
}
</script>
Login page will use fullscreen template (we want to show just a form on a blank screen):
frontend/layouts/fullscreen.vue: <template>
  <v-app>
    <v-container fill-height>
      <nuxt/>
    </v-container>
  </v-app>
</template>frontend/pages/login.vue:<template>
  <v-layout justify-center align-center>
    <v-card class="elevation-10" style="flex: 0 1 400px">
      <v-card-title class="headline">Log In</v-card-title>
      <v-card-text>
        <v-form @submit.prevent="submit">
          <v-alert v-if="alert" :type="alert.type" value="true">{{alert.message}}</v-alert>
          <v-text-field label="Email" v-model="email"/>
          <v-text-field label="Password" v-model="password" type="password"/>
          <v-btn type="submit" :loading="loading" :disabled="loading">Log In</v-btn>
        </v-form>
      </v-card-text>
    </v-card>
  </v-layout>
</template><script>
export default {
  layout: 'fullscreen',
  data () {
    return {
      email: '',
      password: '',
      alert: null,
      loading: false
    }
  },
  methods: {
    submit () {
      ...
    }
  }
}
</script>
For now we should be able to browse main, admin and login pages without any restriction.
#5 Step: preparing the vuex store and logging in
That’s good idea to keep all api requests in one place. And the store is the good place for that. We’ll not use api requests directly from components and pages, but dispatch an action to the store instead. And two more rules I advise to follow in any vue + vuex application:
- Any action should return a promise;
- Do not use mutations directly (only actions can commit anything to the store).
That’s our store/auth.js:
frontend/store/auth.js:import api from '~/api'export const state = () => ({
  user: null
})export const mutations = {
  set_user (store, data) {
    store.user = data
  },
  reset_user (store) {
    store.user = null
  }
}export const actions = {
  fetch ({commit}) {
    return api.auth.me()
      .then(response => {
        commit('set_user', response.data.result)
        return response
      })
      .catch(error => {
        commit('reset_user')
        return error
      })
  },
  login ({commit}, data) {
    return api.auth.login(data)
      .then(response => {
        commit('set_user', response.data.user)
        return response
      })
  },
  reset ({commit}) {
    commit('reset_user')
    return Promise.resolve()
  }
}
All api requests collected in the api/index.js file like that:
frontend/api/index.js:import axios from 'axios'export default {
  auth: {
    me: () => axios.get('auth/me'),
    login: (data) => axios.post('auth/login', data)
  }
}
Now we can complete the submit action from the login page (yes, we have to add axios into the project as well):
frontend/pages/login.vue:submit () {
  this.alert = null
  this.loading = true
  this.$store.dispatch('auth/login', {
    email: this.email,
    password: this.password
  }).then(result => {
    this.alert = {type: 'success', message: result.data.message}
    this.loading = false
    this.$router.push('/admin')
  }).catch(error => {
    this.loading = false
    if (error.response && error.response.data) {
      this.alert = {type: 'error', message: error.response.data.message || error.reponse.status}
    }
  })
}
And.. it will not work, because we haven’t set up the axios yet. We have to define the baseURL (notice that the setting is baseURL, not baseUrl), and also we’ll substitute x-access-token header for future requests later. Let’s create the plugin for that. It will be placed into the api/init.js because it’s related to the api. There we’ll define axios.default.baseURL. We can use different environment settings for development/test/production, for now just create frontend/config.js file (copy it from config.sample.js) and specify baseURL variable to be the location of your backend.
frontend/config.js:export const baseURL = '...specify your backend url here...'frontend/api/init.js:import axios from 'axios'
import {baseURL} from '~/config'axios.defaults.baseURL = baseURL
Of course, we have to add the plugin to the nuxt.config.js as well:
frontend/nuxt.config.js:

plugins: [
  '~/plugins/vuetify.js',
  '~/api/init.js'
]
Check if it works now. You should be able to follow the /login url and send the form. Error messages (if any) should appear over the form. Success message should appear as well, and right after that the browser should be redirected to the /admin page with Hello, admin@test.com message:
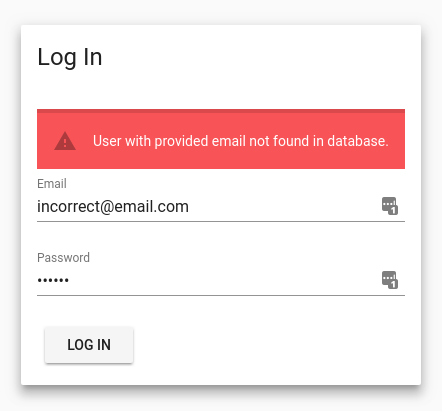
Of course, that’s just a single request, we don’t store the session cookie and don’t support the following axios requets with it. Let’s append admin.vue page with this simple check:
frontend/pages/admin.vue:<v-btn color="primary" flat @click="$store.dispatch('auth/fetch')">Check Me</v-btn>
Ups. The click on Check Me button gives 400 error and resets the user.
The cookie theory
That’s the main part. Before this we haven’t actually used nuxt and ssr, and now it’s time to. We have to store the auth token somewhere at the client, and this will be cookies. We can’t use local storage, because the browser does not send them in request, it’s not visible on server side from the nuxt server. Also we’ll push the token into the axios setting on client side so that every next request before page reload will pass the authentication. And then, on nuxt server side initialization, we have to retrieve the cookie header and pass it into the axios config on server side before any other fetch / asyncData requests will go.
We’ll use js-cookie and cookie packages. They are different. The first one works on client side, we’ll use it to set and clear the cookie in the browser. The second one will parse the cookie header on server side.
#6 Step: working with cookies on client side
Let’s start with
cd frontend
npm i js-cookie cookie --save
We’ll use a couple of utility functions stored in utils/auth.js:
frontend/utils/auth.js:import axios from 'axios'export function setAuthToken (token) {
  axios.defaults.headers.common['x-access-token'] = token
}export function resetAuthToken () {
  delete axios.defaults.headers.common['x-access-token']
}
Let’s inject them into the auth store now:
frontend/store/auth.jsimport {setAuthToken, resetAuthToken} from '~/utils/auth'
import cookies from 'js-cookie'
...
login ({commit}, data) {
  return api.auth.login(data).then(response => {
    commit('set_user', response.data.user)
+   setAuthToken(response.data.token)
+   cookies.set('x-access-token', response.data.token, {expires: 7})
    return response
  })
},
reset ({commit}) {
  commit('reset_user')
+ resetAuthToken()
+ cookies.remove('x-access-token')
  return Promise.resolve()
}
Now we can log in, and the click on Check Me button at the admin page works correctly because axios now has the valid x-access-token header. If it does not work (especially if the api lives on the separate domain), check the response headers, Access-Control-Allow-Origin should include the front end url (e.g. localhost), Access-Control-Allow-Headers should contain x-access-token.
Add the log out action to the admin page:
frontend/pages/admin.vue: <v-btn color="primary" flat @click="logOut">Log Out</v-btn>
...
logOut () {
  this.$store.dispatch('auth/reset').then(() => {
    this.$router.push('/')
  })
}
This also works. We can log in, then click on Check Me (make the request to /me that requires authenticated user), and then log out.
Assume that we load the page and it has x-access-token cookie. This case we have to set it inside the axios settings as well, let’s do it in the api/init.js:
frontend/api/init.js:import axios from 'axios'
import {baseURL} from '~/config'
import cookies from 'js-cookie'
import {setAuthToken, resetAuthToken} from '~/utils/auth'axios.defaults.baseURL = baseURLconst token = cookies.get('x-access-token')if (token) setAuthToken(token)
else resetAuthToken()
#7 Step: working with cookies on server side
There’s magic nuxtServerInit action, it should be stored inside store/index.js. It should return a promise. We’ll use it to parse x-access-token header and check if the provided token is valid:
frontend/store/index.js:import cookie from 'cookie'
import {setAuthToken, resetAuthToken} from '~/utils/auth'export const actions = {
  nuxtServerInit ({dispatch}, context) {
    return new Promise((resolve, reject) => {
      const cookies = cookie.parse(context.req.headers.cookie || '')
      if (cookies.hasOwnProperty('x-access-token')) {
        setAuthToken(cookies['x-access-token'])
        dispatch('auth/fetch')
          .then(result => {
            resolve(true)
          })
          .catch(error => {
            console.log('Provided token is invalid:', error)
            resetAuthToken()
            resolve(false)
          })
      } else {
        resetAuthToken()
        resolve(false)
      }
    })
  }
}
Any fetch / asyncData methods called after nuxtServerInit, that’s why all the following axios requests on server side will contain the token.
#8 Step: pages with restricted access
We want to restrict an access to the admin page for non-authenticated user. There’re several ways to do that. For example, we can add this code to a protected page:
export default {
  fetch ({store, redirect}) {
    if (!store.state.auth.user) {
      redirect('/login')
    }
  }
  ...
}
But what if we have several protected routes and do not want to copy & paste this code to every one? Let’s use vue-router middleware, we’ll check the route against the url templates like that:
frontend/middleware/auth.jsexport default function ({store, redirect, route}) {
  const userIsLoggedIn = !!store.state.auth.user
  const urlRequiresAuth = /^\/admin(\/|$)/.test(route.fullPath)
  const urlRequiresNonAuth = /^\/login(\/|$)/.test(route.fullPath)
  if (!userIsLoggedIn && urlRequiresAuth) {
    return redirect('/login')
  }
  if (userIsLoggedIn && urlRequiresNonAuth) {
    return redirect('/admin')
  }
  return Promise.resolve()
}
Then add the middleware to the project:
frontend/nuxt.config.js...
router: {
  middleware: ['auth']
}
Currently we have a working solution. We can log in, then reload admin page and stay being authenticated, make check request and log out as well.
Sign in via Google
The first step here will be registering the app in google developers console, creating OAuth 2.0 credentials and filling the backend/config.js with your client id and client secret. Also fill client/config.js with the client id. Then install googleapis.
#9 Step: google auth backend
We’ll create a new route in the auth.js to handle request with token, received from google:
backend/auth.js:routes.post('/google', (req, res) => {
  if (!req.body.token) return res.status(500).json({type: 'error', message: 'No access token provided.'})
  const OAuth2 = google.auth.OAuth2
  const oauth2Client = new OAuth2(config.google_client_id, config.google_secret_id)
  const plus = google.plus('v1')
  oauth2Client.setCredentials({
    access_token: req.body.token
  })
  plus.people.get({
    userId: 'me',
    auth: oauth2Client
  }, (error, response) => {
    if (error) return res.status(500).json({type: 'error', error})
    const emails = (response.data || {}).emails
    if (!emails || emails.length == 0) return res.status(500).json({type: 'error', message: 'No email in google'})
    ...
  })
})
Now, if everything is ok, we have the current user email. We can do a number of things with it, for example, if there’s no registered user with that email, we can add it (complete the registration) and redirect to the profile form asking the user to fill some data.
For now we’ll just check the provided email and sign in if the user registered.
backend/auth.js: db.query('select * from `users` where `email`=?', emails[0].value, (error, results) => {
  if (error) return res.status(500).json({type: 'error', message: 'db error', error})
  if (results.length == 0) return res.status(403).json({type: 'error', message: 'User with email from google+ not found in database.'})
  const user = results[0]
  return res.json({
    type: 'success',
    message: 'User logged in through google',
    user: {id: user.id, email: user.email},
    token: jwt.sign({id: user.id, email: user.email}, config.jwtToken, {expiresIn: '7d'})
  })
})
#10 Step: google auth frontend
Add the link to google api backend:
frontend/api/index.js:google: (data) => axios.post('auth/google', data)
Call it from inside the store:
login_google ({commit}, token) {
  return api.auth.google({token}).then(response => {
    commit('set_user', response.data.user)
    setAuthToken(response.data.token)
    cookies.set('x-access-token', response.data.token)
    return response
  })
}
Everything else we’ll do in frontend/pages/login.vue. Add variables for checking the state:
data () {
  return {
    email: '',
    password: '',
    alert: null,
    loading: false,
+   google_loading: false,
+   google_ready: false
  }
}
Then add the button to trigger the google auth:
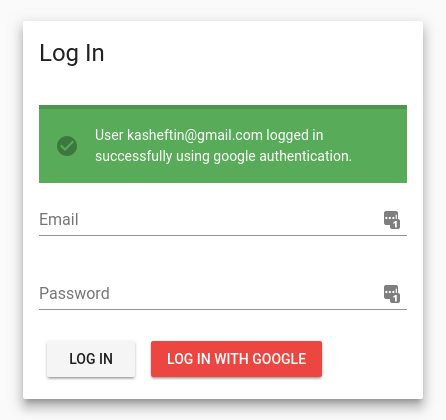
<v-btn color="red white--text" v-if="google_ready" @click="google_submit" :loading="google_loading" :disabled="google_loading">Log in with Google</v-btn>Then add google api loader, it should run on component mount:
import {googleClientId} from '~/config'
...
mounted () {
    window.gapiOnLoadCallback = () => {
      window.gapi.load('auth2', () => {
        window.google_auth2 = window.gapi.auth2.init({
          client_id: googleClientId,
          fetch_basic_profile: false,
          scope: 'profile email'
        })
      })
      this.google_ready = true
    }
    const installGoogleSdkScript = (d, s, id) => {
      if (d.getElementById(id)) {
        this.google_sdk_initialized = true
        return
      }
      let fjs = d.getElementsByTagName(s)[0]
      let js = d.createElement(s)
      js.id = id
      js.src = 'https://apis.google.com/js/platform.js?onload=gapiOnLoadCallback'
      fjs.parentNode.insertBefore(js, fjs)
    }
    installGoogleSdkScript(document, 'script', 'google-jssdk')
  },
Finally, fill google_submit method:
google_submit () {
  if (!this.google_ready) return
  this.alert = null
  this.google_loading = true
  window.google_auth2.signIn()
    .then(() => this.$store.dispatch('auth/login_google', window.google_auth2.currentUser.get().Zi.access_token))
    .then(result => {
      this.alert = {type: 'success', message: result.data.message}
      this.google_loading = false
      this.$router.push('/admin')
    })
    .catch(error => {
      this.google_loading = false
      if (error.response && error.response.data) {
        this.alert = {type: 'error', message: error.response.data.message || error.reponse.status}
      }
    })
}
Do not forget to add your google email to the database to check if it works: