Painting and Rendering Optimization Techniques in Browser
How browsers works and some performance tips!
DISCLAIMER: This article is for those enthusiasts who wants to be a better painter (in the world of browsers) and understand the elegance of painting!
Journey to Render a Web Page
Definitely the first step is — browser requests a page from the server. The server then responds with a HTML page. It contains a bunch of string texts, and has other things that likely we need to GET like — style sheets, JavaScript files etc. That HTML needs to be parsed to figure out what is the actual structure of the page. Hence comes the….
DOM
The Document Object Model. It is the representation of the page in a tree-like structure which contains the various nodes in the page that are present.

Similarly the CSS is a new language itself and needs to be parsed.
CSSOM
The Cascading Style Sheet Object Model. This is also a giant tree of all the rules about how our web page should look. It tells about how this paragraph will look, how this class will look etc etc.

Now that we have DOM and CSSOM ready, now the browser goes ahead to combine these two and make a Render Tree.
Render Tree
The browser combines the DOM and the CSSOM and generates the render tree with the elements that are needed to be displayed. (Remember my golden rules from my previous article?) It contains all the style properties for every nodes of the DOM which are effectively needed to be rendered.

The Render Tree has one-to-one mapping with the visible objects of the page. Therefore no hidden objects, but yes pseudo elements are present for example- :before, :after etc. There might be multiple rules applied to a single element, we need to figure that out here. The process by which we figure that out is called style calculation.
Style Calculation
The browser figures out what styles will be applied to what element. This involves two things —
- Figure out which rule applies to which element- go through CSS specificity and which one came later so on and so forth.
- Figuring out how, what the end of the result of an element with multiple rule is.
The more complicated you are making the selector, the more time it is taking to calculate. Therefore class names are easy rule of thumb. But think about time taken by this:
.menu > .menu-item:nth-child(4n + 1) {/* your styles */}You can imagine how complicated is this and it will take lot longer to calculate. So as an advice stick to simple class names whenever possible, consider using BEM. If multiple selectors tries to apply to a same element, browsers need to figure out who will win — therefore, to speed that up we should not do it! Some key takeaways —
- Reduce the amount of CSS we are shipping
- The less styles we have, the less there is to check
- Reduce the number of styles that effect a given element
Alright, now we have the rules ready and need to put it into the page. Hence, comes the next step.
Layout (a.k.a Reflow)
It looks into the elements and figures out where it needs to go on the page. It will see the sizes and position of the elements and try to calculate the line breaks, placement of each of the elements and the relationship between the elements. It already sounds like a lot of work and is a slow process.
Paint
Now that we know how the things look like and where they should go, we draw some pixels on the screen. Paint actually creates the picture of the layout that needs to be rendered. We are not done yet.
Composite Layer
Creating pictures is one step, but we need to send it to the GPU to process the image so that the screen can display it. You might end up painting multiple layers but you eventually need to combine them.
Things were good till now and then comes our friend
JavaScript
It has the ability to change all of this after the initial load, which in a nutshell means — “You have to do all of the things above yet again!”
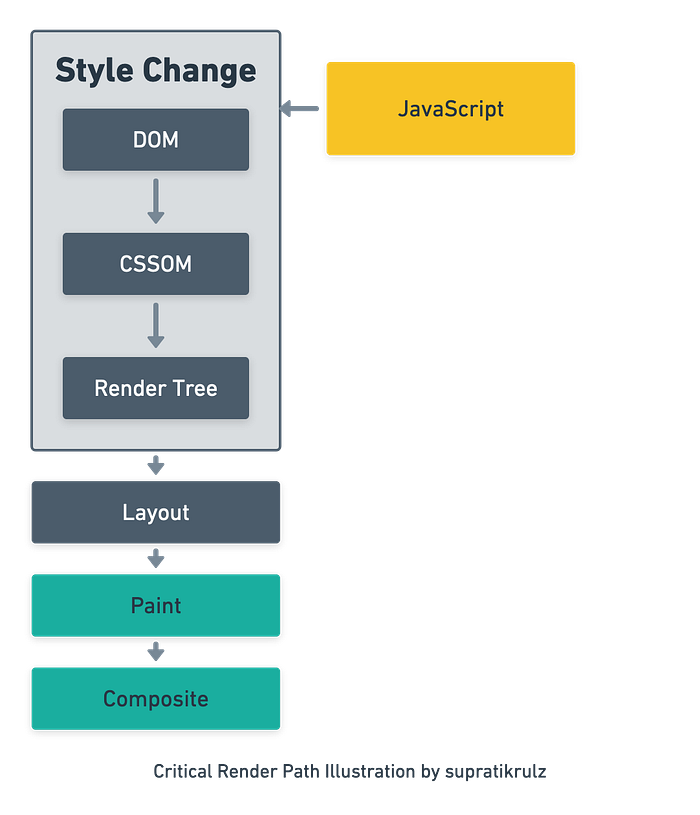
Some of the things JavaScript can do are — change class of a node, change the inline styles, add or remove elements from the page and lots more. The illustration below shows the steps in rendering.
But you don’t always need to do all these stuff every time. Some things can be skipped. In an event like changing the background color or opacity of the element, do we need to re-layout the page? Probably not, right? This section is all about that. Because remember the golden rules — Not doing stuff in this case skipping the process, is better than doing stuff.
Layout and Reflows
“Reflows are very expensive in terms of performance, and is one of the main causes of slow DOM scripts, especially on devices with low processing power, such as phones. In many cases, they are equivalent to laying out the entire page again.” — Opera
When the dimension of the element changes, the browser has to reflow the page. A reflow of an element causes a reflow of its parents and children. Since all of these processes happen to be in the same thread, therefore it makes reflow a blocking operation. It consumes decent amount of CPU. Reflow is definitely noticeable by the user when it happens often — like in a loop or so.
What causes a reflow?
There are bunch of reasons, some of them are —
- Window resize
- Changing font
- Changing content
- Adding or removing style sheet
- Adding or removing classes
- DOM manipulation
- Changing orientation
- Changing size or position
- Calculating size or position(this is unexpected right? Read more)
Guess what, after a reflow there is also a repaint that happens which is also expensive.
How can we avoid reflows?
- Batch DOM manipulations — Using frameworks you get this for free. This is what makes React “React”.
- Avoid modifying inline styles repeatedly
- Change classes at the lowest level of the DOM tree — If you change a container element from lets say 800px wide to 300px, what do you expect? Everything below that will undergo a reflow.
- Avoid table layouts — Consider a width change in column. All the cells underneath that column will undergo a reflow and also the adjacent ones too.
- Trade smoothness for speed if you are doing animations using JavaScript — Ideal frame is 16ms right? Suppose you want to move pixel by pixel with JavaScript, and every time it takes longer than 16ms to render, guess what happens? The animation is junky since you miss the frame.
Demos
Nothing can be explained better than showing demos.
Consider the codepen link here
If you see the code, then you will find that the JavaScript reads the height and then writes the height. Here is the performance analysis of the same below

If you see closely, do you see bunch of purple lines which are repeating itself? Those are the reflows occurring due to bunch of reads and writes. This is very bad, as it increases the frame time. You can see here it’s 35.8ms which is way more than 16ms. Turns out there is a way we can improve this. If we do all the reads at first and then do all the writes, then things become much smoother. See the codepen link.
So if you see the code, you will see I am reading and calculating the height of all the elements before my first write. So previously, there was a recalculation over and over to check if the heights were changed after writing to the DOM, now everything happens all at once and we should see performance boost.

We can clearly see here that the purple lines are continuous and are not jittering. That means we saved a lot of style calculations and repaint. Also we can see the total time to do the animation reduced to just 7.71ms. How cool is that?
But now you may argue that we have many different components and we cannot do the reading and writing separately. But what you can do is you can do all the batch reads first for that component itself and then do batch writes by using requestAnimationFrame. This will ensure that all the writes happens during the next frame of execution and will not hamper the current thread. See the codepen link for the code.

We can see that all the layout calculations due to write are pushed together and does not happens with the read calculations, thus making the code performant.
But if you look closely you will find bunch of requestAnimationFrame fired because of the call of forEach loop. What if we could do all the batching and do all of it at only one requestAnimationFrame? Turns out there’s a library for it which can help us achieve this — fastdom.
The methods in which we are interested is fastdom.measure and fastdom.mutate . As the name suggest, we have to read stuffs in measure and write stuff in mutate , this will allow us to batch all the reads and writes in individual execution frames. See the codepen link for the code.

Did you see? All the jank are now gone and only one requestAnimationFrame takes care as a result the code is more performant than ever. It took only about 2.75ms in total.
Frameworks to the rescue
Frameworks like React actually helps to solve this problem. Every visual measure is stored in state, as a result when we do a setState() it batches the manipulations that should be made to the DOM and does all the changes in single requestAnimationFrame. But all this comes with a JavaScript cost. Sometimes if we don’t use it correctly, it can still cause performance issue.
Important point to note is production builds are much faster that development builds because react removes many things like proptypes , detecting errors etc. in the production build thus making it more performant.
Some key takeaways
- Don’t mix reading layout properties and writing them — you’ll do unnecessary work.
- If you can change the visual appearance of an element by adding a CSS class. Do that, you’ll avoid accidental trashing.
- Storing data in memory — as opposed to the DOM — means we don’t have to check the DOM.
- Frameworks come with a certain amount of overhead.
- You can do bad things even if you use a framework.
- You may not know you’re layout thrashing — so, measure!
Avoid Paints!
Anytime you change something other than opacity or a CSS transform, you’re going to trigger a paint. When we do a paint, the browser tells specified elements on the page to draw a picture of itself. It has all of this information form when we constructed the render tree and did the layout. Triggering a layout will always trigger a paint. But, if you’re just changing colors or something—then you don’t need to do a reflow. Just a repaint. But we want to avoid re-paint. The Compositor Thread to the rescue!
Lets learn about some important threads in browser —
- UI Thread — UI of the browser like tab, menu etc.
- Render Thread — This thread does pretty much everything you can think of. This is the main thread where all JavaScript, parsing HTML and CSS, style calculation, layout, and painting happens. There are present one per tab.
- Compositor Thread —Draws bitmaps to the screen via the GPU.
Compositor Thread
- When we paint, we create bitmaps for the elements, put them onto layers, and prepare shaders for animations if necessary.
- After painting, the bitmaps are shared with a thread on the GPU to do the actual compositing.
- The GPU process works with OpenGL to make magic happen on your screen.
The main thread is CPU intensive but the compositor thread is GPU intensive. The main thread could do hard JavaScript computation while this can take up the animations.
“Again, paints are expensive and you should avoid it whenever possible”
Things compositor thread is good at!
- Drawing the same bitmaps over and over in different places.
- Scaling and rotating bitmaps.
- Making bitmaps transparent.
- Applying filters.
- Mining Bitcoin. (Because you know GPU, Haha)
Compositing is kind of a hack, it is something that is done by your browser under the hood. But you can always suggest the browser — “Hey, hey! Can you use my suggestion?”
What kind of elements gets its layer in compositor?
The four main elements that gets a layer in composition are —
- The root object of the page.
- Objects that have specific CSS positions.
- Objects with CSS transforms.
- Objects that have overflow.
The Hack
This wont work always but you can suggest the browser that this element will transform in future by specifying
.element {
 will-change: transform
}
For older browsers who doesn’t support will-change used: transform: translateZ(0)
But I wont support the later because it’s commanding the browser to create a layer instead of suggesting it.
Managing layers takes a certain amount of work on the browser’s behalf. Each layer needs to be kept in the shared memory between the main and composite threads. Therefore keeping all elements in browser to different layer is a very bad idea
* {
 will-change: transform
}
💡Tip — will-change is for things that will change, not for things that are changing.
will-change is something that we should use with JavaScript, change the property before changing, let the animation do its work and after animation is finished we should remove the will-change, because it’s not going to change anymore.
More Demo!
Clone this Github repository in your local machine and open index.html. Now open the Chrome dev tools and head over to activate Rendering tool and check on Paint Flashing. What do you see?

If you see the performance also, its not that great. You see the yellow spikes? Those are the jQuery calls trying to animate and blocking the CPU.

Now if you see the style.css file, you will find the move class which can basically do the same stuff without JavaScript. Now lets analyze that. Uncomment solution-1.js script import and comment out the others.


See how clean does it looks now. Much better. Paint happens when the class toggles.
Now with will-change, we can define way before the animation starts that it will transform, hence no painting will take place while clicking. Head over and uncomment solution-2.js script import.

See how on hovering over the element at first triggers a paint, but subsequently on clicking and animating it doesn’t re-paints. Now on transitionend event the will-change property gets removed and hence the paint. The performance is also the same. Neat!
Its the same performant as the previous one while animating, but it makes the element ready before the animation has to happen.
If you haven’t already checked out my previous article on Compiler Optimization Techniques in JavaScript, click on the link below!
Here on Medium, I try to write a weekly article on Web Technologies and share my knowledge with people. If you want direct updates then consider me following. Do share with your friends if you liked the content, it keeps me motivated to write more.
See you next week!

