Quick Guide to Image Inpainting using OpenCV
Imparting the capability of hallucination to machines.
We’ve all been in a scenario where we’ve wanted to pull off some visual tricks without using Photoshop, get rid of annoying watermarks, remove someone who photobombed your “would have been” perfect photo, or repair an old worn-out photograph that is very dear to you. What if I told you that you could achieve these desires through the use of Image Inpainting? Intrigued? Let’s dive right in.
What is Image Inpainting?
Image Inpainting is the process of conserving images and performing image restoration by reconstructing their deteriorated parts. This process is typically done manually in museums by professional artists but with the advent of state-of-the-art Deep Learning techniques, it is quite possible to repair these photos using digitally. In addition, it’s also possible to remove unwanted objects using Image Inpainting.
There are many techniques to perform Image Inpainting. Traditionally there are two approaches for this: Diffusion-based and Exemplar-based approaches. The Diffusion-based approach propagates local structures into unknown parts while the Exemplar-based approach constructs the missing pixels one at a time while maintaining the consistency with the neighborhood pixels. These approaches fail when the size of the missing part is large, hence the need for deep neural networks to add an additional component that provides plausible imagination.

Here, we will be using OpenCV, which is an open-source library for Computer Vision, to do the same.
The OpenCV library has 2 algorithms:
- cv2.INPAINT_TELEA
- cv2.INPAINT_NS
cv2.inpaint(src, inpaintMask, dst, inpaintRadius, flags)1. src: Input 8-bit 1-channel or 3-channel image.
2. inpaintMask: Inpainting mask image
3. dst: Output image
4. inpaintRadius: Radius of a circular neighborhood of each point inpainted that is considered by the algorithm
5. flags: Algorithm to be used - INPAINT_TELEA or INPAINT_NS
The Telea method is based on the Fast Marching Method in which the algorithm starts from the boundary of the region to be inpainted and goes inside the region gradually filling the boundary first. Every new pixel to be constructed is decided by the normalized weighted sum of its neighborhood pixels. Selection of the weights is important as more weightage is given to those pixels which are in the vicinity of the point i.e. near to the boundary. Once a pixel is inpainted, it moves to the nearest pixel using the Fast Marching Method. This algorithm works like a manual heuristic operation.
Fast Marching Method
The Fast Marching Method is a grid-based scheme for tracking the evolution of advancing interfaces using finite difference solutions of Eikonal equation. It has both unconditional stability and rapid computation, unlike other techniques. It has various applications like predicting seismic wave propagation, medical imaging, etc. It tracks phases composed of any number of events by sweeping through a grid of points to obtain the evolving time position of the front through the grid.


This method is used to solve the boundary value problems of the Eikonal equation:

where F(x) is a speed function in the normal direction at a point x on the boundary curve. T is the time at which the contour crosses a point x which is obtained by solving the equation.
The Navier-Stokes(NS) method is based on fluid dynamics and utilizes partial differential equations. It travels along the edges from known regions to unknown regions (because edges are meant to be continuous) thereby reconstructing new possible edges. It continues isophotes (lines joining points with same intensity, similar to contours) while matching gradient vectors at the boundary of the inpainting region. For this, some methods from fluid dynamics are used. Once they are obtained, color is filled in to reduce the minimum variance in that area.
In this method, two constraints need to be satisfied:
- Preserve Gradients (edge like features)
- Continue to propagate color information in smooth regions
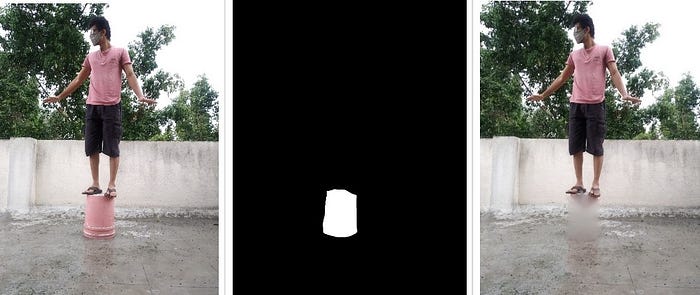
For the OpenCV algorithm to work, we need to provide two images:
- The input image to be inpainted
- Mask image of same size as that of the input image which indicates the location of the damaged part(Zero pixels(dark) are ‘normal’, Non-zero pixels(white) is the area to be inpainted)
I created the Mask image manually using the GIMP photo editor. You can use any photo editor.
Code
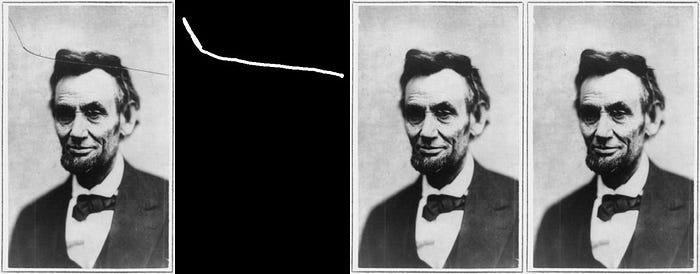
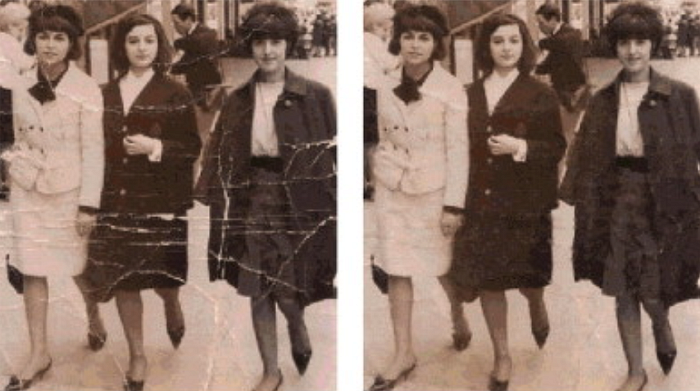
Results
Conclusion
In this article, I have introduced the concept of Inpainting and the traditional technique using OpenCV. Despite the manual intervention required by OpenCV to create a mask image, it serves as an introduction to the basics of Inpainting, how it works, and the results we can expect. We can expect better results using Deep Learning-based approaches like Convolutional Neural Networks (CNNs) and Generative Adversarial Networks (GANs) which can lead to perfectly inpainted images.
Please refer to this for further reading.

