(re)creating a 3D Sketch app with Node, React and Three — Part 1
In this article, I will write about my experience re-implementing a native Android app to a React App. On this part, there will be explanations of how the previous app worked and why to remake it using other tools. My motivation? Two things: many e-mails I received from users asking for new features in the app and a workshop I will lecture soon about React, how is the workflow and how to design better apps with it. I want my students to deeply understand how a ‘non-native’ (aka webapp) approach brings more consistency, flaxibility and speed to a project.
The ‘old’ Android App and reasons to move from Native to Web
A few years ago, back when I was an undergrad student at Milwaukee (WI), studying a lot about coding, enrolled in some SE and CS courses, I decided to practice some of the things I learned in the Android Programming classes by creating a simple app. The idea was to create something that would reassemble some old programs I randomly used in my childhood, e.g. Alias Studio, which allows the users to easily draw objects in 3D using lines, drawing on planes or more complex meshes, and also to help me to draw some hardware prototypes I had in mind, at the time I didn’t even know that to Sketch objects (and later Industrial Design) would become a passion in my life.


So I created an Android App, using OpenGL ES (1.0), Java and Android Studio, called: 3D Sketch. Surprisingly, the app reached more than 30 thousand downloads on google play.
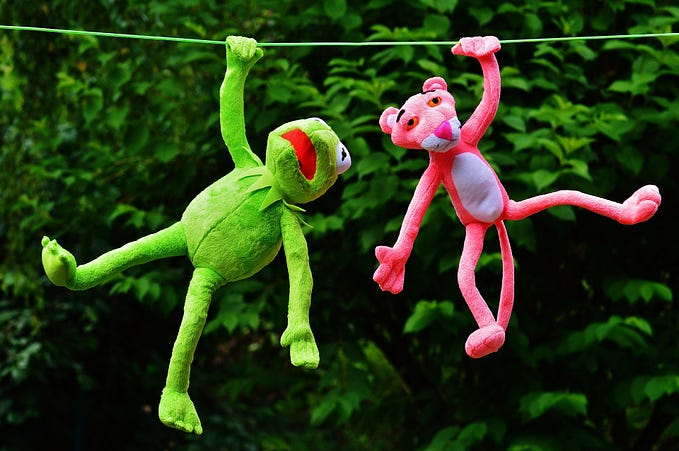
As can be seen in the video bellow, the user had a very simple (flat) UI and a 3D environment. The user could add, remove and transform planes positions and orientations, then by touching those planes the interface changed for a 2D Drawing mode, where the user could draw on the screen, converting that Canvas 2D image to a Texture and importing that to the related plane. Simple like that. However, I didn’t know how to implement Raycast — that’s why the app kind of changes from 3D to 2D to allow the user to draw — then I had to use Color picking to understand where the user is touching in the 3D environment. In other words, every time the user touches the screen, the app renders, bellow the visible layer, a layer where every object has a different random color. Then reading the pixel color of the X, Y position where the touch happened the app can understand with which object the user is focusing on. I know, “old” times.
From Java For Android to a Progressive Web App with Declarative UI
Recently, due to the influence of some friends that are great full stack developers, I started to study about React.js and Node.js. And it was love at second (yeah, the React lifecycle is kinda tricky to get used so quickly) sight.
Then when I felt I had to remake the 3DSketch app, was obvious to me that It had to be done using React, It must be a web app, responsive (to allow handheld devices’ users) and also desktop users. But let me make clear for you the main points compared that made me think like that:
- Java vs Javascript: Java is a great language, however when seaking for flexibility, quick development and production, javascript is one of the quickest ways to get a project running for many users in couple days.
- Maven vs NPM: that is easy, NPM = “don’t carry anymore about managing packages” — eom.
- OpenGL ES vs Three.js: I really liked to spend hours of my day playing with vertexes, shaders and so on. However I probably don’t have so much free time now, so I need a flexible, ready-to-use, well documented and web friendly 3D rendering Framework. Three.js is built over WebGL, and coupled with React (react-three-renderer) it can achieve a reasonable performance. Especially in our case here, just drawing Planes and textures. Also Three.js has a great community and awesome examples, easy to understand and has a nice React wrapper (react-three-renderer).
- XML+Java vs CSS+JSX+JS: Editing .xml files describing the UI and going back to a .java file to implement its behaviors was ‘okay’ at the time (at least I didn’t have to create and position every UI component on code). However with better UI Design tools, focused on web development, e.g. Sketch, which allows developers to import SVG and CSS direct to the app, or quickly test many UI prototypes without ever writing one line of code is a key point to be explored. Also things like animation, responsivity are easier with web frameworks. I can keep writing here all the advantages of having declarative UI, but just read this instead.
I know, I have to redesign a lot of that old app to make the transition to react smoothier, just copy all the components wouldn’t work. I will talk more about the details of the design in following articles. However, for now, I will kickstart the development by adding the main features that will remain from the old project.
WebApp Barebones — main packages
React
Probably the quickest way to have a progressive webapp with react started is using the ‘create-react-app’ npm package from facebook:
$ npm install -g create-react-app
$ create-react-app 3d-sketch-app
$ cd 3d-sketch-app
$ npm start
That’s it, go to “http://localhost:3000”, that’s all for that. I’ll not post all codes here for every small step, I Just wanted to show you how simple it was to start with react.
Three.js
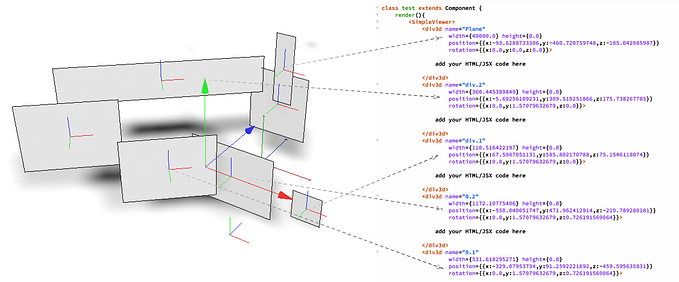
After some research and trials with some projects I ended up liking more the react-three-renderer to render Three.js into React components. It works like a charm with react-sizeme, so to make a responsive 3D environment was easy. To the orbit controls, I used the ‘three-orbit-controls’ package. However to move the camera is not enough, we need to pick and transform the objects on scene. ‘react-three-renderer’ has an example, using raycast, to pick objects on scene, but the whay it transforms the object is by using a imaginary plane parallel with the camera, still not what we need in therms of moving the object. We need something like the Transform Controls from Three.js, that has transform controls that behave more like modeling tools’ controls, like Cinema 4D or 3DMax.

Easy, I just edited the original code a little bit and made a webpack wrapper for the class. So just import that package: ‘three-transform-controls’

Next..?
The following post will be focused in how I designed the new UI to be simple and have all the structures. Eventually, I’ll cover all the steps of (re)creating this app.
This was my first post on Medium, feedbacks always welcome. Also, If you want the next part to have a more “coding” approach — with parts of the code on the post — leave a feedback. I really don’t know the public that is more interested in this type of content, maybe a full-stack developer would like both Design and programming parts.