React Hooks (Conceptual Understanding) — Part 1
Master React Hooks Step By Step
Hooks Defined
Hooks are functions that let you “hook into” React state and lifecycle features from function components. Hooks don’t work inside classes — they let you use React without classes.
If you are already famililiar with hooks also head over to Building an Input/Tagging Component tutorial using React Hooks.
Hook 1 — useState
First and foremost we will learn in detail about useState to manage state in functional component.
Example 1 : useState with simple value
With useState we can use state in a functional component.
Let’s understand useState with the help of a simple example. (Ignore the CSS in the examples as they are not the topic under discussion)
import React, {useState} from 'react';export default function Counter() {
  const [counter, setCounter] = useState(0);
  return (
   <div className="content">
     <h1 className="count">{counter}</h1>
   </div>
  );
}
So, we have a very simple function that uses useState and renders an h1 wrapped within a div. The counter is being displayed within the h1 tag.
The output will be the value 0 displayed on the screen.
The output will be 0 displayed on the screen.

The working source code is here
Let’s dissect how this works.
What does calling useState do?
useState takes in an initial state as a parameter and returns an array with two objects. First, the state value that you passed and second, an updater function, which can be used to modify the state.
Internally react preserves this state value. So, when the component is rendered again because of state changes, the latest value is always available.
NOTE: Since the functional component doesn’t have render method whenever the state changes the entire function code component is executed. React internally manages to diff and state for optimization and also preserves the state.
What do we pass to useState as an argument?
The only argument to the useState() hook is the initial state. Unlike classes, the state doesn’t have to be an object. We can keep a number or a string if that’s all we need. I
We could also pass in an object to useState.
NOTE: We can create multiple state variables by using useState multiple times as shown below.
const [counter, setCounter] = useState(0);
const [error, setError] = useState('');
In the above, the counter variable is initialized to 0 and the error variable is initialized to empty string.
What does useState return?
It returns a pair of values: the current state and a function that updates it. This is why we write const [counter, setCounter] = useState(0). This is similar to this.state.count and this.setState in a class, except you get them in a pair.
Tip: What Do Square Brackets Mean?
You might have noticed the square brackets when we declare a state variable:
const [counter, setCounter] = useState(0);The names on the left aren’t a part of the React API. You can name your own state variables:
const [count, setState] = useState(0);This JavaScript syntax is called “array destructuring”. It means that we’re making two new variables count and setState, where count is set to the first value returned by useState, and setStateof the second one is an updater function which can be used to modify the state (count in this case).
For Demo Purpose Only
For e.g. internally useState may be implemented as shown below (code is for reference only and does not represent the original react useState code). Note the return part of the useState function. It returns the state and an updater function.
const useState = function (istate){
  let _state;  // local state  // sequence hooks, are internally defined in this case.
  if (sequence == undefined) {
    sequence = sequenceGen();
  }  _key = sequence();  // internal implementation

  let hook = hooks[_key];  // Get from hook store
  if (hook == undefined) {
    hooks[_key] = istate;
    _state = istate;
  } else {
    _state = hook;
  }  // Updater function
  let _updater = (k,newState) => {
    _state = newState;
    hooks[k] = newState;
    return _state;
  }  //Bind the _updater with the key as 1st parameter
  _updater = _updater.bind(null, _key);return Object.freeze([
    _state,
    _updater
  ]);
}
The most important part is the return function. When you call useState you get an array back with two objects, the first one is the state value and the second one and updater function as shown above.
Example 2: Updating state using the updater function
To update state we will use the updater function returned by the useState method call.
For e.g. to update the counter we can use the below code, anywhere, maybe on click of a button, etc.
setCounter(counter+1);NOTE: Don’t do
setCounter (counter ++)as it means
counter = counter + 1And since counter variable is const (best practice) it will give you error or no updates will happen.
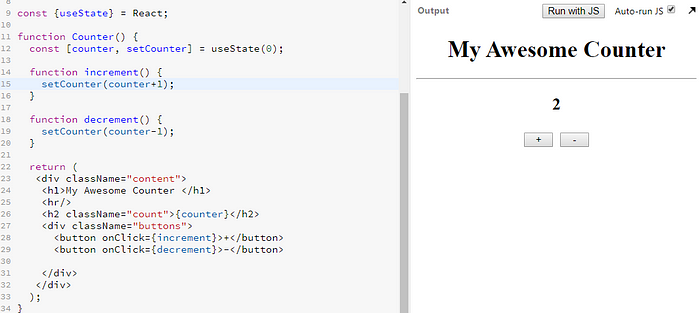
Let’s see an example of this. We will add two buttons, to the page. One will increase the counter when clicked and the other will decrease the counter.
We will write an increment() and decrement() helper function which will be respectively invoked from the button click.
Code Extract:
function Counter() {
  const [counter, setCounter] = useState(0);

  function increment() {
    setCounter(counter+1);
  }

  function decrement() {
    setCounter(counter-1);
  }

  return (
   <div className="content">
    <h1>My Awesome Counter </h1>
    <hr/>
    <h2 className="count">{counter}</h2>
    <div className="buttons">
      <button onClick={increment}>+</button>
      <button onClick={decrement}>-</button>

    </div>
   </div>
  );
}
The output of the above is shown below.
Full Source code of updating state is here
Example 3: Better Practice: Use the updater function with the functional parameter
The updater function also takes a function as a parameter just like setState. This is useful when you are dealing with asynchronous bugs and your state updates are interdependent.
So, instead of
setCounter(counter+1);
Use the functional updater function
setCounter((prevState) => prevState + 1);A working example is here
function Counter() {
  const [counter, setCounter] = useState(0);

  function increment() {
    setCounter((prevState) => prevState + 1);
  }

  function decrement() {
    setCounter((prevState) => prevState - 1);
  }

  return (
   <div className="content">
    <h1>My Awesome Counter </h1>
    <hr/>
    <h2 className="count">{counter}</h2>
    <div className="buttons">
      <button onClick={increment}>+</button>
      <button onClick={decrement}>-</button>

    </div>
   </div>
  );
}
The output remains the same.
Example 4: Using multiple state variables
Let us know see how to use multiple state variables. Let’s add a feature to show error message, when the counter goes negative.
Let’s create a variable to hold the error state.
const [error, setError] = useState("");Let’s modify the JSX as shown below.
{ error.length > 0 && <div className="animated error">
          {error}
        </div>
Here we are checking for the presence of error and if true we display the message.
Now, to make it work let’s modify the increment() and decrement() function.
First’ let’s take a look at the decrement function. In the decrement function if the counter is 0 and if you click the decrement button we change the error state.
NOTE: Whenever you call any updater function, the React component is re-rendered on the next cycle.
function decrement() {
    if (counter == 0) {
      setError("You cannot order negative quantity!");
      return;
    }
    setCounter((prevState) => prevState - 1);
  }
NOTE: I am using both the functional syntax and non functional syntax for your reference. In this case both will work without any issue as we are not sequentially accessing state value immediately after state change.
Now, let’s also modify the increment() function. As once the valid action is performed the error has to be cleaned.
function increment() {
   if (error.trim() != "") {
     setError("");
   }
   // Here variable name could be any thing.
   // I am calling it as prevState, you can also call it as
   // prevCounter
   setCounter((prevState) => prevState + 1);
  }
In the increment function first we check if any errors were there and if yes we reset the error to empty and invoke the updater function.
The full code in action is here
NOTE: I have added some CSS and animation to make it pretty.
Example 5: use multiple state attributes with single updater function (issues and tips)
Now, if you keep multiple attributes withing one updater function, then you have ensure that all state properties are manually merged (setState automatically merges properties)
For. e.g.
const [user, setUser] = useState({username: 'r', password: 'a'});The above code blocks creates a state variable user, which contains two attributes/properties, username and password and one updater function setUser.
Next create an input screen (jsx) for capturing username and password. We assign name attribute to each input so that we can refer it later.
<div className="row">
  <div className="fields">
    <label>Username</label>
    <input type="text" name="username" onChange={handleChange}
            placeholder="enter username" />
  </div>
</div>
<div className="row">
  <div className="fields">
    <label>Password</label>
    <input type="text" name="password" onChange={handleChange}
         placeholder="enter password" />
  </div>
</div>
We also have to create a handleChange function to capture the user input and store it within the state variables using updater function, setUser
function handleChange(e) {
  setUser({
    [e.target.name] : e.target.value
  });
}
So, here we are invoking the setUser function and updating the property dynamically, only those property which is changed.
e.target.name refers to the input whose value is getting changed.
The problem with this approach is that , as the updater function doesn’t automatically merge the properties, you will see weird behavior, i.e. if you enter username, then the password field gets emptied and vice-versa.
You can see the problem in action here
To fix this issue change the handle change function as shown below.
function handleChange(e) {
  setUser({
    ...user, //Merge properties with using objects with useState
    [e.target.name] : e.target.value
  });
}
Here, we first merges all the user properties and then updates the specific property as needed.
The fixed code in action is here
Hook 2— useReducer
The second hook is the useReducer hook. Those who love working with redux may find this interesting. React now provides a built in useReducer hook, which can be used instead of the redux library.
It’s an alternative to useState. It accepts a reducer of type (state, action) => newState, and returns the current state paired with a dispatch method. (If you’re familiar with Redux, you already know how this works.).
NOTE: useState returns and updater function and useReducer returns a dispatch function, which can be used to dispatch or call various actions.
useReducer is usually preferable to useState when you have complex state logic that involves multiple sub-values (the username , password example, thought it's not complex, but real objects can get bigger) or when the next state depends on the previous one. useReducer also lets you optimize performance for components that trigger deep updates because you can pass dispatch down instead of callbacks. (from react docs)
First’ let's define our reducer.
// YOU CAN NAME THIS REDUCER, as CounterReducer to make it more
// meaningfulfunction reducer(state, action) {
  switch (action.type) {
    case "increment":
      return {
        ...state,
        counter: state.counter + 1
      }
    case "decrement":
      return {
        ...state,
        counter: state.counter - 1
      }
    case "reset":
      return {
        ...state,
        counter: Number(action.value)
      }
    default:
      return state;
  }
}
NOTE: The only mandatory thing is the action parameter should have a type property.
Let’s also define an initial state ( we are creating this as a const outside our main component).
const defaultState = {counter: 0, someothervalues: "test"};NOTE: someothervalues is not of significance.
Now, withing our Counter component, create a reducer and initialize it.
const [state, dispatch] = useReducer(reducer, defaultState);The state is stored in const/variable and the dispatch will be used to modify the state.
We will create increment, decrement and reset JSX to test the dispatch action.
<div className="buttons">
  <button onClick={()=> dispatch({type:"increment"})}>+</button>
  <button onClick={()=> dispatch({type:"decrement"})}>-</button>
  <button onClick={
            ()=> dispatch({type:"reset", value:value})}>reset
  </button>
</div>
Dispatching action
To dispatch the action on the button click we simply have to invoke/call the function by passing the action type.
And voila you have your reducer feature implemented in functional component.
In the demo code, below I also show how to use useState along with reducer. So, the hooks are quite flexible and you can adapt it to your needs.
The full code in action
Hook 3— useEffect
The next important hook is useEffect. The useEffect hook allows us to hook into the lifecycle of the component, like componentDidMount, componentDidUpdate, componentWillUnmount. So this one function plays the role of about three lifecycle events from class component.
Do note, though, the functional component doesn’t have a lifecycle event, but then hook allows us to perform this operation, as real use cases need this feature.
Let’s begin with a simple example. Now we want to execute some code on each render, including first and subsequent. The following example demonstrates it.
Usage
The useEffect function takes a callback function which will be executed on render.
Example 1: useEffect — Runs always (on all render) (componentDidMount and componentDidUpdate)
function TestUseEffect() {
  const [count, setCount] = useState(0);

  useEffect(() => {
    console.log(`RENDER: Count: ${count}`);
  });

  return (
    <div>
      <p>useEffect api</p>
      <p>Count: {count}
        <button onClick={() => setCount(count + 1) }>+</button>
      </p>
    </div>
  )
}
To use this refer the code block below
function App() {
   return (
      <div className="App">
        <h1>Hello</h1>
        <h2>Start editing to see some magic happen!</h2>
        <TestUseEffect />
      </div>
   );
 }

const root = document.getElementById("root");
ReactDOM.render(<App />, root);
So, if you click on the button (open up the console window/browser dev tools), you will see the log getting outputted each time the render happens.
NOTE: You can have more than one useEffect() call in the same component.
Now, sometimes, we don’t want some function/or feature to be executed on each render, but only on the first render, like componentDidMount of a class component.
Let’s see how to achieve componentDidMount feature with useEffect.
Example 2: useEffect — On first mounting only (like componentDidMount)
Typically this is required when you need to fetch some data or other operations when the component first mounts.
function TestUseEffectDidMount() {
  const [count, setCount] = useState(0);

  useEffect(() => {
    console.log('componentDidMount fetch Data...');
  }, []);  // The empty array is the key

  return (
    <div>
      <p>TestUseEffectListener</p>
      <p>Count: {count}
        <button
           onClick={() => setCount(count + 1) }>
            +
        </button>
      </p>
    </div>
  )
}
To use this effect refer the code below
function App() {
   return (
      <div className="App">
        <h1>Hello</h1>
        <h2>Start editing to see some magic happen!</h2>
        <TestUseEffect />
        <TestUseEffectDidMount />
     </div>
   );
 }const root = document.getElementById("root");
ReactDOM.render(<App />, root);
Passing an empty array[] as the second parameter, makes the useEffect runs only once.
Passing an empty array [] tells React that your effect doesn’t depend on any values from props or state, so it never needs to re-run.
If you run the application and open-up the console, you will see the log only gets outputted on first render.
Example 3: useEffect — simulate componentDidUnmount
Let’s simulate componentDidUnmount with useEffect. The useEffect function can return an optional cleanup function
Let’s create a simple component that will be unmounted.
function TestUseEffectUnMount(props) {
  const [count, setCount] = useState(1);
  const {onCountChange} = props;  useEffect(() => {
    // Do something here
    return () => {
      console.log('componentUnmount cleanup...');
    }
  }, []);

  return (
   <div>
    <p>TestUseEffectUnMount</p>
    Count: {count}
    <button onClick={() => setCount(count + 1) }>+</button>
    <button onClick={() => {setCount(count - 1);
       onCountChange(count)} }>-</button>
   </div>
  )
}
NOTE: The useEffect here returns a callback function. Here you can do the necessary cleanup like removing eventhandlers, reference cleanup etc.
This component takes a prop which has a callback function called onCountChange. So when the counter changes when clicking on the decrement (-) button, this component informs the parent component.
Let’s take a look at the parent component that uses <TestUseEffectUnMount/> component.
function App() {
  const [show, toggleVisibility] = useState(true);

  const onCountChange = (count) => {
     alert(count);
     if (count <= 0) {
        toggleVisibility(!show);
     }
   }
   return (
    <div className="App">
     <h1>Hello</h1>
     <TestUseEffectDidMount />
     {
         show && <TestUseEffectUnMount onCountChange={onCountChange}
     />}
    </div>
   );
 }
Do note here the parent component <App/> is passing a callback handler onCountChange to <TestUseEffectUnMount> component.
So, when the count changes and alert is shown the and the visibility of the show variable is toggled.
Also, in the return statement the <TestUseEffectUnMount> is only shown if the show variable is true.
So, what happens here is when the counter reaches 0 (on clicking the decrement ‘-’ button, this callback is invoked and the condition becomes false, and the Component will not be rendered thereby firing the cleanup from the useEffect hook.
Let’s mount this component.
const root = document.getElementById("root");
ReactDOM.render(<App />, root);
Take a look at the completed demo codepen url below.
Example 4: useEffect — Optimizing Performance by Skipping Effects
In some cases, cleaning up or applying the effect after every render might create a performance problem. In class components, we can solve this by writing an extra comparison with prevProps or prevState inside componentDidUpdate:
componentDidUpdate(prevProps, prevState) {
  if (prevState.query!== this.state.query) {
    // make an ajax call
    this.setState(...);
  }
}
This requirement can be achieved with the useEffect Hook API. You can tell React to skip applying an effect if certain values haven’t changed between re-renders. To do so, pass an array as an optional second argument to useEffect:
useEffect(() => {
  console.log(`Query param changed to ${query}`);
}, [query]); // Only re-run the effect if query changes
In the example above, we pass [query] as the second argument. What does this mean? If the query is mumbai, and then our component re-renders with query still equal to mumbai, React will compare ['mumbai'] from the previous render and ['mumbai'] from the next render. Because all items in the array are the same mumbai == mumbai , React would skip the effect. That’s our optimization.
If the query changes to some other value, say delhi due to user action then the effect will fire.
See the <OptimizedComponent/> output in the codepen below.
The complete example can be experimented here (Keep the browser console window open to verify the log messages)
https://codepen.io/rajeshpillai/pen/PVpjwy?editors=0011Tip (from React docs)
Unlike
componentDidMountorcomponentDidUpdate, effects scheduled withuseEffectdon’t block the browser from updating the screen. This makes your app feel more responsive. The majority of effects don’t need to happen synchronously. In the uncommon cases where they do (such as measuring the layout), there is a separateuseLayoutEffectHook with an API identical touseEffect.
Hook 4— useContext
The useContext hook enables to hook onto the react context api. It comes in very handy to avoid prop drilling.
Steps to use context API
- Import useContext
- Use React.createContext to create the shareable context (multiple components will use this)
- Create a Provider (ThemeProvider in this case) and set the value to be the object that needs to be shared across component.
- useContext as required in child components.
First import the useContext
const {useReducer, useState, useContext} = React;
    OR
import {useReducer, useState, useContext} from React;
We will create a theme context that allow us to change the style of the application.
const ThemeContext = React.createContext();Let’s now create a ThemeProvider. The ThemeProvider provides a dropdown list with themes to be selected.
const ThemeProvider = ({children}) => {
  const [theme, setTheme] = useState("theme1");

  function handleChange(e) {
    setTheme(e.target.value);
    e.preventDefault();
  }
  return (
    <ThemeContext.Provider value = {theme}>
      <select onChange={handleChange}>
        <option value="theme1">Theme 1</option>
        <option value="theme2">Theme 2</option>
      </select>
      {children}
    </ThemeContext.Provider>
  );
}
When the user changes the theme the handleChange event is fired and we use the setTheme updater function.
Once this parent component is rendered all the child component will render as well.
Let’s create a <Counter/> and <Footer/> component both which need theme. I will not delve into the details of the <Counter/> component as it is more or less the same that we discussed so far. But I will highlight the required code to make context work.
The <Counter/> Component
function Counter() {
  const [state, setState] = useReducer(reducer, defaultState);
  const [value, reset] = useState(0);
  const theme = useContext(ThemeContext);

  function handleChange(e) {
     reset(e.target.value);
  }

  return (
     <div className={`app ${theme}`}>
      <h1>useContext </h1>
      <h1>{state.counter}</h1>
      <input style={{width:"20%", textAlign:"center"}} type="number" value={value} onChange={handleChange} placeholder="enter initial counter value and press reset"/>
      <div className="buttons">
        <button onClick={()=> setState({counter: state.counter+1})}>+</button>
        <button onClick={()=> setState({counter: state.counter-1})}>-</button>
        <button onClick={
            ()=> setState({counter: Number(value)})}>reset
        </button>
      </div>
    </div>
  );
}
The important code block is
const theme = useContext(ThemeContext);The above piece of code grabs the theme from the context.
And we use this theme as part of the jsx as shown below.
<div className={`app ${theme}`}>Now, let’s take a look at the <Footer/> Component
The <Footer/> Component
function Footer() {
  const theme = useContext(ThemeContext);
  return (
    <footer className={theme}>useContext demo</footer>
  );
}
The Footer component too grabs the theme and applies it as a className.
Now here the theme could be anything, we are using css classes to simulate it.
Now, let’s take a look at the <App/> component which connects all these pieces together.
The <App/> Component
function App() {
  return (
    <ThemeProvider>
      <Counter />
      <Footer/>
    </ThemeProvider>
  );
}
const rootElement = document.querySelector("#root");
ReactDOM.render(<App />, rootElement);
Our <Counter> and <Footer> Component is wrapped within the <ThemeProvider>.
Now the beauty of this approach is if we hadn’t used the context, then the theme value would have be required to pas through all the component hierarchy.
Here is a complete working application with theme support using context api.
https://codepen.io/rajeshpillai/pen/NZGMZO?editors=0010For those curious here is a small version of mini-view library with custom hooks (not optimized for performance) for learning purposes.
Custom Hook (for the curious minds, for learning purpose)
If enough, interest, will add explanations for this (as separate article).
Todo
- useRef
- useMemo
- useCallback
History
- 2-Dec-2019 — Added React Hook Example Link
- 28-Oct-2019 — First version published
P.S: Please bookmark this I will be adding more real-world examples as an update or as a new article. Few definitions has been directly extracted from the official React documentation.