React Native and Forms Redeux: Part 2
Wrapping two part series with validation and submission.

This is part of a two-part series starting with React Native and Forms Redeux: Part 1.
Validation
In this next example, we want to ensure that both the first and last name fields are not empty and not blank (only spaces) before one can submit the form; observe the disabled button.

We also want the first and last name fields to highlight red with an appropriate error message after the user has interacted with the field (touched) and it is still empty or blank (only spaces).

As before, we start by copying the RefactorForm folder to a ValidationForm folder (renaming the components as appropriate) and adding to App.js.
We, next, update the FKTextInput component; accepting and using some additional Formik properties (from Field); we also make some styling changes. These changes implement the field-level validation behavior.
components / FKTextInput / index.js
Observations:
- In order for Formik to determine if a field has been interacted with (touched), we need to pass field.onBlur to the TextInput (like with onChange, we need to supply the field name)
- form.errors indicates if the field has an error or not; it is an object keyed off the field names
- form.touched indicates if the field has been interacted with; it is an object keyed off the field names
- These changes have no impact on SimpleForm as it does not have any validation rules
note: Thank goodness for react-devtools; while the Formik documentation is good, I had a hard time finding documentation on the supplied properties to a custom field component. It was much easier to simply inspect them directly.
components / FKTextInput / styles.js
In order to implement the form-level validation behavior we use the Formik provided isValid property to conditionally disable the submit button.
components / ValidationForm / index.js
Now that we have implemented all the view-level changes for validation, we implementation the validation logic.
components / ValidationForm / index.js
Observations:
- The validate function is called on every interaction with the form, e.g., as one enters information into a field (Formik allows one to change this behavior)
- The validate function’s return object indicates which errors exist; keys are the field names and the values are the error message
- In this case, we implemented our validation rules by hand. Formik recommends a more declarative approach, using the yup library, for common validation strategies.
Refactor2
Looking at the ValidationForm component, we start to see us mixing logic (validate) with view (render) in the same file. Also, it is harder to troubleshoot render props as you cannot see the parameters using redux-devtools like you can see component properties.
We can replace the render prop with a component property to address these issues.
As before, we start by copying the ValidationForm folder to a Refactor2Form folder (renaming the components as appropriate) and adding to App.js.
We first extract out what was the render function into a React component.
components / Refactor2Form / Refactor2FormView / index.js
And then we use it in the form.
components / Refactor2Form / index.js
Submitting
Often the form submit handler is asynchronous and takes awhile to complete. In this situation, a common pattern is to disable the form elements until the submission is complete.

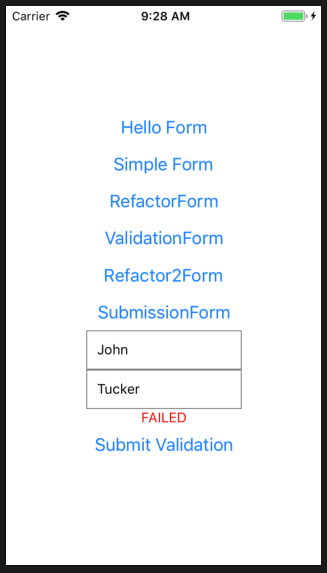
note: After I took these screenshots, I renamed the button from Submit Validations to Submit Submission; just in case you noticed.
It is also common to provide a message on success or failure; additionally on success is common to reset the form.

This is getting a bit old, but… We start by copying the Refactor2Form folder to a SubmissionForm folder (renaming the components as appropriate) and adding to App.js.
We need to define a disabled state in the FKTextInput component; used when the form is submitting.
note: While we could directly obtain isSubmitting directly in FKTextInput, we want to generalize a disabled state as there may be other reasons to disable a field.
components / FKTextInput / index.js
Observations:
- As we want to ensure this component works with the earlier example, we make disabled an optional property but set its default value to false.
- With React Native TextInput, we implement a disabled state with two properties: editable and selectTextOnFocus
We then we define a disabled, success, and failure state in SubmissionFormView; applying a little styling for clarity.
components / SubmissionForm / SubmissionFormView / index.js
Observations:
- The status object is a free-form object, i.e., status.succeeded and status.failed are something that we will create
components / SubmissionForm / SubmissionFormView / styles.js
We finally create an asynchronous submit handler (just waits three seconds).
components / SubmissionForm / index.js
- Unlike other form libraries, e.g.., Redux Form, handling asynchronous submit handlers is fairly straightforward; especially when using async functions
- In order to demonstrate the failure situation, simple uncomment the line throwing an error
Wrap Up
While we covered the most common usage of forms, there is more that Formik can do, e.g., asynchronous validation. See the growing list of examples for ideas.
Ok… I am convinced that Formik is going to be my next React forms library; it does not get much easier than this. I just wish I found out about it before I wrote that other article on using Redux Form (but I will say, Redux Form has served me well over the years).
