React Native Quirks
Somebody should told me this before
If you want to start with CSS in the React Native and if you come from the web environment just like me, the React Native environment comes with its own set of quirks. Here is a list of some I had to face for the last few weeks.
Edit: Since I’ve written this article I found other options to tackle the quirks. Moreover, React ecosystem changes rapidly and so do the “quirks”. I’ve found out some of these thoughts were false, but I keep it here for the record though and for learning purposes from my mistakes. So look for the “Edit” sections for getting the update on the quirk.
First, the setup.
Follow the Get Started tutorial. Here’s my .~/profile contents:
#!/bin/bash
export ANDROID_HOME=${HOME}/Library/Android/sdk
export PATH=${ANDROID_HOME}/emulator:${PATH}
export PATH=${PATH}:${ANDROID_HOME}/tools
export PATH=${PATH}:${ANDROID_HOME}/tools/bin
export PATH=${PATH}:${ANDROID_HOME}/platform-tools
Note: Extra parts are shown bold.
$ react-native init App
$ cd App
$ react-native run-ios
$ emulator @Nexus_5_API_23_x86_64
$ react-native run-android
Note: Nexus_5_API_23_x86_64 is the name of the AVD you’ve specifield. See Running emulator from the command line.
Issue #0: No mention in the official Docs how to setup custom fonts
I’ve downloaded the Open Sans from Google Fonts to set up this font to for both platforms. Here’s how I’ve added the font:
Step #1: Add to package.json:
{
  ...,
  "rnpm": {
    "assets": [
      "./App/Fonts"
    ]
  }
}
Step #2: Link fonts: react-native link.
Step #3: Use fontFamily: 'OpenSans-ExtraBold, that’s the file name without the .ttf extension. Do not use fontWeight rule if not necessary.
Note: fontFamily: 'OpenSans-Regular' does not work. Use fontFamily: 'OpenSans'
Issue #1: OSes render line height differently
When setting the lineHeight, the origin of the line is at the base line on Android, on iOS it origins at the cap height. Therefore Android trims descenders (like p, q or y), iOS trims ascenders (diacritics).
Edit: I wrote another article about adjusting the font files rather than hacking with paddings. Do not apply any of this section and read the linked article instead.
Note: Here’s quick reminder about what is what in the typography.

Workaround: Always set the line height explicitly, mix paddingTop for iOS, paddingBottom for Android, try setting the includeFontPadding: false. Values are matter of trial/error to get proper results. (I’ve overlaid image in the photoshop and counted pixels.)
Example:
import {Platform, StyleSheet} from 'react-native'export default StyleSheet.create({
  container: {
    flex: 1,
    justifyContent: 'center',
    alignItems: 'center',
    backgroundColor: '#F5FCFF'
  },
  lettersRow: {
    flexDirection: 'row'
  },
  letters: {
    backgroundColor: '#66CCFF',
    color: 'blue',
    fontFamily: 'OpenSans-ExtraBold',
    fontSize: 100,
    includeFontPadding: false,
    lineHeight: 100,
    margin: 10,
    paddingBottom: Platform.OS === 'ios' ? 0 : 28,
    paddingTop: Platform.OS === 'ios' ? 28 : 0,
    textAlign: 'center',
    textAlignVertical: 'center'
  }
})
Note: textAlignVertical: ‘center’ has a minor impact on rendering, mainly for the line heights above the default line height.

Note: iOS nor Android aproaches setting the lineHeight ideally. On the web the line height is distributed more or less evenly above and below.
Note 2: I’ll do some more research to come up with a lambda to use to set up the font styles, so stay tuned.
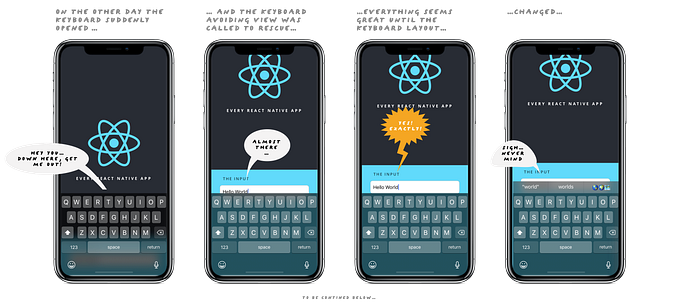
Issue #2: Flexbox has issues with long text and Image in a row

Look at the image closely you’ll notice how the inner <Text /> is rendered the same with or without the image. As if the <Image was not taken into account when calculating the row layout.
Note: First I also thought the flexbox layout is having issues with ‘space-between’.
Edit: There should be no need to change the structure. Try it without wrappers first. Add
flexShrink: 1orflex: 0.999on the<Text />node. That should work fine.
Ideal structure:
<View style={styles.row}>
  <Text>Lorem ipsum dolor sit amet, consectetur adipisicing elit, sed do eiusmod tempor incididunt ut labore et dolore magna aliqua.</Text>
 <Image source={require('./assets/images/Icon.png')} />
</View>
Workaround:
<View style={{flexDirection: 'row'}}>
  <View style={styles.row}>
    <Text style={{flex: 0.999}}>Lorem ipsum dolor sit amet, consectetur adipisicing elit, sed do eiusmod tempor incididunt ut labore et dolore magna aliqua.</Text>
  <Image source={require('./assets/images/Icon.png')} />
 </View>
</View>
So wrap the row in another row and add {flex: 0.999} to the <Text /> element.
Issue #3: Android prefers whole numbers for setting the font dimensions
Solution: Wrap calculations in the Math.ceil() to fix rounding issues.
Issue#4: Animation component doubles the margins
(Not sure how to replicate this issue isolated right now. Might be related to the custom component’s erroneous passing of props (the style) to the children.)

In my case the component applied double margins: on the Animated container and also on its children. Background colour was inherited on the children too. Other CSS rules have been have been inherited automatically too without the side effects.
Edit: I honestly think this was a rookie mistake caused by me and myself only. So be careful when using spread and style later like this
<View {...this.props}><View styles={this.props.style} /></View>. Style gets therefor applied twice using{...this.props}and later usingthis.props.stylewithout you being fully aware of it. Use props explicitly or make sure you know what{...this.props}does.
Possible workaround: explicitly set margins, backgroundColor or/and wrap children in <View />.
Issue #5: Android ignores negative margins
Solution: Try to recreate the design with the positive margins. Position: relative with negative units do work though.
Note: Since margins do not collapse at all, possibly the best way to tackle this is to use halve margins from the start as a styling strategy.
Edit: This is not entirely true, Android can do negative margins but since they have some odds recreate the design with positive margins whenever possible.
Issue #6: it’s hard to select elements in the Android Inspector
Solution: Add temporary padding to the element or its container and inspect it. Click around. Repeat until success.
Edit: Install the ReactDevtools app. You’ll gain access to the full DOM tree, edit styles and lots of goodies.
Issue #7: Android ignores box shadow
Solution: Use {elevation: n}, where n is a whole number from 1 to 24. Ideally use [1, 2, 4, 6, 8, 9, 12, 16, 24] according to Material Design Guidlines: Elevation & Shadows.
Edit: Keep in mind that shadows on Android require parent element to have padding to render shadow. Otherwise the shadows gets clipped.
Issue #8: Android uses a default grey text colour; iOS uses full black
Solution: Always explicitly define the text colour.
Let me know if you ♥︎ the article in the comments. Thanks for stopping by!