ReactJS — A quick tutorial to build dynamic JSON based form.
Learn step by step!

In this article we will quickly build a dynamic form based on json data with events and states.
Don’t worry about the CSS (you can customize it the way you want, and with flexbox, and grid, its even better).
If you are a visual learner then head on to https://youtu.be/xbHAXny11B0
The entire source code is hosted on 🔗github Dynamic Form
As usual spin a new react project using whatever template you prefer.
I will be using create-react-app
Run the command on the console/terminal
create-react-app react-dynamicform
Once the project is setup change the directory to the folder and exeucte the below command.
npm startOpen the code in your favorite editor, shrug your shoulder off and get coding.
Let’s define the data for our form in app.js (just so that we can test the dynamic submit feature)
Open up App.js and put in the code below.
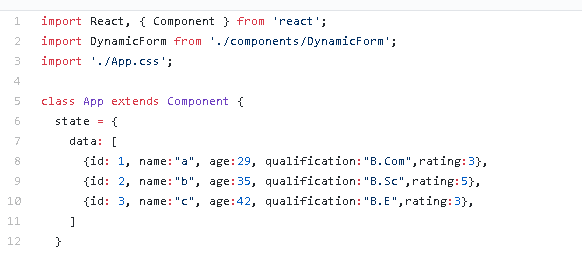
In the above block of code we are defining some state information.
Continue working on App.js and lets have a look at the render() method. In the render method we create a component of type <DynamicForm> that takes some props. We yet have to create this <DynamicForm> component.
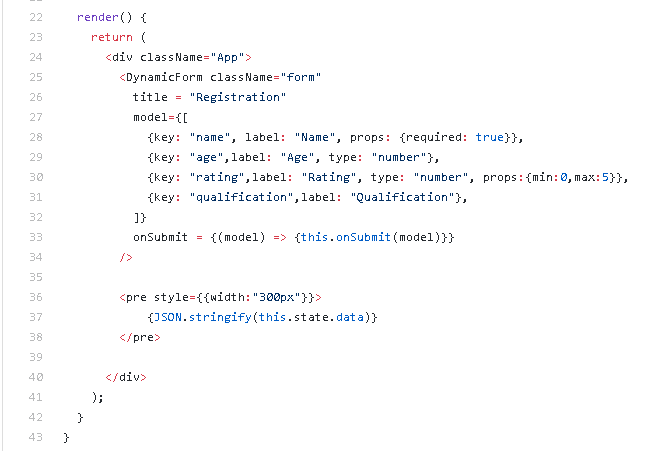
Let’s have a look at the props that we are passing to the DynamicForm component.
- className
Usef for styling - title
The title of the form - model
The structure/definition of the form data in JSON/Object literal.
You can also load this structure externally from a database or file system. - onSubmit
The event handler when the user clicks on submit button.
Let us have a deep look at the model props as that is the heart of this dynamic form component.
- key
Unique ID. It is used as “key” prop the component and also this value is used for dynamically create the state value for the specific input in the DynamicForm component. - label
The text to display on the label field of input. - props
Valid html props, includes validation, min, max (for numeric) etc. - type
The type of input to generate. Currently supports two types, default, text, and number.
The <pre> section simply renders the state information for completeness sake.
Now comes the crux of the code, the DynamicForm, itself.
Now I have created a folder with the following hierarchy
→src →components/DynamicForm
Inside DynamicForm folder, all the code for the components resides in index.js file and the styles are stored in form.css.
For simplicity I would not bother putting the styles here (but you can always refer the github for the same).
Let’s explore index.js and take a peek at the code.

Ok, we begin by creating an empty state variable. Any guess, why state is empty? Bang! Yes, because state will be created dynamically by using the keys from the model props.
Let’s take a look at the render method of DynamicForm component.

We begin by storing the title in a variable and then return the jsx for the component.
The returned jsx is very simple, except the form has a submit handler and the important things are happening in the helper method renderForm();
Lets’ take a peek into renderForm() method.

Huh, the method is not as complex as we might think.
Ok, lets dissect it.
We begin my storing the model props in a variable.
We loop through all the model/metadata (as this describes the form fields)
We grab some key props from the model for ease of use. If the “type” props is not defined, we default it to “text”;
Finally we return a jsx. Now inside the return statement , the label and the input field for the forms are dynamically created. We assign a unique key to each element, so that React can keep its sanity and don’t shout on us for missing keys error.
The code is annotated with my illegible handwriting, but I hope it makes it clear the intent of the code.
The interesting thing here is the onChange() event handler, as it is here the state values are dynamically created.
Let’s take a peek at the onChange() handler.

So, anytime the form input changes, the state is updated with the correct value of the respective input. This is where the magic is happening.
And now finally, lets take a look at the onSubmit() handler. When the user submits the form, the DynamicForm component simply passes the message to the parent component.

Now in the parent component, in this case “App.js”, we can handle the submit, and may be store the model state, withing our data array.
Let’s take a look at the onSubmit() action in App.js

We, create a new id for the data (crude way to do so, but in real case the id’s are generated on the server) and finally update our state using set state.
And finally add the getDerivedStateFromProps method so that props changes triggers re-render of components.
static getDerivedStateFromProps(nextProps, prevState) {
    if (nextProps.defaultValues &&
            Object.keys(nextProps.defaultValues).length) {
        return {
            ...nextProps.defaultValues
        }
    } else {
        // Assign default values of "" to our controlled input
        // If we don't do this, React will throw the error
        // that Input elements should not switch from uncontrolled
        // to controlled or (vice versa)     let initialState = nextProps.model.reduce((acc, m) => {
            acc[m.key] = m.value ? m.value : "";
            return acc;
        },{});
        console.log("initialState: ", initialState);
        return {
            ...initialState
        }
    }
}
I will be creating a hook version of this tutorial soon and these life cycle methods will be not needed.
And voila, we are done!
Hope you enjoyed this small nugget of React code. Please share your thoughts, comments or anything that you think might help me creating more content :)
NOTE: Added custom validation. The display you can control as needed. Even multiple validations on the same field are supported.
It’s a quick code, so there could be bugs.
The branch is here
https://github.com/rajeshpillai/react-dynamic-form/tree/instructor
All validators can be stored in the validators folder. A validator should return a boolean.
History
- 1-July-2019 — Added feature note
- 08-June-2019 — Added getDerivedStateFromProps method
- 27-Dec-2018 — Fix typos.
- 18-Apr-2018 — Updated github code to handle radio button (The article is not updated, but will do so when I grab some free time)
Happy Coding!
Learn with me (@rajeshpillai): https://twitter.com/rajeshpillai
I have created a patreon account for community support of Full Stack Engineering Curriculum
https://www.patreon.com/unlearninglabs
Promotion: If you would like to support my open source curriculum Mastering Full Stack Engineering in 12 to 20 weeks ,then here is a special 10$ coupon for medium readers for my upcoming live ReactJS-Beyond the basics and JavaScript Deep Dive — Code Your Own ReactJS course on udemy.

✉️ Subscribe to CodeBurst’s once-weekly Email Blast, 🐦 Follow CodeBurst on Twitter, view 🗺️ The 2018 Web Developer Roadmap, and 🕸️ Learn Full Stack Web Development.