Ride on Waves Surfboard: Migrating from Waves Browser-based IDE to Surfboard CLI tool Part 1
Hey 👋, today I’m going to show you how to get started using the Waves RIDE language locally using Surfboard. But first…
Assumptions
I assume you are neither new to the Waves Blockchain nor have you never written dApps using Waves RIDE.
I also assume you have been using the Waves RIDE online IDE here
So with that out of the way let’s find out…
What is Surfboard
According to Surfboard official repo, it is:
Surfboard is a command line interface for working with RIDE programming language. Surfboard allows to compile RIDE scripts, deploy and run tests.
What this means, is that Surfboard is a command line that allows for the use of the Waves Ride Programming Language on a local machine. Pretty easy right? 😏
Let’s Surf!! Installing Surfboard
Surfboard is an NPM package. With that fact established, to get started with Surfboard you would need to have Node and NPM installed on your machine. To verify that Node is installed on your machine, run the following command:
node -vif the above command returns a version number then hurray Node installed and you can proceed to install Surfboard by running:
npm install -g @waves/surfboardTo also verify the above installation, run:
surfboard -vthis should return something similar(if you are on a Mac) to:
@waves/surfboard/1.10.0 darwin-x64 node-v12.13.0To see commands exposed by Surfboard, run:
surfboard -hThe above will output something of the form:
Surfboard =========VERSION
  @waves/surfboard/1.10.0 darwin-x64 node-v12.13.0USAGE
  $ surfboard [COMMAND]COMMANDS
  compile  compile ride file
  config   change config
  help     display help for surfboard
  init     initialize new Ride project
  repl     run ride repl
  run      run js script with with blockchain context
  test     run test
Creating a new Ride Project 🏄
I am pretty sure you noticed the init command as seen above. This command is used to create a new Ride project. Let’s explore that, shall we? 😅
So first things first, navigate to a folder you want your Ride Projects to be located in. Then run the following command:

The above command will output:
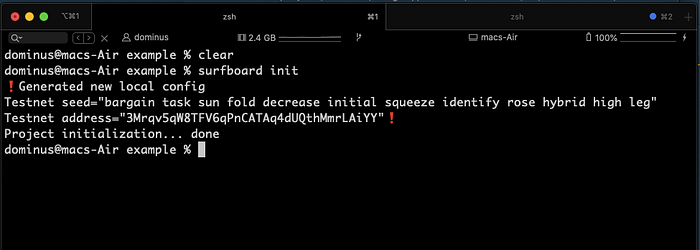
If everything goes as planned 👼, you’d see the above output. Let's analyze these:
Surfboard being sophisticated in creating a new Ride project will create a new Waves wallet for you on the Testnet node of Waves Blockchain.
The Anatomy of a Surfboard generated Ride Project
Needless to say, Surfboard created some files and folders for us, let’s take a peek into them…

Pro tip 👼: If you are using VS Code, you will find the following extensions essential:
Explaining The Structure 💁
Surfboard created 3 folders and a single config file for us when we ran init. These are
- ride/ — would contain all of our Ride Scripts(Smart Contracts/dApps)
- test/ — would contain all of our tests files(which are normally jest files)
- scripts/ — would contain scripts used for deploying our smart contracts or dApps
- surfboard.config.json — this is the configuration file for our Ride project
surfboard.config.json
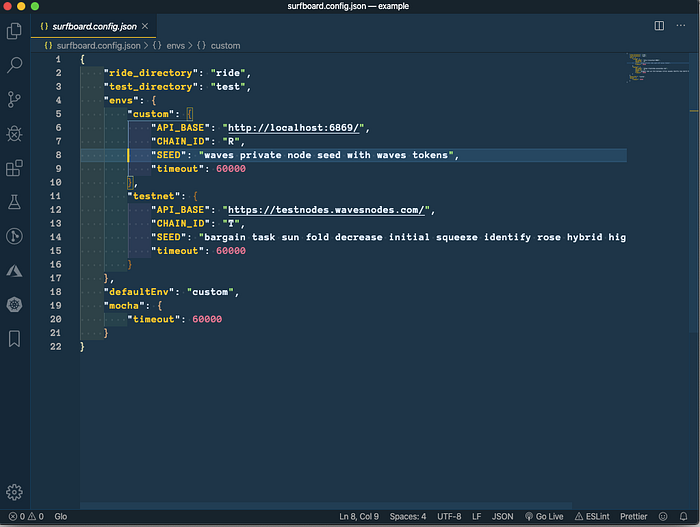
When you open the surfboard.config.json file, you would see the basic configuration for your RIDE project, I’d like to point you to the envs (environment) entries which are: custom and testnet. The significance of these entries is to set the default deployment environment for your dApps. However, to use the default which is custom, you need to set up a local node: Ilya Smagin did a great job in walking through the setup process using Docker images. See it here. However, for this article, we would be deploying to testnet(which I guess we are pretty use to while developing on ide.wavesplatform.com)
Deploying to Testnet
You’d noticed that we have wallet.ride in the ride/ directory. Let’s deploy that dApp to the wallet created for us by Surfboard. To do that, run:
surfboard run wallet.deploy.js --env=testnet --variables dappSeed="dApp seed"When you run the above command, you will get an error(which is expected) because we know to deploy a dApp we would need to fund the wallet that will be scripted 😏. So lets head on to Waves faucet. Copy your dApp address and head on there to grab some Waves!!

Re-run the command and you will get a transaction id as output. In my case I got:

You can see the transaction for the deployed dApp here
Quick Glance into wallet.deploy.js
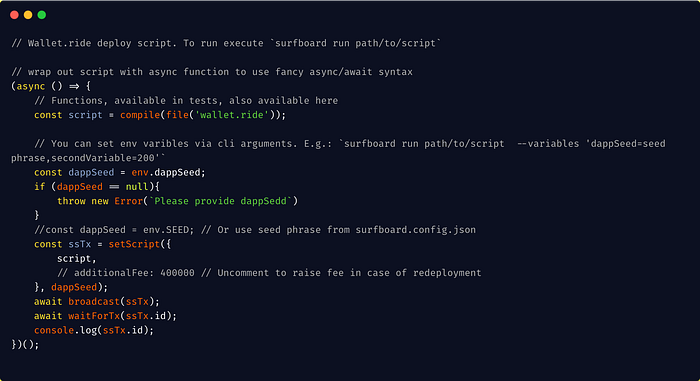
The above shows the content of wallet.deploy.js. What we are really concerned about here is…
const dappSeed = env.dappSeed…from that line above we could see that the dappSeed is being assigned from the env object which is being set from
--variables dappSeed="dApp seed"in the command deploy command we ran…
surfboard run wallet.deploy.js --env=testnet --variables dappSeed="dApp seed"…I hope that makes sense?
And we are done...
Congratulations 🎊. You have successfully:
- Installed the Surfboard CLI
- Created a new Ride project from Surfboard init
- Had an overview of the anatomy of a surfboard generated Ride project
- Deployed an example dApp on testnet
Kudos to you for completing this part 1. Part 2 would be more in-depth as we would dive into understanding the wallet.deploy.js file used in deploying our dApp.
Big thanks to Ilya Smagin(the RIDE Architect) from taking the time out to review this article.
P.S: New To Ride?
Check out Awesome Waves Ride by Waves Africa community.
Happy Surfing 🏄 🏄

