Setting Up Development Environment Using React Native on Windows
Recently, I decided to explore and use React Native for developing Android Apps. However, as I was setting up my development environment on Windows, I ran into a lot of challenges. Setting up React Native on Windows is challenging and requires attention to a lot of moving pieces, even if you want to get a sample app up and running on an emulator.
In this article, I will discuss how to set up your development environment on Windows using React Native framework and Android Studio to build Android Apps.
I will be using the following tools to set up my development environment:
- Windows
- Visual Studio Code
- Android Studio
- Built-in emulator in Android Studio
- Node Package Manager (NPM)
- Node.js (Version 8 or newer)
- React Native command line interface (React Native CLI)
- Java Development Kit (JDK 8 or newer)

Step 1: Install Visual Studio Code
Download and install the latest version of Visual Studio Code for Windows from https://code.visualstudio.com/
Step 2: Install Android Studio
- Download and install the latest version of Android Studio for Windows from https://developer.android.com/studio/
- Android Studio installs the latest Android SDK by default. React Native requires Android 6.0 (Marshmallow) SDK or higher. I decided to use Android 7.1.1 (Nougat). Feel free to use the latest SDK.

- Make sure you have the following SDK tools installed:

Important: You will need the Intel x86 Emulator Accelerator (HAXM installer) to run the emulator on Windows. For more information, please refer to the following link: https://github.com/intel/haxm/wiki/Installation-Instructions-on-Windows
Note: You need to enable Intel Virtualization Technology by changing a BIOS setting. Please look at the following link to see how that is done:
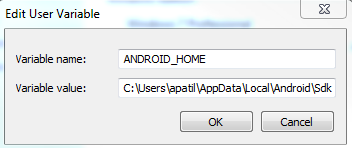
- Configure the ANDROID_HOME environment variable. Open the System pane under System and Security in the Windows Control Panel, then click on Change settings. Open the Advanced tab and click on Environment Variables. Click on New to create a new ANDROID_HOME user variable that points to the path to your Android SDK:
- Finally, add Android Debug Bridge (ADB) to the PATH environment variable. This will help you know which devices are connected or which emulators are currently running. Install location of ADB: C:\Users\apatil\AppData\Local\Android\Sdk\platform-tools\adb.exe
Step 3: Install Node
- Download and install the latest version of Node.js from https://nodejs.org/en/. Note: Npm is installed with Node.js.
Note: Make sure you add NPM to the PATH environment variable.
- Once npm is installed, install React Native CLI by running the following command from the Windows prompt command line or Integrated Terminal in Visual Studio Code. Note: Integrated Terminal can be found under View →Integrated Terminal
npm install -g react-native-cliStep 4: Using embedded JDK
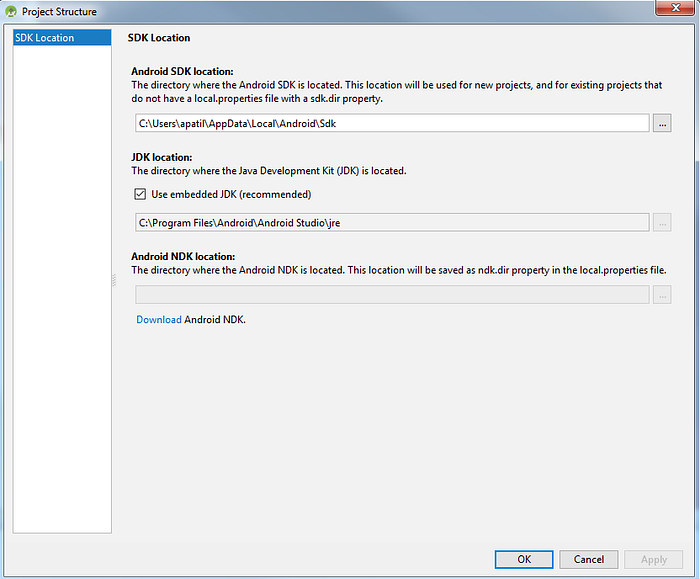
Android Studio comes with an embedded JDK which is recommended. Make sure you check the following option under File → Other Settings → Default Project Structure in Android Studio:
Step 5: Creating a new React Native application
Finally, lets create our first React Native application by running the following command in your workspace location
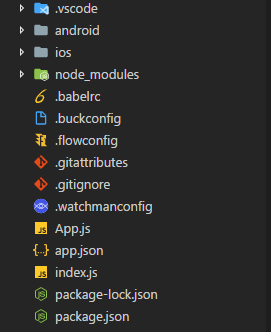
react-native init SampleReactNativeProjectThis creates the following project directory structure when you open the project in Visual Studio Code.
Step 6: Building for Android
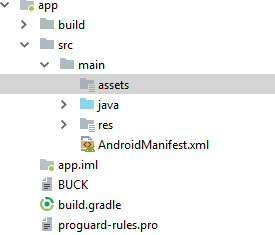
- Before we go ahead and run the app, open up the “android” directory in our project in Android Studio and create an “assets” directory under app/src/main.
- To simplify the build and install process, in package.json, add the following script under “scripts”:
"android-windows": "react-native bundle --platform android --dev false --entry-file index.js --bundle-output android/app/src/main/assets/index.android.bundle --assets-dest android/app/src/main/res && react-native run-android"- Now run the following command to install the app and see it running on the emulator. This runs the script above which we set up in package.json.
npm run android-windowsThis starts up a Metro Bundler instance in a new command prompt instance and installs the app on the emulator as shown below:


Note: If you still run into the following error, “java.lang.UnsupportedClassVersion Error: com/android/build/gradle/AppPlugIn: Unsupported major.minor version 52.0”, ensure that you have checked the embedded JDK as shown in step 4 above.
If you enjoyed reading this article, please leave a comment or hit the clap icon below to show your appreciation. Feel free to recommend and share this article. Thanks for your time.
About me
Amrut is a Full Stack Software Engineer who is passionate about tech and Software Development in Web and Mobile. He likes to write about coding, investing, trading, finance, and economics. In his free time, Amrut likes to understand business models of publicly traded companies and analyze their financial statements. He strongly believes in adding value to people’s lives through quality work and empower people to take control of their personal finances. He also loves to watch and discuss American Football.