How to setup Webpack +2.0 from scratch in 2017 — Part IV
Hey hey hey! So glad we made it to chapter 4 already, I’m excited. This is a follow up on chapter 3 — you can find chapter 3 here.
Let’s get cracking, we’ve got a lot to cover.
This is where we left off.
We have all of the main functionality already — but we want more, we’re going to boost up our performance and make our build production ready.
Minification
Start off by minifying and uglifying our code. Uglifying..? What the hell is that supposed to mean? Are we gonna let a T-Rex eat and squack it out? Allow me to give you an excellent explanation found on Quora.
Let’s install a webpack plugin called uglifyjs-webpack-plugin
We have done this before… Try to figure this one out before moving on. We install it via npm.
Ready? Let’s gooooooooooo
npm i uglifyjs-webpack-plugin --save-devNow we require() it and new it up and all done!

Call the plugin with new special keyword.

All done! Time to test it! You can delete our output.js and run webpack once again.

Now we should have something like this

talk about spaghetti code. But it works!
Don’t forget — This “ugly” code is not meant for us humans! This is solely for the browser!
Node Environments
It’s actually pretty straight forward, there are no tricks. We have the options to choose whether our app is in production or development
We can accomplish this by using a command called NODE_ENV=production
Not that hard ain’t it? Every day we learn a little to acquire more knowledge. Nobody knew everything from day 1, so don’t worry.
By the way — we also use NODE_ENV=developmentfor development phase. Obvious, right? Okay, so let’s specify our development phases in package.json
Let’s call the script production while we’re at it.

WINDOWS: If you’re on Windows and the production script is not working as intended — try setting your production script like this
“production”: “SET NODE_ENV=production & webpack -p”I also added a build script which is just the standard compile once webpack command. (From chapter-1)
Always nice to test early on, so let’s do it!
Yup works like a charm. But it’s actually not doing much. We need to define what scripts we want to run in production mode in our .js files as well. We can accomplish this using the process.env.NODE_ENV = "production";
Add a simple ifstatement to check wether it’s in production — if the condition is true (is the NODE_ENV in production mode?) — Yes? Here’s what happens now.
if (process.env.NODE_ENV === 'production') {
  module.exports.plugins.push(
    new webpack.optimize.UglifyJsPlugin() // call the uglify plugin
  );
}
We add this to the bottom of our file. We call it production behavior.
Don’t forget to move new webpack.optimize.UglifyJsPlugin() from our development plugins to production plugins.

Now if we remove our output.js once again and run npm run build we should see this.

Okay.. buut if we remove it once again and run npm run production

We should see the uglified code.

Cool! We have set our webpack ready towards a real production setup! Good job!
CSS Minification
Surely this is very easy. just grab a plugin called optimize-css-assets-webpack-plugin and off we go.
npm i optimize-css-assets-webpack-plugin --save-devRequire the plugin and call it in our production logic and all done! It’s so simple!
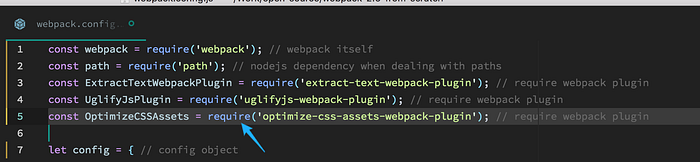
1. require the plugin
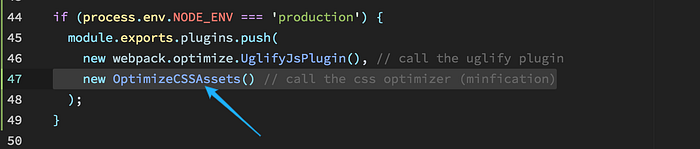
2. call the plugin in our production logic
It’s showdown time!
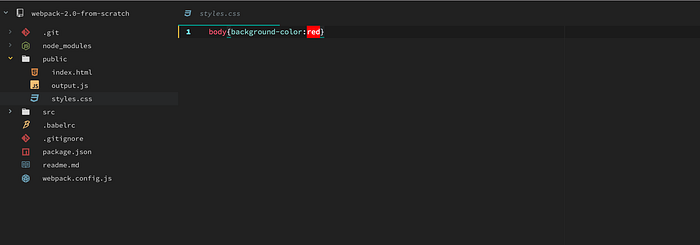
Woah, it works!
Let’s test if it works in our browser as well, once it does, I think we can pat ourselves on the back and go home for today, we’ve achieved a lot!

and yup, it works. Good job!
We learned about boosting our application performance and setting up our config for production, woop!
Continue on chapter V!
Source code, as always!
Thank you and I hope you learned a lot with me!