Simple To-Do application with Laravel and Vue

Let’s build simple to-do application using Laravel framework and Vue.js. In this case we will use bulma css framework, but you can use any other.
Laravel installation
First of all, install Laravel. You can install it globally using Composer:
composer global require "laravel/installer"And then use laravel new command for creating a fresh laravel installation in specific directory. For example, laravel new todo will create a directory named todo containing a fresh laravel installation with all dependencies:
laravel new todoOr you can also install Laravel using Composer create-project command:
composer create-project --prefer-dist laravel/laravel todoDatabase preparation
Create database todo, that we will use in this project. If you use mysql from terminal:
mysql -uroot -penter root password and then:
create database todo;Now go to the .env file and set such database parameters as
DB_CONNECTION=mysql
DB_HOST=127.0.0.1
DB_PORT=3306
DB_DATABASE=todo
DB_USERNAME=db_username
DB_PASSWORD=db_password
Now we create model with migration and controller using artisan command:
php artisan make:model Task -mcIn our model define property $guarded for mass-assigment:
class Task extends Model
{
    protected $guarded = [];
}
In our migration define our tasks table. Here is archive column for marking if the task is completed, with the rest everything is obvious:
public function up()
{
    Schema::create('tasks', function (Blueprint $table) {
        $table->increments('id');
        $table->text('body');
        $table->boolean('archive')->default(false);
        $table->timestamps();
    });
}
And now it’s time to run out migration using artisan command:
php artisan migrateRouting
For this project we will use web routes. So in routes/web.php define all out routes:
Route::get('/', function () {
    return view('main');
});Route::get('current_tasks', 'TaskController@index');
Route::get('archived_tasks', 'TaskController@archived');
Route::post('create_task', 'TaskController@store');
Route::post('delete_task/{id}', 'TaskController@destroy');
Route::post('archive_task/{id}', 'TaskController@archive');
Route::post('edit_task', 'TaskController@edit');
Here is we defined routes for getting active tasks (current tasks) and archived tasks, also — routes for create, edit, delete and archive task. All this routes (except one, that returns view ‘main’) we will call using AJAX.
Controller
In our TaskController define all methods according to our routes:
namespace App\Http\Controllers;use App\Task;
use Illuminate\Http\Request;class TaskController extends Controller
{
    public function index()
    {
        return Task::where('archive', 0)
                      ->orderBy('id', 'desc')->get();
    }    public function archived()
    {
        return Task::where('archive', 1)
                       ->orderBy('id', 'desc')->get();
    }    public function store(Request $request)
    {
        $this->validate($request, [
            'body' => 'required|max:500'
        ]);        return Task::create(['body' => request('body')]);
    }    public function edit(Request $request)
    {
        $this->validate($request, [
            'body' => 'required|max:500'
        ]);        $task = Task::findOrFail($request->id);
        $task->body = $request->body;
        $task->save();
    }    public function archive($id)
    {
        $task = Task::findOrFail($id);
        $task->archive = ! $task->archive;
        $task->save();
    }    public function destroy($id)
    {
        $task = Task::findOrFail($id);
        $task->delete();
    }
}
Package.json
We don’t need bootstrap or jquery in this project, so let’s change our package.json file:
"devDependencies": {
    "axios": "^0.16.2",
    "cross-env": "^5.0.1",
    "laravel-mix": "^1.0",
    "lodash": "^4.17.4",
    "vue": "^2.1.10"
  }
And then run
npm installIt’ great, that we have axios out of the box. But we also need to get bulma:
npm install bulma -SAnd I think it’s good to know what day is today on tasks page, so we will use vuejs-datepicker for that (you can use whatever you want, just visit https://vuejsexamples.com/):
npm install vuejs-datepicker -SCSS
I choose some UI for this project, but you can use whatever you want. There is my resources/assets/sass/app.scss file:
// Bulma
@import "~bulma/bulma.sass";body,
html {
    background-color: #4E3759;
    margin: 0;
    padding: 0;
}a {
    outline: none;
}#app {
    margin-top: 40px;
    margin-bottom: 40px;
}.task-list .title {
    margin: 1rem 0;
}.task-list .card {
    margin: 20px 0;
}.check {
    color: #ff3860;
}.done {
    color: #22c65b;
}.check:hover {
    color: #ff3860;
}.check:active,
.done:active {
    border: none;
}.done:hover {
    color: #22c65b;
}
View
Main view resources/views/main.blade.php:
<!DOCTYPE html>
<html>
<head>
    <meta charset="utf-8">
    <title>Learn Vue</title>
    <link rel="stylesheet" type="text/css" href="css/app.css">
    <link rel="stylesheet" href="https://maxcdn.bootstrapcdn.com/font-awesome/4.7.0/css/font-awesome.min.css">    <meta name="csrf-token" content="{{ csrf_token() }}">
    <script>
        window.Laravel = { csrfToken: '{{ csrf_token() }}' }
    </script>
</head>
<body>
    <nav class="navbar">
        <div class="navbar-brand">
            <a class="navbar-item" href="{{ url('/test') }}">
                <img src="images/logo.png" alt="ToDo application" width="112" height="28">
            </a>
            <div class="navbar-item is-hidden-desktop">
                <p class="control">
                    <a class="button is-primary" href="#">
                            <span class="icon">
                                <i class="fa fa-calendar"></i>
                            </span>
                        <span>Date</span>
                    </a>
                </p>
            </div>
        </div>
        <div class="navbar-menu">
            <div class="navbar">                <div class="navbar-item" id="date_picker">
                    <datepicker v-model="date" input-class="input"></datepicker>
                </div>             </div>
        </div>
    </nav>   <div id='app' class="container">
        <task-list></task-list>
    </div><script src="js/app.js"></script>
</body>
</html>
Here is the first element for new vue instance (datepicker):
<div class="navbar-item" id="date_picker">
    <datepicker v-model="date" input-class="input"></datepicker>
</div>
And the second element for new vue instance (task-list):
<div id='app' class="container">
    <task-list></task-list>
</div>
Vue.js
In our resources/assets/js/app.js load all dependencies, load all View components and define new Vue instances:
// load all dependencies
import axios from 'axios';
import Datepicker from 'vuejs-datepicker';window.Vue = require('vue');
window.axios = axios;// load all components
Vue.component('task-list', require('./components/Task-list.vue'));// define new Vue instances
const app = new Vue({
    el: '#app'
});const date_picker = new Vue({
    el: '#date_picker',    components: {
        Datepicker
    },    data: {
        date: new Date()
    }
});
And finally, let’s see all the magic in our resources/assets/js/components/Task-list.vue:
<template>
    <div class="columns">
        <div class="column is-half is-offset-one-quarter task-list">
            <div class="box">
                <h2 class="title">My tasks</h2>
                <hr>
                <div class="field has-addons">
                    <div class="control is-expanded">
                        <input class="input" type="text" placeholder="New task" v-model="task.body">
                    </div>
                    <div class="control">
                        <a class="button is-primary" @click="createTask()">
                            Add task
                        </a>
                    </div>
                </div><div class="tabs is-centered">
                    <ul>
                        <li :class="{'is-active':isActive('current')}">
                            <h3 class="title">
                                <a href="#" v-on:click.prevent="fetchTaskList()">
                                    Current task
                                </a>
                            </h3>
                        </li>
                        <li :class="{'is-active':isActive('archive')}">
                            <h3 class="title">
                                <a href="#" v-on:click.prevent="fetchTaskList(1)">
                                    Archived tasks
                                </a>
                            </h3>
                        </li>
                    </ul>
                </div>
                <div class="card" v-for="task in list">
                    <header class="card-header">
                        <p class="card-header-title">
                            Task {{ task.id }}
                        </p>
                        <a href="#" class="card-header-icon" aria-label="more options"
                            v-on:click.prevent="archiveTask(task.id)">
                            <span class="icon">
                                <i class="fa " :class="{'fa-square-o': !task.archive,check: !task.archive, 'fa-check-square-o': task.archive, done: task.archive}" aria-hidden="true"></i>
                            </span>
                        </a>
                    </header>
                    <div class="card-content">
                        <div class="content">
                            <p v-if="task !== editingTask" @dblclick="editTask(task)" v-bind:title="message">
                                {{ task.body }}
                            </p>
                            <input class="input" v-if="task === editingTask" v-autofocus @keyup.enter="endEditing(task)" @blur="endEditing(task)" type="text" placeholder="New task" v-model="task.body">
                        </div>
                    </div>
                    <footer class="card-footer">
                        <a class="card-footer-item" v-on:click.prevent="deleteTask(task.id)">Delete</a>
                    </footer>
                </div>
            </div>
        </div>
    </div>
</template><script>
    export default {
        directives: {
            'autofocus': {
                inserted(el) {
                    el.focus();
                }
            }
        },        data() {
            return {
                message: 'Double click for editing.',
                list: [],
                task: {
                    id: '',
                    body: '',
                    archive: ''
                },
                editingTask: {},
                activeItem: 'current'
            }
        },        created() {
            this.fetchTaskList();
        },        methods: {
            fetchTaskList(archive = null) {                if (archive === null) {
                    var url = 'current_tasks';
                    this.setActive('current');
                } else {
                    var url = 'archived_tasks';
                    this.setActive('archive');
                }                axios.get(url).then(result => {
                    this.list = result.data
                });
            },            isActive(menuItem) {
                return this.activeItem === menuItem;
            },            setActive(menuItem) {
                this.activeItem = menuItem;
            },            createTask() {
                axios.post('create_task', this.task).then(result                        => {
                    this.task.body = '';
                    this.fetchTaskList();
                }).catch(err => {
                    console.log(err);
                });
            },            editTask(task) {
                this.editingTask = task;
            },            endEditing(task) {
                this.editingTask = {};
                if (task.body.trim() === '') {
                    this.deleteTask(task.id);
                } else {
                    axios.post('edit_task', task).then(result => {
                        console.log('access!')
                    }).catch(err => {
                        console.log(err);
                    });
                }
            },            deleteTask(id) {
                axios.post('delete_task/' + id).then(result => {
                    this.fetchTaskList();
                }).catch(err => {
                    console.log(err);
                });
            },            archiveTask(id) {
                axios.post('archive_task/' + id).then(result => {
                    this.fetchTaskList();
                }).catch(err => {
                    console.log(err);
                });
            }
        }
    }
</script>
Now run in terminal:
npm run devIf you want watching for the changes use:
npm run watchThat’s it. If you did all right, you must see this:
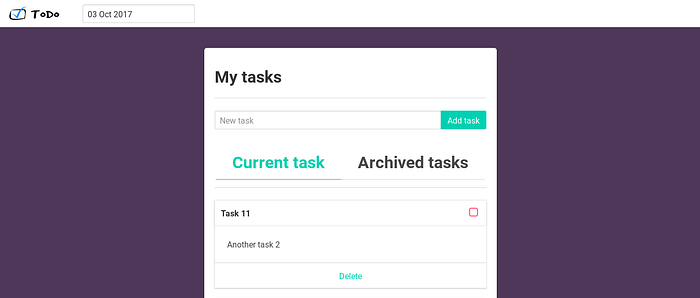
Here is you can add, edit and delete task. Double click on task body allow you to edit this task.
P.S. The source code available on GitHub. If you have any questions or suggestions write it on the comment. Thanks for the reading!