Sunsets and Shooting Stars in p5.js

This beginner-friendly tutorial will teach you how to paint a sunset scene on p5.js using gradients, loops, arrays, and objects!
Making a sunset, moon, and stars
- Open a new window in Google Chrome and go to the p5.js editor. You should see code that looks like this:
function setup() {
 createCanvas(400, 400);
}function draw() {
 background(220);
}
2. Setting up the canvas. We’re going to want our sunset scene to take up the whole window. In the setup() function, replace the line with createCanvas to read:
createCanvas(windowWidth, windowHeight);3. Adding a gradient function. Now we want to fill the background with a gradient to emulate a sunset. We’re going to borrow a function to make a gradient from the official p5.js website. Paste this function definition at the bottom of your code:
function setGradient(x, y, w, h, c1, c2, axis) {
  noFill();  if (axis == "Y") {  // Top to bottom gradient
    for (let i = y; i <= y+h; i++) {
      var inter = map(i, y, y+h, 0, 1);
      var c = lerpColor(c1, c2, inter);
      stroke(c);
      line(x, i, x+w, i);
    }
  }
  else if (axis == "X") {  // Left to right gradient
    for (let j = x; j <= x+w; j++) {
      var inter2 = map(j, x, x+w, 0, 1);
      var d = lerpColor(c1, c2, inter2);
      stroke(d);
      line(j, y, j, y+h);
    }
  }
}
Basically, this function takes in the starting (x, y) coordinates of the gradient, the width, the height, the two colors, and the axis (X or Y) that that the color should change on, and it paints a gradient.
A gradient on the y-axis makes the color change top to bottom; a gradient on the x-axis makes the color change left to right. The lerpColor function gradually blends the two colors together.
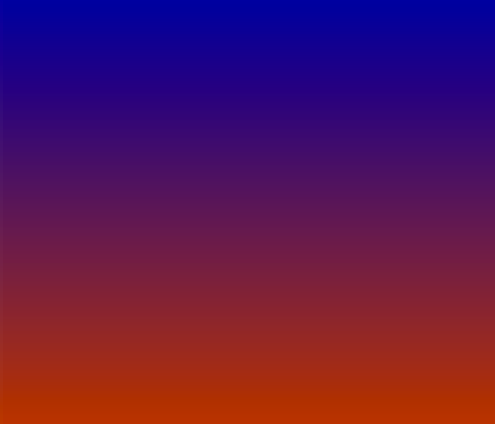
4. Picking the colors. We’ll need to pick two colors for our gradient. To emulate a sunset, I picked a navy blue and an orange-y color from the HTML Color Picker and put them into my draw() function:
var color1 = color(0, 0, 153);
var color2 = color(204, 51, 0);
Feel free to pick your own — the three values you’ll need will be the rgb (red, green, blue) values listed in parentheses right below the big color block.

5. Let’s make our gradient! To call the setGradient function we defined in the previous step, we need to write this code at the bottom of the draw() function:
setGradient(0, 0, windowWidth, windowHeight, color1, color2, "Y");6. Test it out! Press the “run” button and see if a gradient appears on your screen.

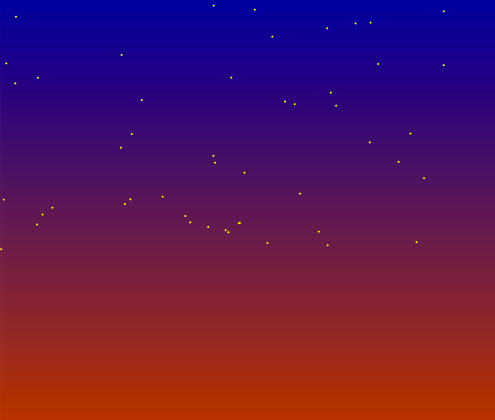
7. Adding a loop. Let’s draw some starts! Stars start coming out at sunset, right? For stars, we’ll want to draw lots of little yellow circles in random positions. To draw a bunch of anything, we’ll want to use a loop that will draw circles over and over again. Here’s a loop that will execute 50 times — add it to your draw() function:
for (var i = 0; i < 50; i++) {
   // Code goes here
}
8. Randomly positioning our stars. I want all my stars to have random (x, y) coordinates. Inside the loop, I’m going to randomly generate two variables, x and y:
var x = random(windowWidth);
var y = random(windowHeight-200);
I made y windowHeight-200 because I didn’t want the stars to come too close to the horizon (the bottom of the screen).
9. Drawing the stars. Now let’s actually draw the stars! Add this code after your x and y variables:
noStroke();
fill(255, 255, 0);
ellipse(x, y, 2, 2);
What’s going on here? First, noStroke() tells the computer I don’t want an outline around my stars. fill(255, 255, 0) makes my stars yellow (feel free to choose your own colors and rgb values from the HTML Color Picker). And finally, the last line draws a 2x2 pixel ellipse at the randomly chosen (x, y) location.
10. Seeing stars. Let’s test it out! When you press the “run” button, do you see stars?
11. Adjusting the frame rate. Are your stars moving SUPER FAST? We can change that. In your setup() function, add the code:
frameRate(1);See what happens when you press “run” again. You can try out different numbers and see what you like best.
12. Challenge: add a moon. You have seen that the function fill(r, g, b) sets a color and the ellipse(x, y, w, h) function paints an ellipse. Can you use these two tools to paint a moon somewhere on the screen?
Extension: Making twinkling stars
Every time our frame changes, all the stars are repainted in different positions. But what if we want our same stars to twinkle continuously?
- We are going to make star objects! At the bottom of your code (below the
setGradientfunction), add this code:
function Star() {
   // We'll add code here
}Star.prototype.draw = function() {
   // We'll add code here
}
2. Giving each star a permanent position. Inside the Star function, define its specific (x, y) coordinates:
function Star() {
   this.x = random(windowWidth);
   this.y = random(windowHeight-200);
}
3. Making each star twinkle. Now we want to draw each star, specifying noStroke() and the fill color just like before. Add the following lines into your Star.prototype.draw function:
noStroke();
fill(255, 255, 0);
ellipse(this.x, this.y, 2, 2);
But we’re going to continuously update each star’s (x, y) position to make it seem like it’s twinkling. Add these two lines into the Star.prototype.draw function as well:
this.x += (random(10) - 5);
this.y += (random(10) - 5);
4. Creating new stars! Since our stars will remember their (x, y) positions, we need to create a set of, say, 50 stars that we’ll keep in the night sky. At the very top of your code (before even the functions!), add this line:
var stars = [];This creates a data structure called an array that will hold all our stars.
Now let’s add stars to it! Inside the setup() function, add these lines:
for (var i = 0; i < 50; i++) {
    stars.push(new Star());
}
Again, we’ve used our loop that will execute 50 times and add (or push) 50 new stars to the stars array.
5. Let’s make the stars twinkle! Finally, we need to add the stars somewhere in our draw() function. Delete your last for loop from the draw() function and replace it with this loop:
for (var i = 0; i < 50; i++) {
    stars[i].draw();
}
6. Test it out! Hit the “run” button. Are your stars twinkling?
7. Extra twinkle. Our stars are currently shuffling around, giving the illusion of twinkling when really they’re just adjusting their position. Let’s play around with making them actually shine.
We’re going to assign each star its own width and height. Add these lines of code to your Star() function:
this.w = 2;
this.h = 2;
Change the line in draw() that starts with ellipse to incorporate these new variables:
ellipse(this.x, this.y, this.w, this.h);Now you’ll want to make the width and height vacillate between 2x2 pixels and 3x3 pixels. Add these lines to your Star.prototype.draw function:
if (this.w == 2) {
    this.w = 3;
    this.h = 3;
} else {
    this.w = 2;
    this.h = 2;
}
8. Test it out! Do you see the stars shining?
Extension: Making a shooting star
- Defining a shooting star. Just like we made a star object, we are going to make a shooting star object! Paste this definition at the very bottom of your code:
function ShootingStar() {
  this.x = random(windowWidth-200);
  this.y = random(windowHeight-400);
  this.w = 6;
  this.h = 4;
}
In this definition, I’m randomly generating (x, y) coordinates within the upper left quadrant of the screen and making the shooting star a little bit bigger than our normal 2x2 star.
2. Charting the star’s progress. We want our star to shoot across the screen and also become flatter and wider as it it progresses. The following function (which you’ll paste at the bottom of your code) accomplishes exactly that:
ShootingStar.prototype.draw = function() {
  noStroke();
  fill(255, 255, 0);
  ellipse(this.x, this.y, this.w, this.h);
  if (this.h > 0) {
    this.h -= 0.5;
  }
  this.w += 7;
  this.x += 5;
}
Every time the star is drawn, its height shrinks, its width increases, and it moves across the x-axis of the screen.
3. Implementing the star. Now that we’ve defined the shooting star’s behavior, let’s add the variable to store it. At the top of your code, add:
var shootingStar;Then, in the setup() function, we’ll put a shooting star inside the variable. Add this code to the bottom of your setup() code:
shootingStar = new ShootingStar();Finally, we’ll need to redraw the shooting star in every frame. Add this code somewhere in your draw() code:
shootingStar.draw();4. Test it out! Do you see the star shooting across your screen? You may want to experiment with the frameRate in the setup and see if you’d like the movement of the star to be faster or slower.

More extensions
- Add more shooting stars using an array and
forloops! (Hint: look at how the 50 stars were created.) - Can you make the shooting stars travel in an arc?
- Use your knowledge of gradients and ellipses to paint other scenes, like confetti falling from the ceiling. (Hint: you’ll want to continuously change the y-value to make confetti fall.)
- Can you make the stars (or confetti) glide all over the screen and bounce off the edge? (Hint: you’ll want to gradually increment/decrement the x and y location and constantly check if those variables are equivalent to
windowWidthorwindowHeight.)