To Handle Authentication With Node JS, Express, Mongo, JWT
Welcome! in this blog we are going to build an application to handle an authentication from scratch using Node JS, Express Framework, Mongo DB and JSON Web Token.

Our Journey🚀
- Generate
package.jsonwith basic application details - To setup remote GitHub repository for same.
- Installing NPM dependencies to run the application
- Create a mock register API and to check with Postman
- To setup database in MongoDB Atlas and connect it in our application
- To create User Model Schema
- Register API — To save user detail in the database
- Register API — To validate request body input
- Register API — To encrypt our password
- Login API — To compare the credentials with the user data in our database.
- Login API — Sign JWT Token
- Verify token middle-ware
- Dashboard API — Protected Route
Let begin🔊

Generate package.json with basic application details
Lets create an application folder auth in a workspace folder and open it in Visual Studio Code.

Run npm init in the application root folder and answer the questions below. Here, we are trying to create a package.json with basic application details

To setup remote GitHub repository for same
Once package.json is ready in your application root folder. Lets create a GitHub Repository to track our code further.
Skip this part, if you dont like to setup version control
gitfor your code.
Go to GitHub, login into your account and create one repository and copy the git URL.

Now, lets initialize git repository and setup our remote to point to repository created above.

Lets commit our package.json file with the command
git commit -m "intial checkin with package.json"
Then I did some setup before doing git push
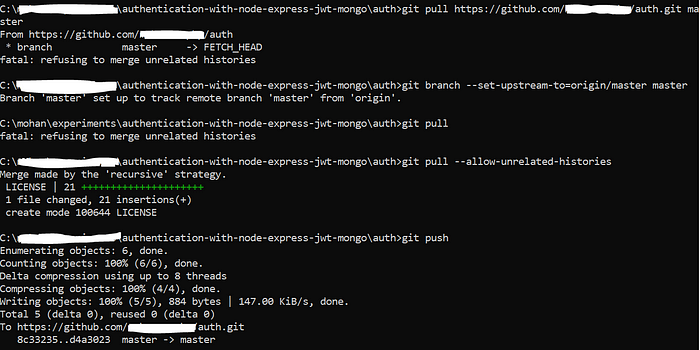
In my case — i already had a license file in remote so i used git pull --allow-unrelated-histories then i did git push
We are good now with repository to track our application further

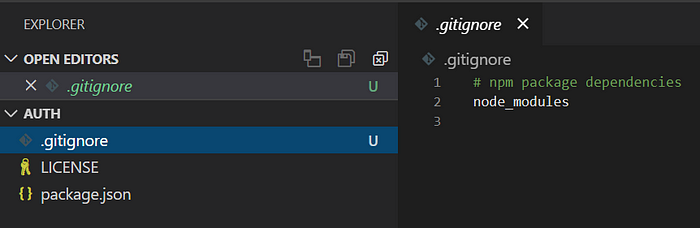
Lets focus on building our application further. Add .gitignore
To install NPM dependencies to run the application
Lets start installing the dependencies by running
> npm i express & npm i nodemon -D
We have installed
- express — minimalist web framework for Node JS
- nodemon — helps to run the application with auto reload feature
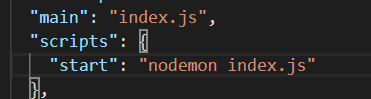
Lets do some modification in package.json as below
Create a mock register API and to check with Postman
Lets create a fileindex.js in application root and write the below code
const express = require("express");
const app = express();
app.listen(3000, () => console.log("server is running..."));
Here, we import express and initialize our app and start app server listening to port 3000
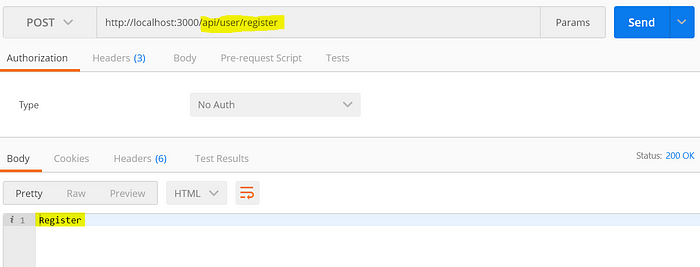
Lets write a simple API and check it via postman
Lets create a folder routes and a file auth.js under that folder, write the code below with a mock API response.
const router = require("express").Router();
router.post("/register", (req, res) => {
  res.send("Register");
});module.exports = router;
And update our index.jsfile as below
const express = require("express");
const app = express();// import routes
const authRoutes = require("./routes/auth");// route middlewares
app.use("/api/user", authRoutes);
app.listen(3000, () => console.log("server is running..."));
Let start our application running in development mode with the command npm start
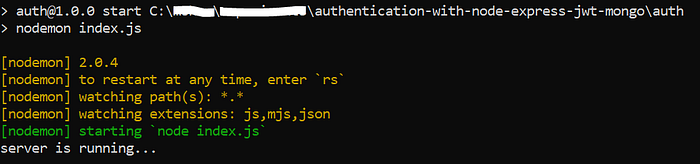
With postman we can find our API is up and running. kudos 👍🏼

To setup database in MongoDB Atlas and connect it in our application
Every
APIshould access some persistence or repository layer for data.
Let create our database via Mongo Atlas.
Mongo Atlas is a cloud database provider, provides database as a service by hosting our database in cloud platforms like AWS, Good Cloud etc.
Start creating one free cluster. I have chosen below configurations

It takes few minutes to create a cluster, once it created start adding an user via Security -> Database Access and in Security -> Network Access add an IP Whitelist with Allow access from anywhere It means we can access this database from any machine

Lets start connecting our database from application code.
We use mongoose for database interactions run npm i mongoose and update the db connection code to index.js
const app = express();
const mongoose = require("mongoose");// connect to db
mongoose.connect(
  "mongodb+srv://xxxx:xxxx>@cluster0-o1hky.mongodb.net/test?retryWrites=true&w=majority",
{
  useNewUrlParser: true,
  useUnifiedTopology: true,
},
() => console.log("connected to db")
);// import routes
const authRoutes = require("./routes/auth");
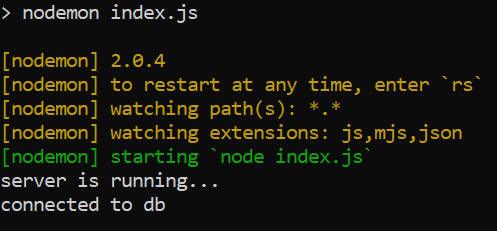
Once we start the server via npm start
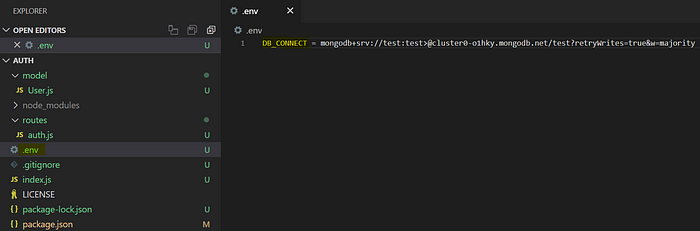
Since our db URL is explicit lets configure it via environment variable so that we dont need to maintain this information in our code. For that lets install npm i dotenv
Create a .env file in our application root and add the Mongo DB URL there
And update index.js
const mongoose = require("mongoose");
const dotenv = require("dotenv");dotenv.config();// connect to db
mongoose.connect(
process.env.DB_CONNECT,
{
  useNewUrlParser: true,
  useUnifiedTopology: true,
},
() => console.log("connected to db")
);
Now we reference the DB_CONNECT from node process environment
To create User Model Schema
Schema defines how our collection and fields in it should be designed. Its similar to Data Definition Language specification for our collections.
Lets create User model — schema for User collection
Create a folder model and a file User.js
Code above specify how our user model and each property should be.
Register API — To save user detail in the database
Lets try using User model to add a user to our database.
Goto routes/auth.js and update code under register API
const router = require("express").Router();
const User = require("../model/User");router.post("/register", async (req, res) => {
  const user = new User({
    name: req.body.name,
    email: req.body.email,
    password: req.body.password,
  });  try {
    const savedUser = await user.save();
    res.json({ error: null, data: savedUser });
  } catch (error) {
    res.status(400).json({ error });
  }
});module.exports = router;
In code above, we create a user object with data from request body.
To read the request body as JSON object - we need to enable body parser, to do that update index.js as below.
// import routesconst authRoutes = require("./routes/auth");// middlewares
app.use(express.json()); // for body parser// route middlewares
app.use("/api/user", authRoutes);
We use async/await since here user.save() is an asynchronous process which return promise to keep it sequential for readability we used async/await
Now lets try hitting the api/user/register via postman
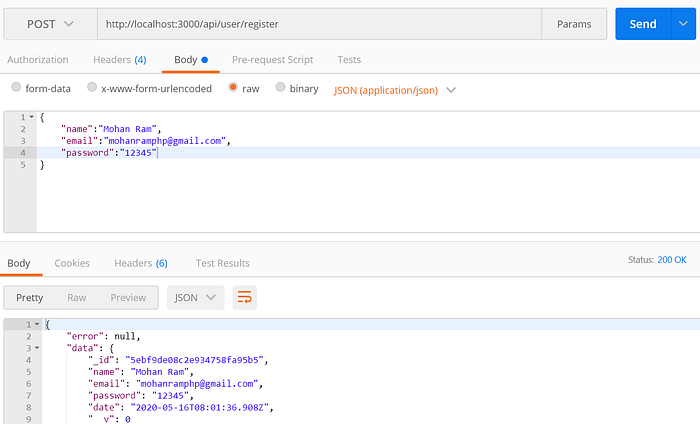
user to our users collection in mongo db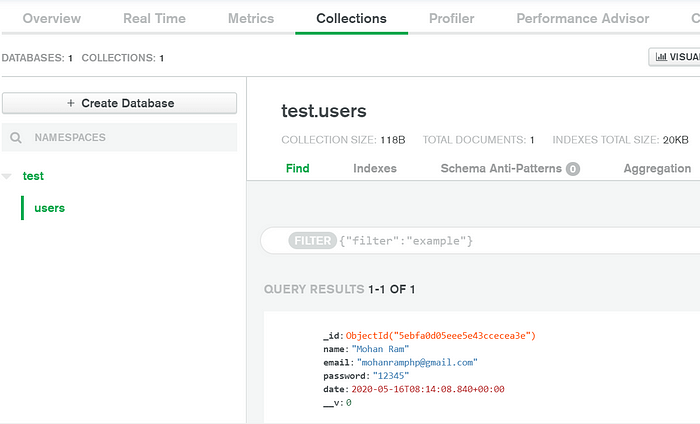
Register API — To validate request body input
Validation play important part in preventing data pollution in the persistence/repository layer
Lets validate our request body data.
For that we use @hapi/joi Let’s run npm i @hapi/joi and restart the app by running npm start
Lets goto routes/auth.js and update as below
// validationconst Joi = require("@hapi/joi");const schema = Joi.object({
  name: Joi.string().min(6).max(255).required(),
  email: Joi.string().min(6).max(255).required().email(),
  password: Joi.string().min(6).max(1024).required(),
});router.post("/register", async (req, res) => {
  // validate the user
  const validation = schema.validate(req.body);
  res.send(validation);
  ...
  ...
We have created a Joi.object by defining the validation rules we like to handle.
We have given same restriction which we given in the userSchema and lets return validation object as response to the API to learn how it looks like.
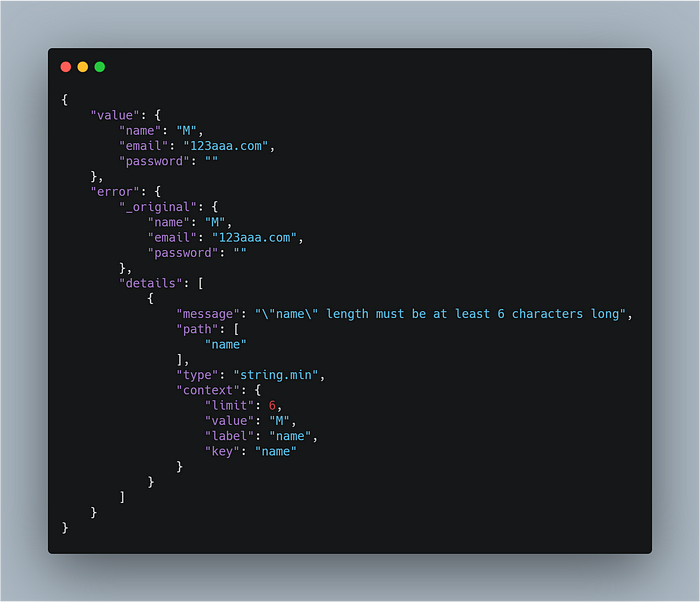
This is how Joi validation object looks like. Here, we are interested with the error message validation.error.details[0].message
Beauty of
Joiis it takes care of generating message string which we send back to consumer
Lets update our code for register API with validation for request body object
// validation
const Joi = require("@hapi/joi");const schema = Joi.object({
  name: Joi.string().min(6).max(255).required(),
  email: Joi.string().min(6).max(255).required().email(),
  password: Joi.string().min(6).max(1024).required(),
});router.post("/register", async (req, res) => {// validate the user
const { error } = schema.validate(req.body);if (error) {
  return res.status(400).json({ error: error.details[0].message });
}const user = new User({
  name: req.body.name,
  email: req.body.email,
  password: req.body.password,
});
...
...
Lets refactor our validation code so that we can separate the validation logic to a separate file. Create a file validation.js in the application root.
const Joi = require("@hapi/joi");const registerValidation = (data) => {
  const schema = Joi.object({
    name: Joi.string().min(6).max(255).required(),
    email: Joi.string().min(6).max(255).required().email(),
    password: Joi.string().min(6).max(1024).required(),
  });
  return schema.validate(data);
};module.exports = {
  registerValidation,
};
Lets use import this file in routes/auth.jsto update our validation part under registerAPI
// validation
const { registerValidation } = require("../validation");router.post("/register", async (req, res) => {
  // validate the user
  const { error } = registerValidation(req.body);  if (error) {
    return res.status(400).json({ error: error.details[0].message   });
  }  const user = new User({
  ...
  ...
We have to add one more validation at last to check whether the givenemail is already registered. To do that lets check the email availability in the users collection and throw error if available. Update routes/auth.js as below
if (error) return res.status(400).json({ error: error.details[0].message });
const isEmailExist = await User.findOne({ email: req.body.email });if (isEmailExist)
return res.status(400).json({ error: "Email already exists" });const user = new User({
...
...
We are good saving user details in our users collection.
Register API — To encrypt our password
In real world, password is exposed to various security threats which means we are in need to treat our password
lets see how can we hash our password. Lets install bcrypt run the command npm i bcrypt and restart the development server by running npm start
Lets update routes/auth.js file with hashing password
const bcrypt = require("bcryptjs");
...
...router.post("/register", async (req, res) => {
...
...// throw error when email already registered
if (isEmailExist)
return res.status(400).json({ error: "Email already exists" });// hash the password
const salt = await bcrypt.genSalt(10);
const password = await bcrypt.hash(req.body.password, salt);const user = new User({
  name: req.body.name,
  email: req.body.email,
  password, // hashed password
});// hashed password would something like $2a$10$IEzCullFI2hg/Sg4nvGN7OwJTnKkVa6XpZR9e6VhXMKEIxXvnpWsW
In the code above, we use two parts from bcryptjs
- Generating Salt — This will generate a random complex string. It accepts the complexity as argument
- Generating Hash Password — This will mix the salt and hardening our password to a complex generated string.
Instead returning whole user object in the success part just return userId
Let see the complete code here for registration
Login API — To compare the credentials with the user data in our database.
Now lets start write code to handle login
// login route
router.post("/login", async (req, res) => {  // validate the user
  const { error } = loginValidation(req.body);  // throw validation errors
  if (error) return res.status(400).json({ error:   error.details[0].message });  const user = await User.findOne({ email: req.body.email });  // throw error when email is wrong
  if (!user) return res.status(400).json({ error: "Email is wrong" });  // check for password correctness
  const validPassword = await bcrypt.compare(req.body.password, user.password);  if (!validPassword)
  return res.status(400).json({ error: "Password is wrong" });  res.json({
    error: null,
    data: {
      message: "Login successful",
    },
  });
});
Code should be self explanatory, lets see at high level.
- We do validation check to sanitize the request body inputs here its
email, password - Then we fetch user record from
userscollection by giving an email and check its availability otherwise throw error foremail - process the password with
bcryptand compare with hash password. Throw error if password is wrong. - At-last we just return success message.

Login API — Sign JWT Token
Lets generate a secure token to act as a protocol to communicate between the service end and consumer end.
To do that we use JSON Web Token.
Run the command npm i jsonwebtoken and restart the server by running npm start
lets update routers/auth.js with token generation code
// login route
router.post("/login", async (req, res) => {
  ...
  ...  if (!validPassword)
    return res.status(400).json({ error: "Password is wrong" });  // create token
  const token = jwt.sign(
    // payload data
    {
      name: user.name,
      id: user._id,
    },
    process.env.TOKEN_SECRET
  );  res.header("auth-token", token).json({
    error: null,
    data: {
      token,
    },
  });
});
In code above we generate a token by passing payload data and secret key
- Payload — data that can be used at client end to do some manipulation (For e.g. — User name can be shown in UI to indicate who has logged in)
- Secret — This is a secret key used to frame our token
We have added our secret to .env file and reference is given in the code above.

Response for successful login
{
    "error": null,
    "data": {
        "token": "eyJhbGciOiJIUzI1NiIsInR5cCI6IkpXVCJ9.eyJuYW1lIjoiTW9oYW4gUmFtIiwiaWQiOiI1ZWJmYjk1MTQ2MWZmMzNhM2M1NGY1MTkiLCJpYXQiOjE1ODk2MjUyMjV9.3XOyWHhkKm7lkZ8RRVWhTUijMuT4p8p5o8w3cGPR_gE"
    }
}
I have add token in jwt.io to show you what token consist of
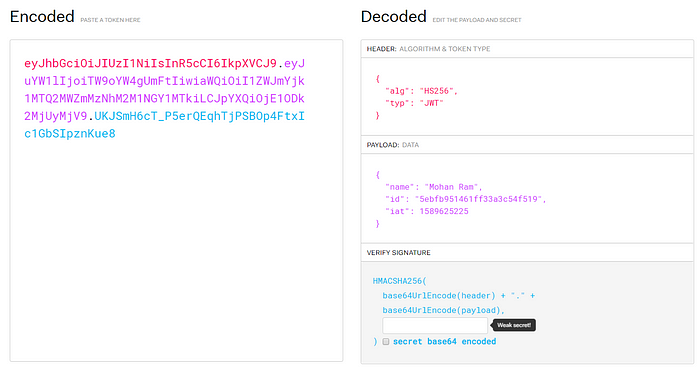
JWT token consist of 3 parts separated each by DOT (e.g. header.payload.signature)
- header — this section contains information about the token itself. Which algorithm is used to hash the token.
- payload — this contains information used by the client or consumer.
- signature — is an hash that is computed by applying following steps
data = base64UrlEncode(header) + "." + base64UrlEncode(payload);
hash = RS256(data, private_key);
signature = base64UrlEncode(hash);
Verify token middle-ware
Lets write a middle ware code to handle the token validity part
Under routes folder create a file validate-token.js and code is below
const jwt = require("jsonwebtoken");// middleware to validate token
const verifyToken = (req, res, next) => {
  const token = req.header("auth-token");
  if (!token) return res.status(401).json({ error: "Access denied" });  try {
    const verified = jwt.verify(token, process.env.TOKEN_SECRET);
    req.user = verified;
    next(); // to continue the flow
  } catch (err) {
    res.status(400).json({ error: "Token is not valid" });
  }
};
module.exports = verifyToken;
In code above, we check for a valid token from the request header auth-token property from the header object.
We sanitize the token and verify it with jwt plugin API and TOKEN_SECRET and added the token payload information to request object so that requested API code can consume it.
Lets design a protected route (route that can be accessed only with valid token) with help of Verify token middle-ware
Dashboard API — Protected Route
We will create a new route that is not exposed as public. It can only be accessed by the consumer who sends the valid token
Lets create a route file routes/dashboard.js and we will see how to protect this route.
const router = require("express").Router();router.get("/", (req, res) => {
  res.json({
    error: null,
    data: {
      title: "My dashboard",
      content: "dashboard content",
      user: req.user, // token payload information
    },
  });
});
module.exports = router;
We just send a mock data with token payload information as response and lets update our index.js to keep our dashboard routes protected with token.
// import routes
const authRoutes = require("./routes/auth");
const dashboardRoutes = require("./routes/dashboard");
const verifyToken = require("./routes/validate-token");// middlewares
app.use(express.json()); // for body parser// route middlewares
app.use("/api/user", authRoutes);// this route is protected with token
app.use("/api/dashboard", verifyToken, dashboardRoutes);
We have added the middle-ware as second argument in the use API. When consumer request with valid token. control will be passed to dashboardRoutes from verifyToken
We call next()method in verifyToken method to continue the execution further.
You can find the complete codebase here and GIF frames showing how to check all the APIs in Postman
Thanks for be with me still 🙏🏼. I know we covered various plugins in our journey to handle the authentication. Hope its fun to learn and use 😍

Keep coding✌️✌️✌️