Turn your website editable in a snap by your team using Google Sheets data
A year ago, some clients asked me if it was possible to update in a snap events & fairs on their website. Today, I’ll tell them “Yes, and everything will be integrated with your business documents in Google Spreadsheets”. Awesome, right?
The goal of this tutorial is to discover how to turn some website parts easily editable by your non-technical team or clients. Ready? Let’s go!
Get Started
The first thing to do is… to create a Google Spreadsheet! This spreadsheet should include a single header row (labels will be used later to render data), and your data rows. You can use any cell format (text, numbers, dates, currencies, dropdowns, checkboxes, …), even URLs (links or photos), that will be rendered in your HTML. Here is an example:
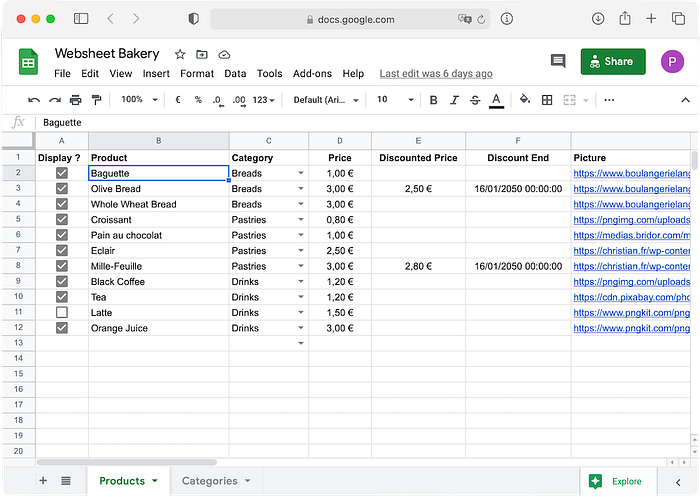
After that, just click on the Share button, and in the Get link section, click on Change to anyone with the link to allow public read access to your spreadsheet. Then, copy the spreadsheet link.
Add websheet.js to your website
In order to render spreadsheet data on your website, we’ll use an open-source standalone and lightweight JS library, called websheet.js. For that, you just need to import it:
Wow wow, what?!
Let me explain: once websheet.js has been imported, you can use the websheet initialiser, which is taking two parameters:
- First one (here,
products) is the data source name. If you call multiple times websheet initialiser, you should use different data source names for each spreadsheet. - Second one is the data source configuration (replace “url” and “sheet” values by your own ones).
Here are the most useful features, but there are many others, such as caching, callbacks, queries (to filter, sort and group rows), etc. Have a look to the documentation to discover them.
Render spreadsheet data
The last step is to render spreadsheet data we’ve just loaded! Anywhere in the website page, add data sources rendering:
In the example above, multiple formatters have been used:
data-websheet="<dataSourceName>"
Define a block that will be duplicated and rendered for each row of the data source.data-websheet-if="<columnName>"
Display the element only if the cell contains a checked checkbox, or if it’s an alias returningtrue(opposite effect withdata-websheet-unless).data-websheet-text="<columnName>"
Fill the text of the element with cell value.data-websheet-bind:<attributeName>="<columnName>"
Fill the given attribute value with cell value, for example:<img data-websheet-bind:src="Picture Column" />
<a data-websheet-bind:href="Link" data-websheet-bind:text="Link Text"></a>
Once websheet.js is loaded, the block above will be duplicated and rendered for each row of the spreadsheet, for example:
<div>
  <div>
    <div> Baguette </div>
    <img src="https://www.boulangerielangelus.com/wp-content/uploads/2015/09/BAGUETTE-CAMPAGNE_ss-ombres-1024x683.png" />
  </div>
</div>
<div>
  <div>
    <div> Olive Bread </div>
    <img src="https://www.boulangerielangelus.com/wp-content/uploads/2015/08/CAMUSETTE-OLIVES-01-1-1024x683.png" />
  </div>
</div>...
Again, here are the most useful features, but there are many others, such as templates, states (loaders & errors), etc. Have a look to the documentation to discover them.
Conclusion
🎉 Awesome, you successfully turned your website editable in a snap! Any change in the spreadsheet update immediately the website.
If you like this open-source library, give a star to the projet! A complete example / demo with all features is available here (it’s a bakery menu, miam). You can also contribute to add more and more features.

If you are interested in improving this tutorial, go ahead and feel free to contact me. 😊


