Understanding Angular Guards

Angular provides lots of features and ready-to-use services which allow seamless development of awesome web application. And routing is one of those useful features. But sometimes you want users to navigate based on some specific condition, such as authenticated (e.g. Logged-in user) user should have access to the dashboard or prevent the user from accidentally navigating away without saving data.
One way to do this is by using some conditional statements on individual pages and navigate users if that condition met. But the downside of this approach is that it increases the complexity of the application, you need to write additional code and also as the application size grows, code will become more unmaintainable.
The other way to solve this problem is by using route-guards. Which provides built-in interfaces that can be implemented to routes to control their navigation.
What is Route Guards
Angular route guards are interfaces provided by angular which when implemented allow us to control the accessibility of a route based on condition provided in class implementation of that interface.
Five types of route guards are provided by angular :
CanActivateCanActivateChildCanLoadCanDeactivateResolve
Let’s dive into each route one by one :
1. CanActivate
To implementing route guard preventing access to the specific route we use CanActivate interface.
Method Signature :
canActivate(route:ActivatedRouteSnapshot, state:RouterStateSnapshot):Observable<boolean | UrlTree> | Promise<boolean | UrlTree> | boolean | UrlTreeNow here we have two options, first is prevent a user from navigating to given route and the other is redirecting the user to some other route e.g. to the login page if the user is unauthorized.
How to implement it?
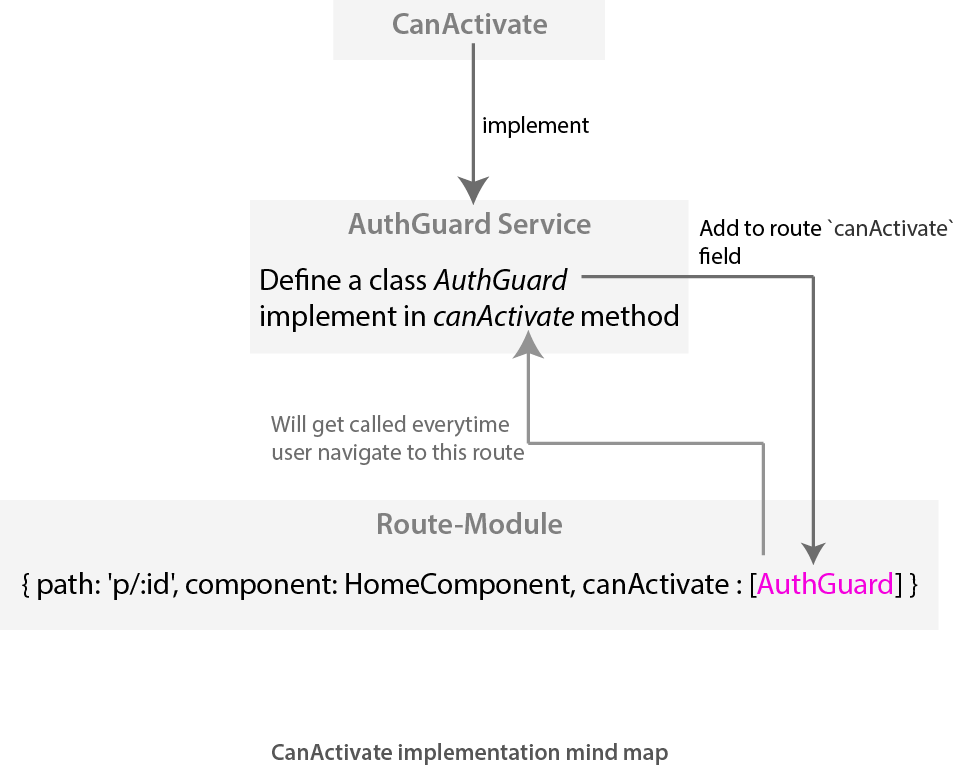
Now first define a service and create a class AuthGuard (you can use any name you want)
// AuthGuard Service
import {CanActivate, ActivatedRouteSnapshot, RouterStateSnapshot, Router} from '@angular/router';import { Observable } from 'rxjs/Observable';export class AuthGuard implements CanActivate {constructor(private authService: AuthService, private router: Router) {}canActivate(route: ActivatedRouteSnapshot, state:RouterStateSnapshot): Observable<boolean> | Promise<boolean> | boolean {
  // return true if you want to navigate, otherwise return false
 }}
Now just use this service in your routes like this
// route-module file
{ path: 'p/:id', component: HomeComponent, canActivate : [AuthGuard] }
Also, don’t forget to add the created service to
providersarray in app.module.ts file e.g.providers: [ AuthGuard]
2. CanActivateChild
CanActivateChild is almost similar to CanActivate interface, the only difference is CanActivate is used to control the accessibility of the current route but CanActivateChild is used to prevent access to child routes of a given route, so by using this you don’t need to add canActive on each child route, in other words, you just need to add canActiveChild to parent route and it will work for child routes as well.
e.g.
// route-module ts file{path: 'dashboard',canActivate: [AuthGuard],canActivateChild: [AuthGuard],component: DashboardComponent,children: [{ path: ':id', component: InfoComponent},{ path: ':id/edit', component: EditInfoComponent}] }
Also, don’t forget to add the created service to
providersarray in app.module.ts file e.g.providers: [AuthGuard]
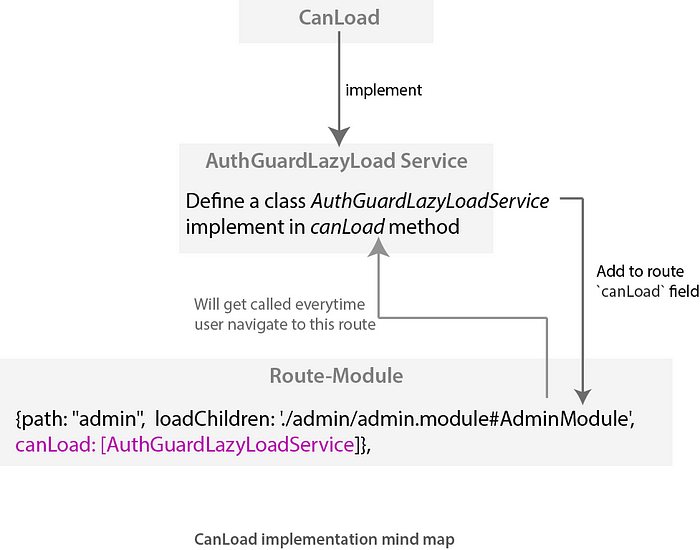
3. CanLoad
Modules in angular can be loaded all at once or be lazy loaded . By default angular load all modules eagerly. To implement lazy loading we use loadChildren in route definition. The main advantage of lazy loading is that it reduces the loading time of application by downloading only the required modules.
Now here if we want to prevent navigation of an unauthorized user we can use CanActivate Guard, that will do the job but also download the module. Now to control the navigation as well as prevent downloading of that module we can use CanLoad Guard.
How to implement it?
Method signature
canLoad(route:Route,segments:UrlSegment[]):Observable<boolean>|Promise<boolean>|boolean;The implementation process is the same as that of CanActivate . First, define a service e.g. AuthGuardLazyLoad and just pass to canLoad field of the route definition.
import { CanLoad, Route, Router } from '@angular/router';export class AuthGuardLazyLoad implements CanLoad {constructor(private router: Router) {} canLoad(route:Route,segments:UrlSegment[]):Observable<boolean>|Promise<boolean>|boolean {
 /* return true or false depending on whether you want to load that module or not
You can also use Observable/Promise resolving boolean value */ }}
Now just pass this service to canLoad field of the route definition, as below :
{path: "admin", loadChildren:'./admin/admin.module#AdminModule', canLoad:[AuthGuardLazyLoad]}Also, don’t forget to add the created service to
providersarray in app.module.ts file e.g.providers: [AuthGuardLazyLoad]
4. CanDeactivate
This route guard is used to keep the user from navigating away from a specific route. This guard can be useful when you want to prevent a user from accidentally navigating away without saving or some other undone tasks.
This route guard is a little bit different in implementation from the above-mentioned routes as it involves defining a method in the component class itself, which gets called whenever the user tries to navigate away from the route.
Method Signature :
canDeactivate(component: T, currentRoute: ActivatedRouteSnapshot, currentState: RouterStateSnapshot,nextState?: RouterStateSnapshot): Observable<boolean|UrlTree>|Promise<boolean|UrlTree>|boolean |UrlTree;Here, T is an interface that we will be using in component as well as in guard service code.
How to implement it?
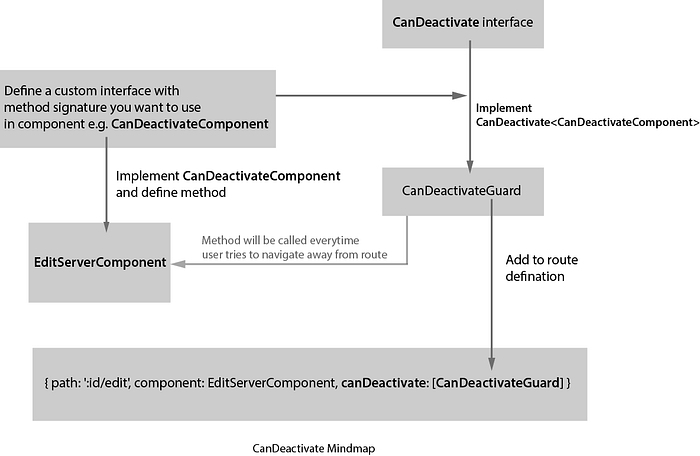
First, create an interface that will be used in component and use it in CanDeactivateGuard service as in below-given code :
// CanDeactivateGuard service
import { Observable } from 'rxjs/Observable';import { CanDeactivate, ActivatedRouteSnapshot, RouterStateSnapshot } from '@angular/router';export interface CanComponentDeactivate {canDeactivate: () => Observable<boolean> | Promise<boolean> | boolean;}export class CanDeactivateGuard implements CanDeactivate<CanComponentDeactivate> {canDeactivate(component:CanComponentDeactivate,currentRoute:ActivatedRouteSnapshot, currentState:RouterStateSnapshot, nextState?: RouterStateSnapshot): Observable<boolean> | Promise<boolean> | boolean {return component.canDeactivate();}}
Now, you need to implement CanComponentDeactivate interface in component as given in below code :
// EditComponent component codeimport { Component, OnInit } from '@angular/core';import { ActivatedRoute, Params, Router } from '@angular/router';import { Observable } from 'rxjs/Observable';import { CanComponentDeactivate } from './can-deactivate-guard.service';@Component({selector: 'app-edit',templateUrl: './edit.component.html',styleUrls: ['./edit.component.css']})export class EditComponent implements OnInit, CanComponentDeactivate {canDeactivate(): Observable<boolean> | Promise<boolean> | boolean {/* return true or false depends on whether you want user to navigate away from this route or not. You can also use Observable/Promise resolving to boolean */}}
Almost done now, you just need to add this route-guard to your route definition as given below :
{ path: ':id/edit', component: EditServerComponent, canDeactivate: [CanDeactivateGuard] }Also, don’t forget to add the created service to
providersarray in app.module.ts file e.g.providers: [CanDeactivateGuard]
5. Resolve Guard
Complex angular applications involve data communication between components, sometimes data is so heavy that it is not possible to pass data through query params. To handle this situation angular has provided Resolve Guard.
Now what the Resolve guard does is resolving data based on implemented code and pass that data to the component.
Method Signature :
resolve(route: ActivatedRouteSnapshot, state: RouterStateSnapshot): Observable<T> | Promise<T> | TT is datatype that resolve will pass to the component after resolving data.
How to implement it?
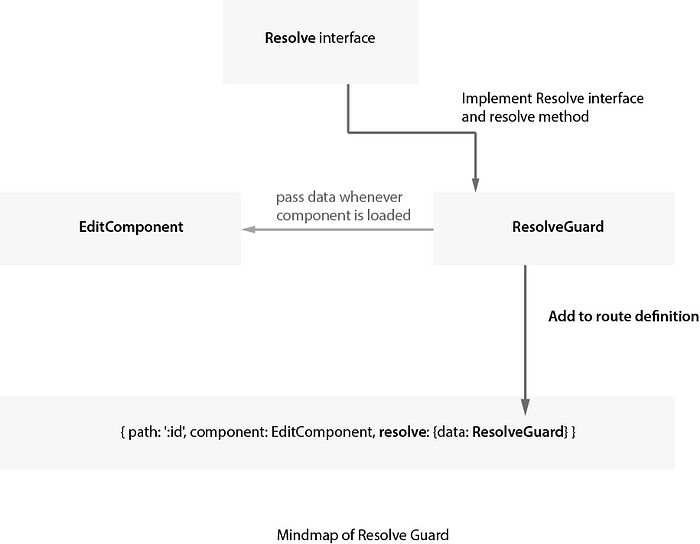
Implementation of Resole guard is quite simple. You just need to define a service and add it to the route definition. As given in code below :
// Resolve Guard serviceimport { Resolve, ActivatedRouteSnapshot, RouterStateSnapshot } from '@angular/router';import { Observable } from 'rxjs/Observable';import { Injectable } from '@angular/core';import { FetchDataService } from '../FetchData.service';interface UserName {id: number;name: string;}@Injectable()export class ResolveGuard implements Resolve<UserName> {constructor(private fetchService: FetchDataService) {}resolve(route: ActivatedRouteSnapshot, state: RouterStateSnapshot): Observable<UserName> | Promise<UserName> | UserName {return this.fetchService.getUser(+route.params['id']);}}
Now add this service to route defination
{ path: ':id', component: EditComponent, resolve: {data: ResolveGuard} }as you can see Resolve route is a little bit different from the rest of the route guards as it takes the object as other route guards accept an array.
how to get data in the component?
it's quite simple. Just subscribe data observer in ActivatedRouteSnapshot as given below
// Component codeimport { Component, OnInit } from '@angular/core';import { ActivatedRoute, Params, Router, Data } from '@angular/router';@Component({selector: 'app-edit',templateUrl: './edit.component.html',styleUrls: ['./edit.component.css']})export class EditComponent implements OnInit {userName: {id: number, name: string};constructor(private route: ActivatedRoute, private router: Router) {}
ngOnInit() {this.route.data.subscribe((data: Data) => {this.userName = data['data'];});}}
Also, don’t forget to add the created service to
providersarray in app.module.ts file e.g.providers: [ResolveGuard]
Conclusion
So, these were the five route guards provided by angular, that allow us to protect access to client-side routes but as said nothing, on client-side is completely protected. Any asset or data delivered to the client is completely accessible by them. Such as in the case of CanActivate Guard if JWT token-based authentication is being used any knowledgeable developer can create valid JWT token and access that route but s/he will not be able to hit the server to get more data given security is implemented on the backend. Hence, always be sure to protect sensitive data on the server.
Hey there, I am glad you have reached the end of this post. If you liked this post or have some questions or want to discuss something let me know in the comment section.
Stay focused, Keep learning & Keep building
Goodbye