Understanding Auto Layout Constraints — Part 1
Auto Layout got introduced at WWDC 2012, but many developers still fear it and some even hate it. Though there are many links available, I want to write an article explaining constraints.
After this tutorial, you’ll know the real power of constraints and how to bend them at your need.
This tutorial focuses on the concept of constraints, so the part of how to add constraints will be brief.
It’s nothing but a mathematical equation
Every view needs an explicit information about its (x,y) coordinate, height and width. Once you provide this much information to every view in the controller, you are good to go.
Constraints are generally applied in reference to another view. There are different types of constraints, and I’ll explain them one by one.
Let’s see the constraints from parent view first.
Now, drop a view on the view controller, then from navigator control+click your view and drag to the parent view, you’ll see something like this

- Leading space to container margin
Now, container margin means the boundary of the parent view and leading space to it means the space between the left boundary of parent view to the left boundary of your view. - Trailing space to container margin
This constraint means space between the right boundary of your view to the right boundary of parent view. - Vertical spacing to top layout guide
This constraint means space from top of your view to the top layout guide of parent view. Now top layout guide is a margin that parent view takes up by default which is 20 points in height. These 20 points are taken so that your view does not overlap the status bar. - Vertical spacing to bottom layout guide
This time though bottom layout guide is the actual bottom of the view controller, since there is no need to leave the space hence this constraint means space between bottom boundary of your view to the bottom boundary of view controller.
One thing that I haven’t mentioned is that Leading and Trailing constraints also leave a margin of 20 points. Now to remove this margin spacing there are two ways. First I need you to add all 4 of these constraints
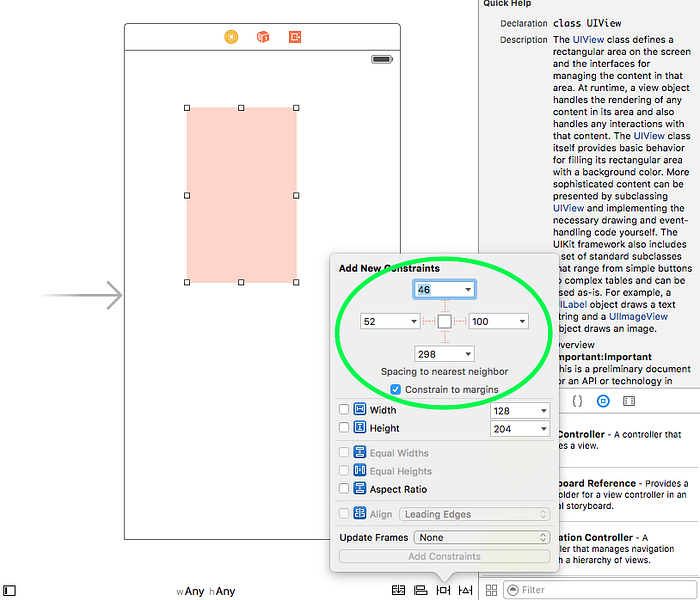
i) Double click on the left constraint in the interface builder and you’ll see something like this

Here in the constant part (where 52 is written) write -20 so that your view will start from the leftmost boundary.
Why -20? because margins have width/height of 20 points.
Now similarly double click on the right constraint and write 0 (zero) so that you can see the difference. Now resolve the issues and you’ll see that the left boundary of view coincides with left boundary of parent view while there is a margin between the right boundaries of your view and parent view.
ii) Second way you can remove this is by adding constraint from pin menu. Remove all the constraints and simply click on the view and select the pin menu (small square type icon second to right in the bottom)
Now in Add New Constraints part uncheck Constrain to margin option and it will remove the margins. Now click on all 4 dotted lines so that they become solid and write 0 (zero) in the left textfield and 20 in the right textfield. Click Add 4 Constraints in the bottom and update frames, you’ll get the similar effect as above.
Now let’s move on to other constraints
- Center Horizontally in Container
This constraint as the name suggests will center your view according to the center of your parent view horizontally i.e. view.centerX = parent view.centerX.
(When I was new to iOS, I added same Leading and trailing space to the view to center it. But this really is a wrong way to do that, you’ll add more constraints than necessary and it won’t work for variable view width)
A good auto layout has as least constraints as possible.
- Center Vertically in Container
This constraint will align the centerY of your view to the centerY of the parent view.
Now, the thing to note is that you can’t add both leading and trailing with horizontal center constraint as this will give rise to an ambiguity (since xcode wouldn’t know which constraint to give priority as they are contradicting each other) unless both leading and trailing space are of same size.
You can add a single leading constraint though as it will stretch the width of your view to satisfy the constraint.
- Equal Widths
This constraint will make the width of your view equal to the width of the parent view. - Equal Heights
This constraint will make the height of your view equal to the height of the parent view.
Both of these constraints are used to either cover entire screen or some percent part of it.
- Aspect Ratio
This constraint works with one of the above two constraints. It is generally used for images, if you have a fixed aspect ratio for an image then provide either height or width to your imageview or button for that matter and give it aspect ratio. This will maintain the quality of your image.
To provide Equal width and height from pin menu, you’ll have to cmd+click both parent view and your view then select the pin menu and check equal width/height option.
Pin menu also have simple width and height options with textboxes to provide values, these are self constraints and you can add a constant value to these. To provide these without pin menu just control drag on your view and select the option.
Now let’s see constraints from one view to other view.
Go ahead and drag a label onto the view controller and control+click the label to view and you’ll see something like this

- Horizontal Spacing
This constraint will define the space between the right boundary or you view to the left boundary of label. - Vertical Spacing
Now, vertical spacing defines the space between top of the lower view to the bottom of upper view. Drag the label above your view and apply this constraint to see it in effect. - Top
This constraint aligns the top of both the views. - Bottom
This constraint aligns the bottom of both the views.
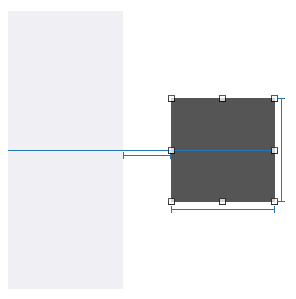
- Center Vertically
This constraint align the vertical center of both the views such that the smaller view will start from the vertical center of the bigger view. - Baseline
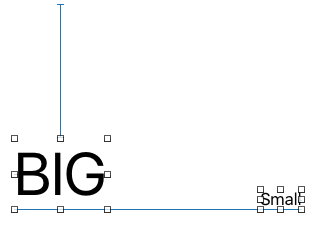
This constraint is little tricky and generally used with labels only. Baseline and bottom appears same but are not, since when you align using baseline, it actually aligns from the point your text ends, while bottom aligns the actual bottom of the views. To see this in effect, take two labels and give them font size 60 and 20 respectively. Now, align them by bottom and baseline one by one.

- Leading
This constraint will align the left border of the views it is applied to. - Trailing
This constraint will align the right border of both the views it is applied to.
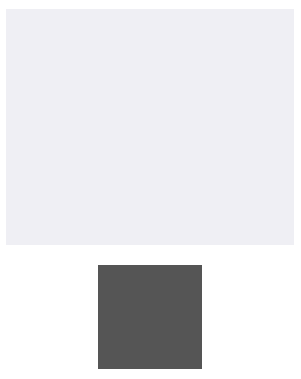
- Center Horizontally
This constraint will align the horizontal centres of both the views i.e. the smaller view will start from the horizontal center of the bigger view. - Equal Widths and Equal Height
This constraint is same as the one with parent view, it will make the width/height of one view equal to the other. - Aspect Ratio
This aspect ratio constraint will define the aspect ratio from height of one view to the width of other view.
Now, this is not all but just the beginning and to use the actual power of auto layout, let’s move to the part 2 of this tutorial, the advanced version.