Understanding Auto Layout Constraints — Part 2
Welcome to the advanced part of understanding the constraints in auto layout. So, let’s dive right in.
Let’s see the mathematical equation of constraints
Now go ahead and select a constraint in your xib document and in utilities select either the attributes or size inspector, you’ll see something like this

- First Item — View from which you applied the constraint.
- Relation — Relationship or the comparison operator that will be applied between the values to which this constraint is applied.
- Second Item — View to which you applied the constraint.
Now to understand Constant and multiplier, you have to understand this equation
First Item.attribute = (Second Item.attribute * Multiplier) + Constant
With this equation, you have the power to bend the constraints. For instance, if you want your view’s width to be 80% of the entire screen width just apply an equal widths constraint from your view to its parent view, select the constraint and put 0.8 in the multiplier.
Now, we’ll dive into Priority later, first let’s see what else can be done with the first item, second item, and relation.

Now, I have already explained Top, Center Y, First Baseline, Baseline and Bottom in part 1 of this tutorial.
- Relative to margin — It is nothing but Constraint to margin when applying constraint from Pin Menu.
- Reverse First and Second Item is self-explanatory.
Exact same options are available for the Second Item too.

- Less Than or Equal and Greater Than or Equal generally makes sense when we are talking about priorities of constraints.
- Identifier for a constraint is just a name of constraint that you give when you easily want to access the constraint (say in your code).
- Placeholder constraint is just a feel-good constraint that will be removed at build time and Xcode will force put the constraints to satisfy if that breaks the layout.
- Installed will tell whether the constraint is active or not and this generally makes sense when we are working with size classes.
Priority of a Constraint
Now, sometimes it might happen that screen size is not enough to accommodate all the constraints or some constraints might conflict during run time, then Xcode has to take a drastic step and break some of your constraint. The bigger question that comes from this is, which constraint will be the victim of this!
Create two views of equal size, width and equal spacing from all directions

Your xib would look something like this. Now, if you see this in preview you can easily notice the constraints that broke.

Your height and width constraint for the views are the victim here and thus are broken by Xcode.
Now set the priority of vertical spacing between the views constraint to low (i.e. 250) and see the preview.
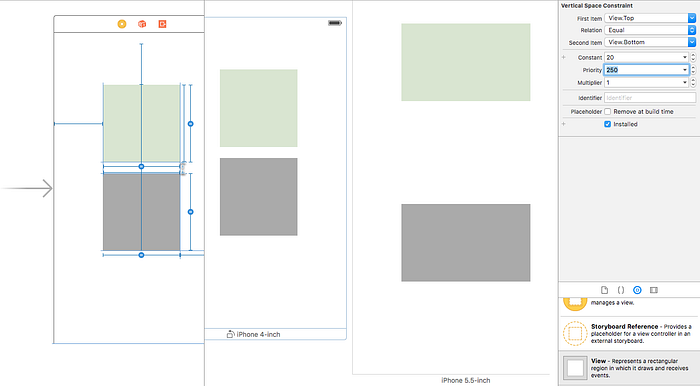
You can clearly see the vertical spacing constraint is broken now. Similarly, you can reduce the priority of trailing or leading so that your width constraint will remain intact.
Now, if you don’t want to mess with priority in this case, you can also set the vertical spacing constraint relation from equal to greater than or equal and you’ll be set with the same result as above.
There are two more priorities which are really important to understand and are generally used when working with labels and buttons.
- Content Hugging Priority
It does not let the size of the container grow beyond the content present in it. For eg.
Let’s say you have a button
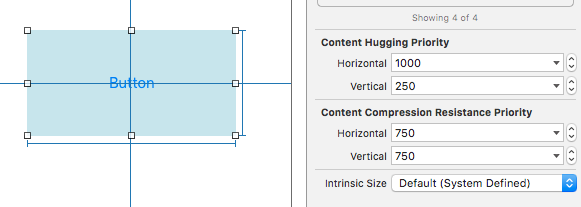
Set its height, width, vertical center and horizontal center constraints. Give it some color so that you can see the difference in the size of content view.
Now select the button and in size inspector set its content hugging priority to 1000 for both horizontal only and open the preview.
You won’t see any change because (priorities!) the width constraint also has Required(1000) priority.
Change the width priority to Low(250) and see the difference.

- Content Compression Resistance Priority
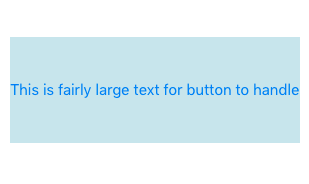
It might happen that the content you want to set in the container view is larger than its width and since it is dynamic, there is no way to know the fixed width of the container. You just don’t want the container to truncate the text. For this, you’ll need to set horizontal content compression resistance priority to required and the container size will increase to accommodate the content.
For now, write some large text in your button and see the preview, the text will truncate according to the width of the button.

Now reduce the priority of the width constraint of button and see the changes
This concludes the topic of priority and with that our topic of understanding constraints. Hope this resolved your doubts and gave you more understanding of the concept of auto layout.