Understanding Git Hooks
The easy way to get Git

Hello Folks!
As promised, I have come up with another article. Here, we will learn about hooks. So, keep up with the article.
Today’s Inspiration: “Today is a good day to learn something new.”
“Enforce code quality and increase productivity” Remember! If something takes too much time or effort, people will avoid it! So, the solution?

Let’s begin… 🙂
Today’s top companies give the highest priority to the quality of the code you have written. So, we have a concept of git hook which does not allow you to commit in “master branch” unless your code validation is accepted. I think it is helpful to maintain a better quality of code.
If you’ve ever worked on an open-source project, or you’re working with a team, it’s very likely you’re using some kind of version control. Version Control System (VCS) has become one of the main requirements for any project, Git being the foremost popular one. However, as the team grows in number, it becomes difficult to handle the different code styles and to enforce certain rules across all the contributors. These issues aren’t noticed by a contributor until he has pushed his changes which end in overheads for the core maintenance team. To enforce these rules and validate the code being pushed, Git provides a great feature, called Git Hooks.
So what are Git hooks?
Git hooks are custom scripts that git executes before or after events such as commit, push. Git hooks are a built-in feature there is no need to download anything. They are unique and run locally and resides inside the .git/hooks directory.
Git hooks can be used to:
- Check commits for errors before they are pushed.
- Ensure code meets project standards.
- Notify team members about changes.
- Push code into a production environment, and more.
There are two types of hooks:

- Client-Side (Local) Hooks
- Server-Side (Remote) Hooks
Server-Side Hooks, as the name suggests, are installed on the server and are triggered only just in case of network operations. For example — Post-Receive may be a sort of server-side hook triggered after a successful push. This makes it an ideal place to send notifications to all the contributors.
e.g: pre-receive, update, post-receive
- The
pre-receivehook is executed every time somebody usesgit pushto push commits to the repository. - The
post-receivehook gets called after a successful push operation.
Client-Side Hooks reside on one’s local repository and are executed when a git event is triggered. Here, a git event can commit, push, rebase, etc. When we run certain git commands, git search for the hooks within the git repository to ascertain if there’s an associated script to run. For example, one could have a pre-push hook to validate that the code enforces certain rules before it’s pushed to the remote repository.
e.g: pre-commit, prepare-commit-msg, commit-msg, post-commit
- The
pre-commitscript is executed every time you rungit commitcommand. - The
prepare-commit-msghook is called after thepre-commithook to populate the text editor with a commit message. This is where auto-generated commit message is created. - The
commit-msghook is much like theprepare-commit-msghook, but it is called after the user enters a commit message. - The
post-commithook is called immediately after thecommit-msghook. This is after a commit has taken place.
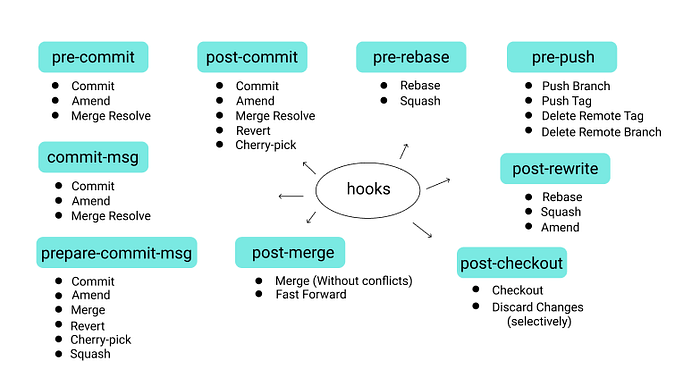
In this image, we have different hooks name with their event (means which command executes which hook).
Implementing Git Hooks
Git hooks are a built-in feature that comes with every git repository. When initializing a new project git populates the hooks folder with template files.
- Navigate to the hooks directory
$ ls .git/hooks/Notice the files inside, namely:

2. Install your hook
To enable the hook scripts, simply remove the .sample extension from the file name. Git will automatically execute the scripts based on the naming. For my purpose, I renamed the “commit-msg.sample” file to “commit-msg”.
3. Select a language to write your hook script.
The default script files are written in shell scripts, but you can use any scripting language you are familiar with as long as it can be run an executable. This includes Bash, Python, Ruby, Perl, Rust, Swift, and Go.
Open up the script file in your code editor and define your language of choice in the first line, using the shebang (#!) sign, so git knows how to interpret the subsequent scripts. Note that you need to include the path of your interpreter. For Mac users who wish to write the scripts in Python, for instance, the Apple-provided build of Python is located in /usr/bin. So, the first line would look like:
#!/usr/bin pythonIf you want to use Bash, on the other hand, the first line would be:
#!/bin/bashAnd for shell:
#!/bin/sh4. Write your script
From here on, you could write any script and Git will execute it before any commits to this project. For reference, I wrote my script in Bash, and here is what I ended with up.
- commit-msg hook
Let’s understand this script:
- Line 3–7 define text-decoration variables, which are used to enhance my console message. For coloring the variables, I have used Git shell coloring.
- Line 9–10 gets the commit message form the console.
- Line 12–13 defines the REGEX pattern from which the commit message will be validated.
- Line 14–21 is a conditional statement that will check the commit message if it matches with REGEX pattern then successful commit otherwise failed.
- Notice that if the conditional above evaluates to a 1 status, line 19 extends that by exiting with a 1 status to indicate failure. This prevents changes from being commit.
We have to give executable permission to our script file using the chmod command.
$ chmod +x .git/hooks/commit-msgAfter writing your hook scripts, just sit back and watch Git do all the work:
Let’s see the example below:
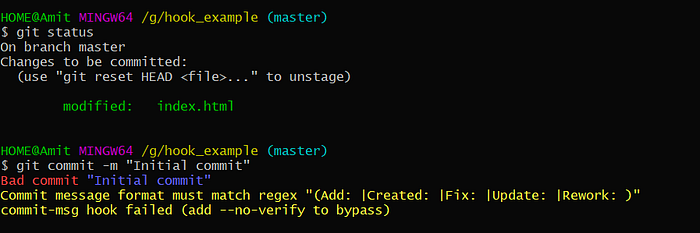
- Commit with an improper commit message
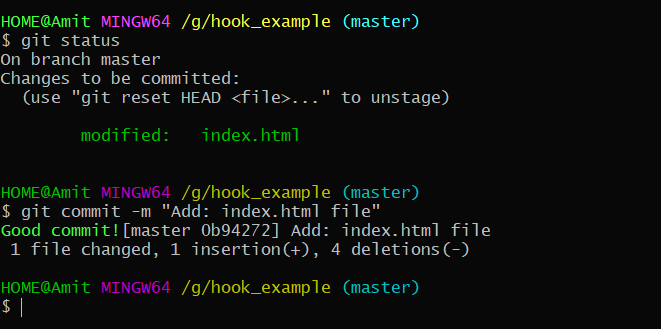
2. Commit with a proper commit message.
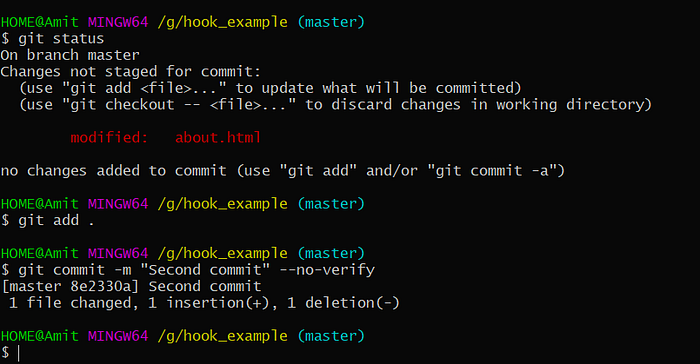
3. If you want to bypass the commit-msg hook then use --no-verify flag.
- pre-push hook
Let’s understand this script:
- Line 5 determines the current branch with
git rev-parse --abbrev-ref HEAD. - Line 6–10 is a conditional statement, will check in which branch you are in. If you’re in the master branch then the script will not allow you to push code in the master branch. If not in master, then you can push.
- Line 12–16 is also a conditional statement, will check your current branch and also check the date and week. If a week is greater than 5 means you i.e Saturday and Sunday then the script will not allow you to push the code.
This pre-push script has some advantages as well because in the IT industry who wants to work at the weekend, no one really? So, this hook prevents you to push code on a Friday night because it’s having a high chance to get an error when you pushed the code. So, it prevents that’s awesome!
- Error while pushing to the master branch.

2. Successfully pushed to another branch on weekdays except for weekends.

- pre-commit hook
While developing any software, at some point the developers have to debug the code to check the bugs or API response. If you are from the JavaScript background then developers mostly use “console.log()” statement to print something in console. Consider a scenario, where you have debugged the code and forget to remove those “console.log()” statements and you’re ready to commit the changes. But, you don’t want those statements to commit. So, in that case, we can take the help of the pre-commit hook in which we have written a script will automatically check the code before commit. If the scripts found any “console.log()” statements then it will not allow you to commit. That’s amazing, right?
Let’s understand the code:
The script uses the grep command to search for the forbidden strings like “TODO:” and “console.log()” in the staged codebase. If strings are found then abort the commit.
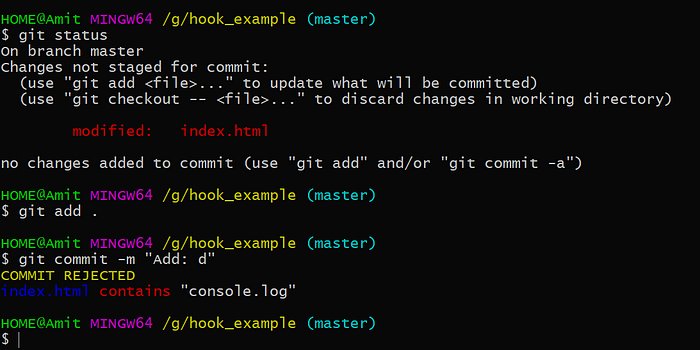
Now, If we remove those statements commit will be accepted.

Be aware of the --no-verify option to git commit. This bypasses the pre-commit hook when committing.
If you are a big fan of JavaScript and worrying about your coding styling and error-prone code? Wouldn’t it be nice to have something in place to force people to fix their code before they can even push it? Well good news, Husky is here to help.
Prevents bad commit or push (git hooks, pre-commit/pre-commit, pre-push/pre-push, post-merge/post-merge, and all that stuff…)
What is Husky?
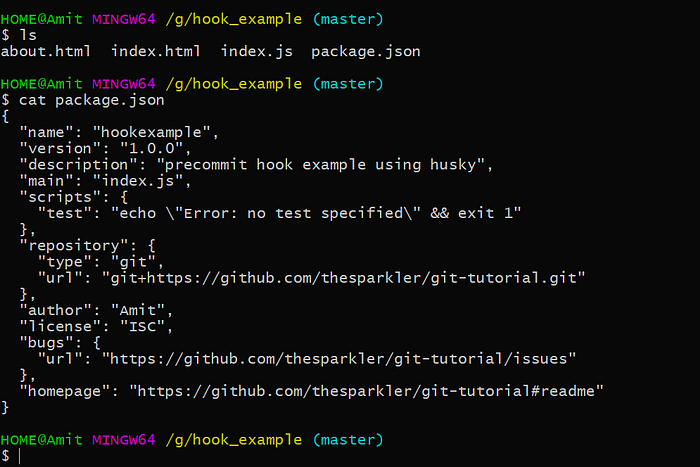
Husky is a very popular (1 million downloads a month) npm package that allows custom scripts to run against your repository. Husky works with any project that uses a package.json file.
Set up
Let’s get started by setting up a package.json file:
Firstly, we need to run npm init to initialize the project.
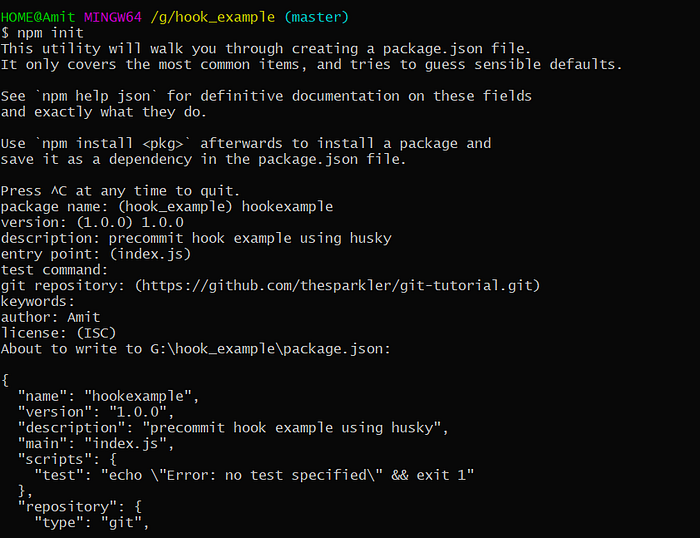
When you run this command it will ask you some questions such as your package_name, version, and entry point (means which file the husky will look at first i.e index.js). After that, it will generate package.json file in your directory.
Let’s view your files.
Now, We’ll be using JSHint as our linter to run before we push or commit our code, this is done via the “scripts” section in our package.json file.
What is JSHint?
JSHint is a community-driven tool that detects errors and potential problems in JavaScript code. Since JSHint is so flexible, you can easily adjust it in the environment you expect your code to execute. JSHint is open source and will always stay this way.
Before any modifications, we need to install jshint and husky package through npm.

You can see these dependencies in your “dependencies” section in your package.json file.

Now, let’s add “hooks” section in our package.json file.

This tells Husky to run jshint index.js when the user type git commit.
Next, we set up a .jshintrc file with basic linting rules:
Then we’ll create an index.js file that violates some of these rules:
Now, let's commit the changes and if you have done everything correctly, you should see something like the following:
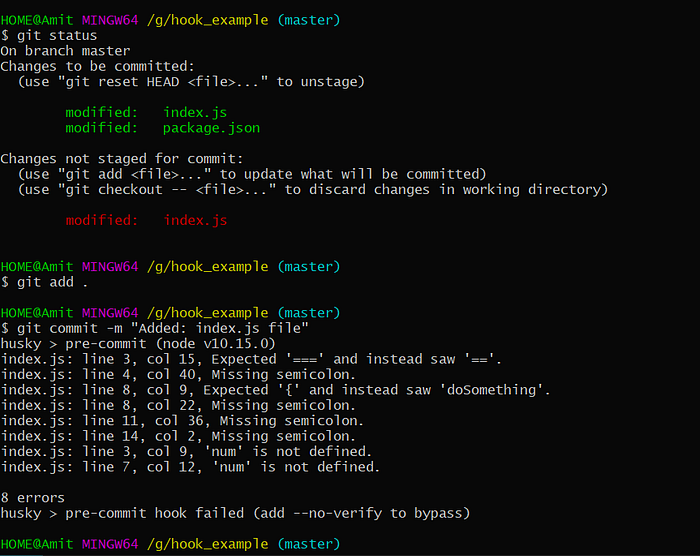
Isn’t that amazing? No more bad code, no more buggy code, and no missing semicolons!
Let’s solve the errors and again commit the changes.

What if I want to skip it?
Shame on you! You should always run it, but for the rare cases where you want to skip it... you can add --no-verifyto flag bypass it, so the full command would be:
$ git commit -m ‘SHAME ON ME’ --no-verifyYou can use it for tons of other things, for instance, you can let husky run your tests before every commit or push, or even clean up directories or run some grunt or gulp tasks… the possibilities are endless!
Conclusion
Git hooks are simple scripts that run before or after certain actions. They are useful for a variety of tasks, but primarily I find them useful for client-side validation so simple mistakes can be prevented. For example, you can test syntax on files being committed, you can even have tests run. I have written hooks that validate the JS code, run JSHint to a standard, and a lot more. Hooks can be written in any language the environment can work with.
Hope you have learned something new !! Please don’t forget to share and thanks for reading.