Weex vs React Native from scratch— 2018
Documenting learnings and research while making a simple Weex and React native app from scratch

End Goal: To create a native payment page that can be rolled out as a native SDK. This SDK will help those merchants who want to integrate with our payment gateway and provide a native experience to their users.
**This is not a deep dive tutorial. I’ll be only showing directions on how to go about in building weex or react native projects to save your time!


WEEX
Installation and config
npm install weex-toolkit -g
weex create awesome-app
Unfortunately, at the very first go we were welcomed with the below error after running the above command. Fortunately, Weex core team was helpful enough to look this for us. Should be fixed in latest version. All good lets move ahead.

Weex is built on top of VueJS. When implementing the vue-router, make sure routes are pushed programatically instead of router-link. Follow this link for details. Guess this is the same reason Weex doesn’t recommend using the vue-router considering the support in Native env.
Weex debugger
We faced issues while doing weex debug so had to skip doing this step for later. Found nothing on net to fix the below. Lets move ahead for now. We were recommended by Weex team to clear the cache and retry. Haven’t tried it again.

Code
We coded a simple input element with a div which is the basic building block in Weex design philosophy. Found the design was a bit off when compared to web vs native. Check out the default placement of Input element


We knew that we had to rely on a UI library to avoid writing pixel perfect UI elements from scratch on both Web and Native. After a day of researching and exploring the issues: Got to know about bui-weex which was again only working on mobile and ui was completely off on web. Further spending some hours trying different combination of sample and template version of bui-weex, found about weex-ui. (A UI component library)
UI component library
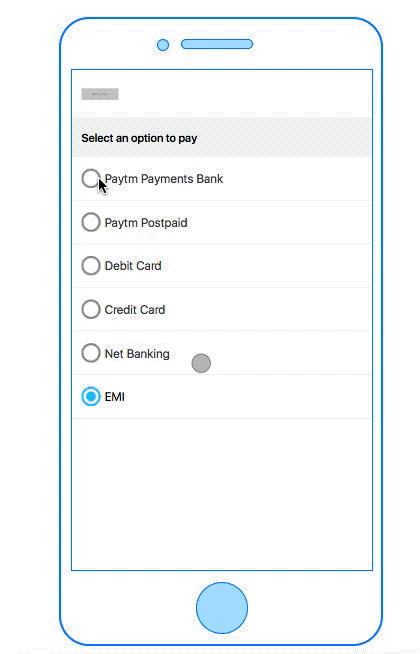
Installed weex-ui locally and telling you upfront that there is limited default customisation support. So if you need to customise any thing, you will have to override the complete component by yourself. You can see the sample use case where we had to override the Radiolist component just to change the placement of radio button from right to left.
If you run the project without preview: the click events don’t work. Although a trivial issue, But if you build they work so need to further explore what’s wrong or an ongoing issue.
For example: http://dotwe.org/raw/htmlVue/bc9689e06574858d390efb2eef3c74dc?1523952038167&p=true
No click events work in this page However the below preview version works:
— Seems like the problem is not with weex-ui but weex.
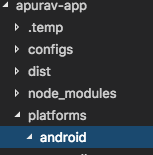
Native Android integration
Follow this to integrate Weex in existing app. While running native build, a major show stopper was local or base64 image support. They don’t work out of the box with weex. So you need to put your images in a CDN to refer these in your weex layout.
Below issues will come along the way primarily because of outdated docs
WXEnvironment.sapplication kept coming as null
The issue was registering custom application class in manifest file
Then frescoimageadaptor not found
Then jsengine: ReportException :undefined:85: ReferenceError: Vue is not defined
Translated this issue to find that version update was required.
We submitted some PR’s along the way to fix documentation and these were quickly merged. Credit to the Weex’s core team.
Weex native integration cheatsheet
weex platform add android
For full details available under weex toolkit follow this link
weex run android
Eventually the best way to integrate with weex is to look at android project created using weex run android command.
Go to platform folder in your weex project directory and explore the weex android source code to check the latest library versions it supports, + ImageAdapter it implemented.
Take this as a base app for further integration with Weex
To save your time, you can refer this project here to start looking at the code.
Tutorial Source Code
We have two projects here:
1.Base weex web project backed by VueJs. Just do npm install and npm start to see this in action. Here is the Github
To add android platform run the following command in cmd and follow the readme
weex platform add android
2. This is an android project where we manually integrate the above weex js bundle generated in dist folder by running the the below command in our base web project
npm run build:prod
The Github link for this project is here
React Native
As compared to Weex the major downside is that it only supports native unlike Weex which will run on web as well. A huge benefit that people coming from web background will understand.
Installation and configuration
You have two ways while building a react native app:
- create-react-native-app
- react-native-cli
Approach 1: create-react-native-app
This will relieve you of pain of installing android build tools locally. In this you can simply use something called as Expo tools to build and test your react native apps over cloud. The installation and config step with this is quite smooth and you can easily follow the steps without any major hiccup.
Possible error that can welcome you while running this command:
create-react-native-app AwesomeProject

To fix the above, just upgrade yarn and retry. Actual issue here.
Approach 2: react-native
This approach required android installed on your machine since it will run an emulator for testing your react native changes. Benefit is no dependency on Expo client and size of the app will be way smaller as compared to a build done using Expo.
react-native init AwesomeProject
We were welcomed with this issue. Not checked but probably fixed by now.
UI component library
Nativebase ui kit is component library that will help you with prebuilt components with React native. It is available for both create-react-native-app and react-native build approaches.
You will face very little issues understanding the custom theming. However documentation is quite extensive and you should be able to get through in case customisations are required.
Some trivial issues on the way and their resolutions:
- Faced status bar header cropping issue: fixed using this
- Changes don’t reflect in Expo app sometimes so its quite annoying since you will need to close the Expo again to reload the changes.
- Perf issue with native base List Item. Resolved using flatlist from react native directly
Build Steps
Build steps are bit different with create react native app vs react-native nomenclature.
1. react-native build steps
The docs are mentioned here works with apps built with react-native cli.
2. create-react-native-app build steps
To build with create-react-native-app, you just have to login to expo in your command prompt and initiate the build in cloud and this step is time consuming.
npm i -g exp
exp build:android
Here is the minimal app.json config required to build an apk with expo. Without these required details your build will fail!!
You will see the below message and you can exit to work on your tasks.
|11:56:49 [exp] Waiting for build to complete. You can press Ctrl+C to exit.
Afterwards you can check the build stats by doing:
exp build:status
OR you can simple click on status url in your terminal like below and check it in expo dashboard in your browser
You can monitor the build at
Now you must be wondering which approach to use while building react native app?
TLDR; I don’t know. But below facts can help you take a call

For most of the organisations, the app size will be the major factor to decide since expo comes with many other unwanted components whether you require them or not. Read this as well for making a final decision. Moreover, when it comes to integrating with an existing native app, React native docs only lists react-native approach to do this.
My personal take: Go with react-native approach to have better control of your app build, size, feature set and future integration perspective.
Native Android integration
You can follow the steps described here to integrate react native code in your existing native app.
Just make sure that when you run the below command to run the bundling step, you have already created the dir android/app/src/main/assets/
react-native bundle — entry-file index.js — bundle-output android/app/src/main/assets/index.android.bundle — assets-dest android/app/src/main/res — platform android
Running the above command will spit out a fully working android project that you can directly import in Android Studio and start playing with it. If you want to integrate react native with an existing Android project, simply refer this project and copy the necessary stuff you need.
To make it easy for you, you can download this sample started project here.
Tutorial Source code
1.This is a sample project created with react-native command. cd into this directory and do
npm install
react-native run-android
Make sure before doing this, Android Emulator is running.
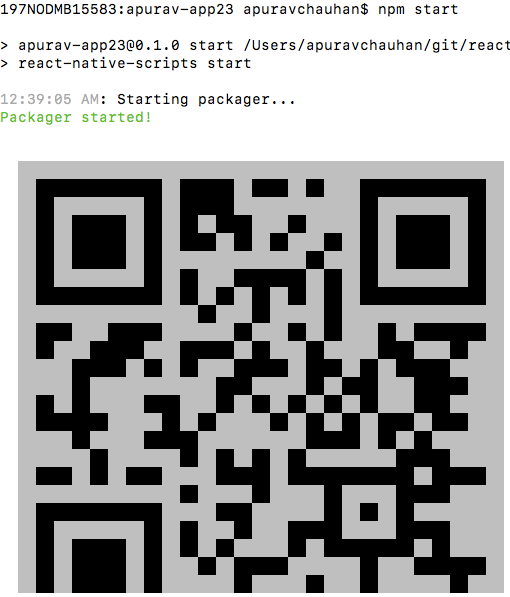
2. This is sample project created using create-react-native-app method. cd into the directory and do
npm install
npm start
This should print a qr code like below which can be scanned using Expo android app for testing the changes.
3. This project is an android project where we integrate the react native js bundle created using method 1. Import and build this project using Android studio and you should be good to run it.
Gotcha: React-native project created using method 1 starts a JS bundler. Sometimes developing different projects can create a confusion. If you integrate the JS bundle in an existing android project, it can sometimes ask you to start the bundler by doing npm start in your react-native project directory from where JS bundle was made.
Need to check if there is a better way to handle or avoid this.
Comparisons: React Native vs Weex
Below are some comparison metrics that we found:
Final App size with different versions
Usecase: Integration with an existing android app of size ~500KB
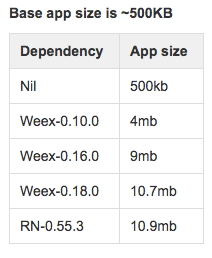
There is around ~10mb dependency size required upfront in order to integrate a single screen built using Weex or React Native.
Performance/Time to render
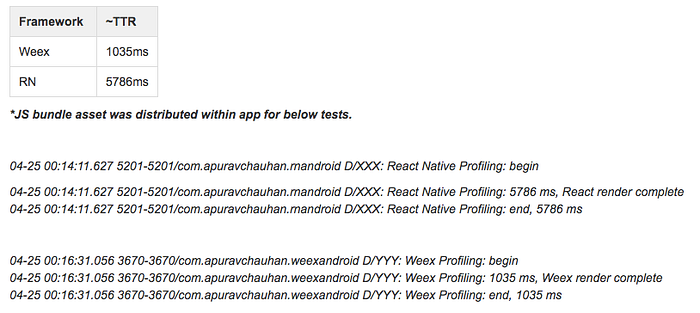
Weex shines when in comes to rendering performance as compared to react native.
Sidenote: To get the above ttr details we used TimingLogger inside the onAttachedToReactInstance hook in react native and onRenderSuccess in Weex. To view the logs, make sure you set
adb shell setprop log.tag.<TAGNAME> VERBOSE
and then open android monitor in android studio with no filters and verbose option enabled.
Refer the above android projects github links for more details
Learning/Development Curve
Both libraries have similar learning curve for developers who are already coming from Web background. Weex follows the VueJS style and React native follows the ReactJS style.
However when stuck on issues, you will find yourself in a tight spot for weex because of discussions happening in Chinese.
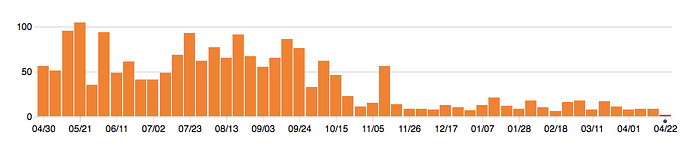
Project Pulse on Github (25th April, 2018)
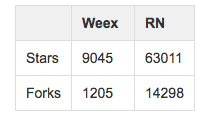
Weex doesn’t seem to be actively worked upon in last few months following the below github graphs
And below is the data for RN

This wraps up the learnings and comparisons. Which one to choose for your project will largely depend on various factors like performance, size, your team skillset, time to deliver and community support. The above data will definately help to make a decision that works for your team and project.

✉️ Subscribe to CodeBurst’s once-weekly Email Blast, 🐦 Follow CodeBurst on Twitter, view 🗺️ The 2018 Web Developer Roadmap, and 🕸️ Learn Full Stack Web Development.