Quick-start Flutter for Web on Windows
Google listened to those Hummingbird chirps! 🕊

You knew this was coming, right? So here it is! The Flutter framework by Google which started off as a tool for crafting quality native apps for both Android and iOS in record time has now shifted its gears. We saw Tim Sneath announcing the “technical preview” of Hummingbird at the Flutter Live ’18 event.
After this announcement, there were few other major/minor fixes for it to come out in the Technical Preview release for those developers who wanted to scale their cross-platform app into a browser-based web app!

As a Flutter lover, I really wanted to test this out and see how I can use Flutter to now make web projects! So, here’s me (just like my earlier post) on how to install this new SDK on Windows devices and quickly set up a new project 😋.
Hah, wait. What’s Hummingbird? 🕊
Okay, so Hummingbird or Flutter for Web, in simple senses,
is a code-compatible implementation of Flutter that is rendered using standards-based web technologies: HTML, CSS and JavaScript.
What you do is that you write the usual Dart code and this exciting new SDK will compile that into a web app which is embedded in the browser and deployed to any web server. As this is another extension to the already great Flutter framework, therefore you can use all the features Flutter offers, plus you don’t need a new set of extensions/plugins to build your first web app! ⚡
Let’s get into this! 💪
> Installation on Windows 🔽
What will you need? Make sure you already have Flutter installed and added to the PATH of your computer. If you run into any trouble then call our ‘Flutter doc’ for that using the flutter doctor command in your command prompt. Either way, if you’re completely new to the Flutter world then you need to follow these five steps:
- Install the Dart SDK. 🔗
- Install Flutter SDK. 🔗
- Update the PATH. 🔗
- Install VS Code (recommended) or Android Studio/IntelliJ IDEA.
- Get extensions for Flutter and Dart from their marketplaces. 🔗 🔗
I’ve written the following article for the same:
When you’re ready with the above, we need to get some dependencies. At first, comes the Dart’s webdev package which provides the build tools. Run the following command:
> flutter pub global activate webdev
You might not be successful in the first go. Here’s why: this command needs you to have $HOME/.pub-cache/bin directory set in your PATH. Just find where Flutter is installed using the where flutter command, navigate to the .pub-cache/bin directory, copy the complete path address and add it to the Environment Variable settings. You might need to restart your device for this to work.
Next, we need to update the packages. Run this:
> flutter pub upgradeThis will run without any issues, I hope 🤞. After it succeeds, you can now start creating the app! ⚡
Testing time! When you hit Ctrl+Shift+P to open the Command Pallete in VS Code and type “Flutter” you should see an option which says “Flutter: New Web Project”. If you’re not able to see this, it means you haven’t upgraded to the latest version of Flutter yet. Just run flutter upgrade from the command panel and you should be on version 1.5+ (1.5.4-hotfix.2).
> Creating our first ‘Humming’ app 👨🏭
Write the title of the project (here: “hummingbird”), specify the location and let VS Code/Dart SDK do its trick in the background. After everything has been finalized, you’ll be greeted with a simple index.html file containing the bare bones of our web app.
Good news is that we don’t need to touch this file 🤷♂️. Time to code straightaway in Dart!
> Coding our app 👩💻
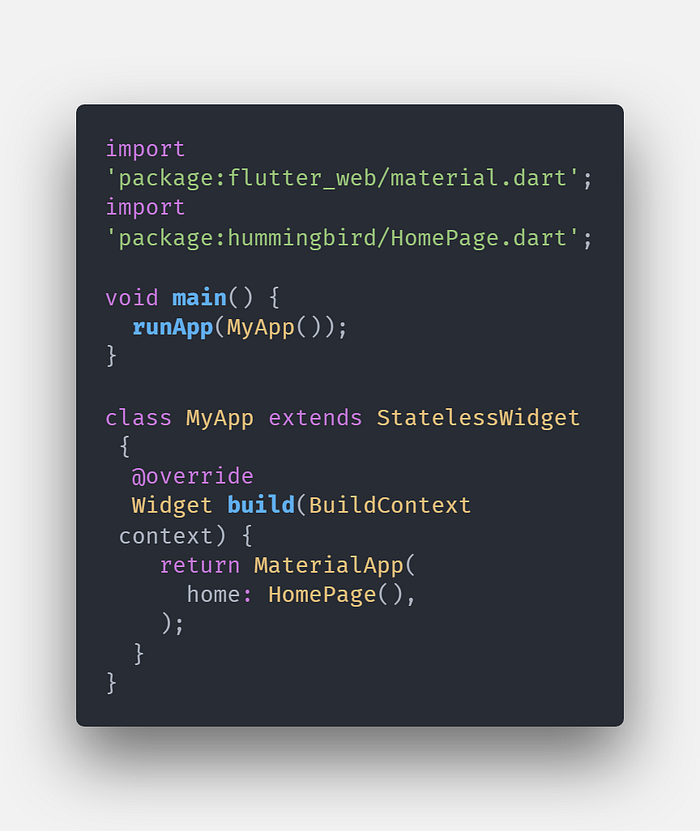
Open main.dart under projectName > lib directory. Remove everything that’s written already, we are those who write from scratch! 😎
Import the material.dart package and note that this time it’s flutter_web/material.dart and not flutter/material.dart. Create an entry point to our app via the main() function which will have the runApp() method whose job is to inflate the given widget and attach it to the screen. Inside this, make sure you pass the class name.
For the class, make it extend the StatelessWidget because right now, we don’t really care about the app state being dynamic/Stateful. Inside this, we need to return the MaterialApp widget having the home: property to be a new class called HomePage() where the actual code for our app will be written.
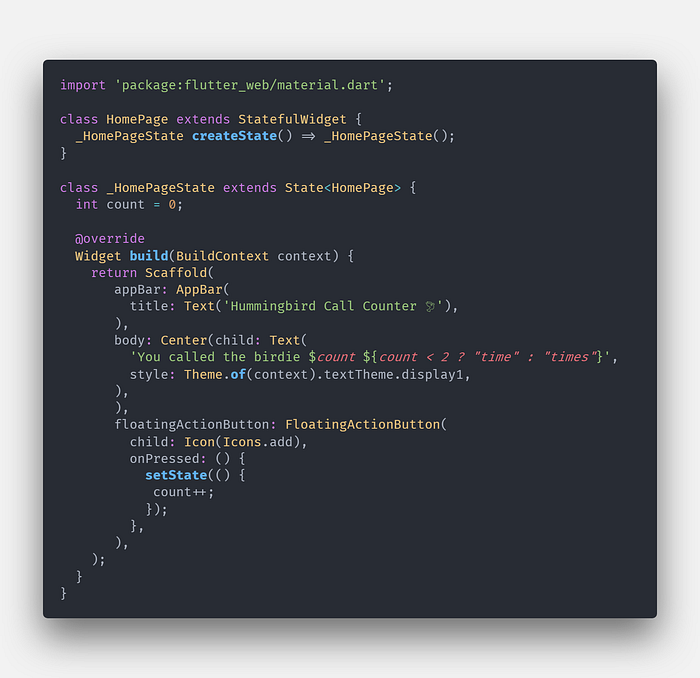
Next, make a new file named HomePage.dart inside the lovely lib folder. Create a Stateful widget.
❗❗ A TIP: Use the Awesome Flutter Snippets extension by Nash Ramdial. After you install it, you can straightway type ‘statefulW’ and hit tab to get the complete listing of the code you want. This, in turn, speeds up productivity and saves you time! ❗❗
Inside the State’s build method, return a Scaffold to start making our app's visual structure. Give it an AppBar with the title “Hummingbird Call Counter 🕊”.
See, this is just a basic app which’s the same as that of what you get in Flutter (for mobile) by default, the counter app 👀. So, the plan is to call the hummingbird by clicking on the button and it will count how many times you “called” the birdie. I know it’s really “meh” but all we gotta do is to serve this code in our web browser, this is what all matters!
Continuing on, let’s make the body which only contains a Text element aligned to the center and we will pass “You called the birdie $count ${count < 2 ? “time” : “times”}” as the text value. This will check for a condition. When the “count” is less than “2”, it will say “time”, else “times”. Again, really childish, I know 😶. Make sure you style this with the Theme set to display1 so that it looks bigger than it actually is. Else, you can also use the fontSize property for manually increasing the font.
We need to have a button! Alright then, FloatingActionButton(FAB) to the rescue⛑️. Make sure you add the icon as Icons.add and use the setState() method and increment the counter variable. Obviously, you need to set counter initially to 0.
Do you know what? That’s all. We’re done coding! 🎉
> Time to fire up the app 🤩
Make sure you’re on the root of the project, run the following command in your CMD or integrated VS Code terminal:
> webdev serve
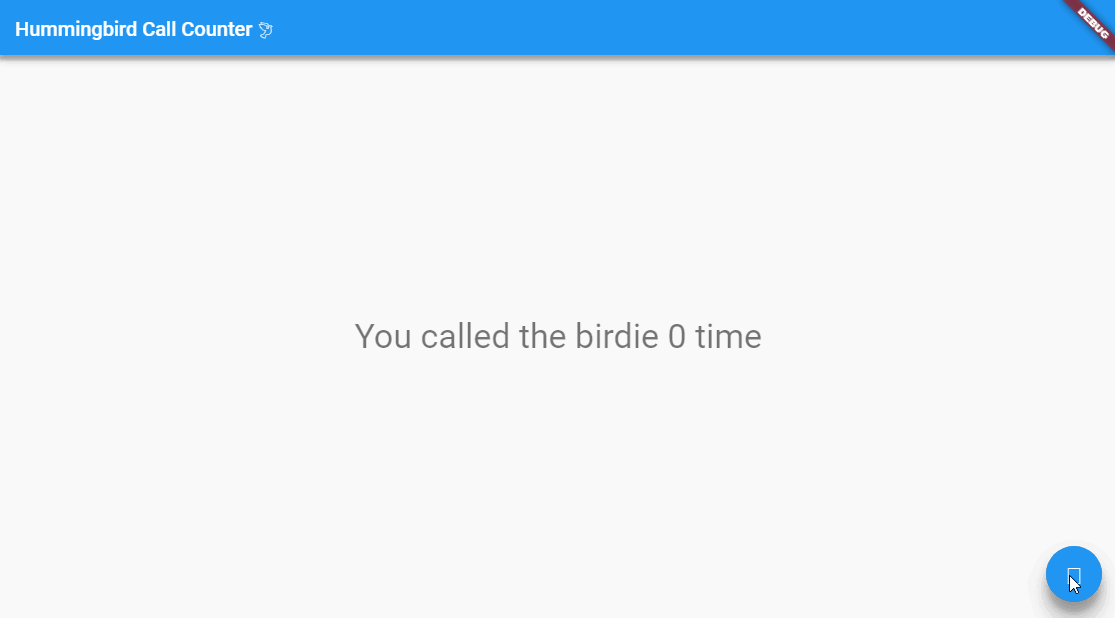
Now all you need to do is navigate to http://localhost:8080 in your web browser and hurrah! You got your first Hummingbird application up and running coded in the already wonderful Flutter framework!
But wait. When you make further changes, you will manually need to refresh the browser page to see the changes. We need something like VS Code’s Live Server extension here, right? Flutter got you! Kill the above command process using Ctrl+C and run a new command:
> webdev serve --auto restart
Now, every time you make changes, this will automatically refresh the state/webpage for you. Note that this will also log down every change as you make in your code. (Make sure autosave is enabled in VS Code for this).
Here’s our output:
And here’s the complete code of HomePage.dart:
Where to next? 🤔
Flutter for Web is really new and therefore, quite exciting. It’s in the Technical Preview stage right now and I’m sure there are lots of new features and improvements coming soon for this. For further reading, I’ll recommend the following resources: