Let’s make a website. Episode V – The code editor
Your new best friend.
Woo hoo! We made some nice progress since the beginning of this series. Our page now has some text, some links, an image, maybe even some GIFs if you experimented a little in the last post!
This post is a little different from the previous ones. We’re not gonna learn any new HTML concepts today. Instead, I’ll present you your new friend, the code editor. This guy is here to help you code.

A code editor?
Wait… why would I need one again?
We’ll get to that soon. Remember the code from last time?
<html>
  <body>
    <h1>Awesome blog!</h1>
    <p>Hello, reader. This is my first post on this great blog. I hope you'll like it!</p>
    <p>And since you like paragraphs so much, here's another one!</p>    <h2>List of badass comics characters</h2>
    <ul>
      <li>Batman</li>
      <li>Batman</li>
      <li>Batman</li>
      <li>Bruce Wayne</li>
      <li>Batman</li>
    </ul>    <a href="http://www.medium.com">This is a link to the Medium homepage</a>    <p>
      <img src="images/great_photo.jpg">
    </p>
  </body>
</html>
It’s beginning to look a little messy, don’t you think? There aren’t even that much lines at this point, and it already feels difficult to read. If you’re coding with Notepad since the beginning of the series, it kinda looks the same. Except it’s black on white instead of black on gray.
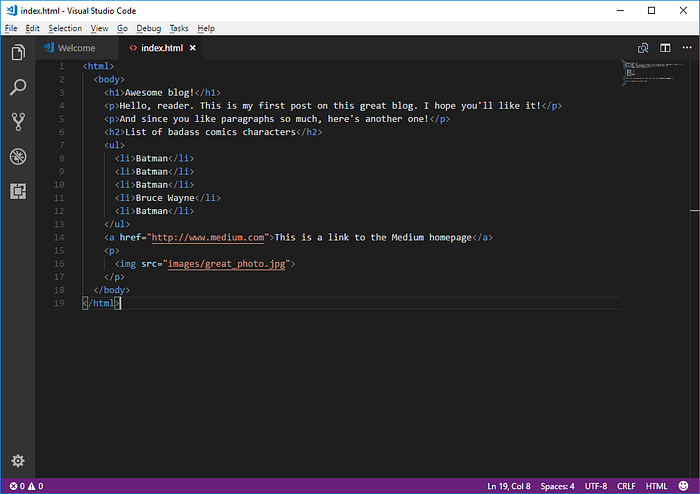
Now what if I told you your code could look like this:
Looking much clearer, heh? The tags are in green, helping your eyes to easily differentiate them from the content which is in black. The attribute names (e.g. href and src) are in purple, while their values are in dark blue.
As a bonus, your lines are even numbered! This will be useful in the future. Right now, not so much. But still! NUMBERS!
WHAT IS THIS AND HOW DO I GET IT?

Code editors are software which assist you in your programming thanks to many features. The most famous of these features is probably the syntax highlighting. Big words which basically just mean that you get some nice colors, allowing you to read the code more easily. For example, a keyword will be colored as orange, another as green… It’s the trick behind the color magic I showed you in the previous part.
You could keep coding in, say, Notepad. But you wouldn’t get this awesome feature and it would be much more difficult to read your code.
There are many editors that you could download. Some famous ones are Vim, Emacs, Notepad++, Sublime Text, Atom, and Visual Studio Code. There are many others. There are also endless debates between developers on which one is the best. To the point that there’s an actual page on Wikipedia titled Editor war. It’s about Emacs vs. Vim.

I use Visual Studio Code (VS Code) myself. It’s from Microsoft and is actually pretty cool. A good compromise between the amount of features and the speed. From this point on in this post, I’ll use VS Code. I will guide you through its installation and we’ll start using it together.
Feel free to download another one though! If you got a friend who’s a developer and uses another code editor, it might be more interesting for you to use the same as him/her, as he/she’ll be able to help you with it!

Intro to Visual Studio Code (Code editors 101)
Installation
Alright, are you ready? Here we go.
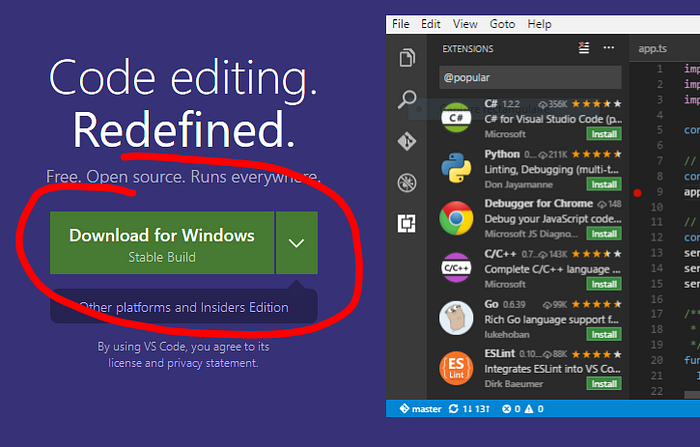
Go to https://code.visualstudio.com/.
Click on the big “Download for Windows” button (if you’re on macOS or Linux, the button will probably say something like “Download for Mac” or “Download for Linux”).
After a few seconds, you will be able to save the file on your disk. Once the download is complete, open the file. Click on next, accept the terms of the license which you totally read in its entirety of course, and then you can basically press next on every step. If you didn’t change any of the options during the installation, once it’s finished, VS Code should open.
Your first steps
You are probably seeing this screen now:
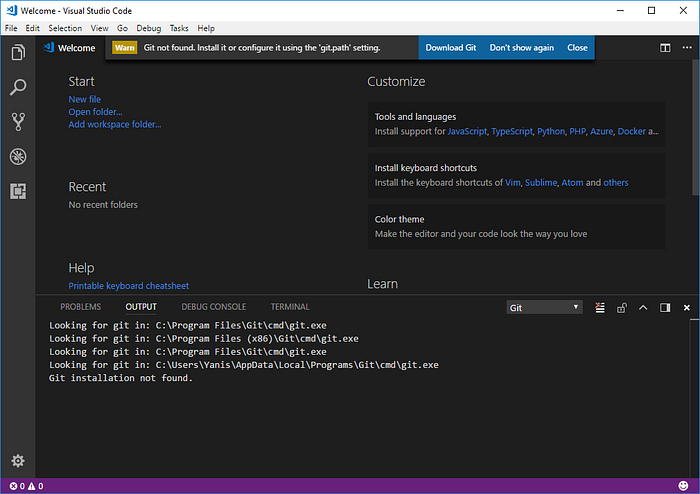
You might feel overwhelmed and be tempted to close everything in desperation. And then open Notepad again because it wasn’t that bad.

Don’t! I’ll guide you through this! First of all, let’s get rid of the clutter.
Located at the top of the window, you can see a yellow warning (“Warn”). VS Code is nice enough to tell us that Git wasn’t found. This is normal, since we haven’t installed Git yet, and we won’t for quite some time. It’s another good friend for the developer, but we’ll wait a bit before meeting this one. Click on “Don’t show again”. For the same reasons, click on the close button on the bottom right (see next picture).

Your first file
Now for the best part. We’re gonna create a new file in VS Code.
Two options:
- In the menus at the top of the window, click on File / New File
- Or just press Ctrl + N (Cmd + N on Mac) on your keyboard if you feel like Neo today

A new tab just opened, named Untitled-1. It’s empty at the moment, because we haven’t typed any code yet.
Let’s save it immediately, to tell VS Code we want to treat the file as an HTML file.
And you’re super lucky cause once again, you’ve got two options:
- In the menus at the top of the window, click on File / Save
- Or just press Ctrl + S (Cmd + S on Mac) because you’re a hacker now
Choose the folder where you wanna save the file, and rename the file to index.html. The .html part is important, this is how we tell VS Code we’re coding in HTML. You can actually replace the index part with whichever name you want! Then click on the save button.
And now VS Code knows that we’re coding in the HTML language. Which basically reads as HyperText Markup Language language but since everybody says PIN number and ATM machine already, we won’t have to spend much time on that.

There’s one last thing to do: copy and paste the following code (from the last article) to your new file in VS Code.
<html>
  <body>
    <h1>Awesome blog!</h1>
    <p>Hello, reader. This is my first post on this great blog. I hope you'll like it!</p>
    <p>And since you like paragraphs so much, here's another one!</p>    <h2>List of badass comics characters</h2>
    <ul>
      <li>Batman</li>
      <li>Batman</li>
      <li>Batman</li>
      <li>Bruce Wayne</li>
      <li>Batman</li>
    </ul>    <a href="http://www.medium.com">This is a link to the Medium homepage</a>    <p>
      <img src="images/great_photo.jpg">
    </p>
  </body>
</html>
And there you have it! Syntax highlighting!
Feel free to add as many tags and attributes as you want, and watch as VS Code automatically colors your code. Pure awesomeness.
Don’t forget to save your file with Ctrl + S (or click on File / Save)!
Let’s conclude
There you go. You now know the very basics of one of the most powerful tools available for developers, the code editor.
Next time, we’ll start learning about CSS. This language lets you design your page. It’s extremely powerful, and can sometimes be quite complex, so we’ll need more than one article to cover it! But once you’ll start getting the hang of it, you’ll be able to make some truly beautiful websites.

Until then, why not have a look around VS Code features? Today, we probably covered less than 1% of what this software has to offer. If you’re curious, you could even try some other code editors!
See you next time!
The next article is available here!
Note: This post is part of a series.
- Let’s make a website. (Episode I)
- Let’s make a website. Episode II — HTML
- Let’s make a website. Episode III — Your first page
- Let’s make a website. Episode IV — Images
- Let’s make a website. Episode VI — CSS
- Let’s make a website. Episode VII — Let’s make a Pokédex!
- Let’s make a website. Episode VIII — Intermission
- Let’s make a website: the JavaScript adventures.
- Let’s make a website: the JavaScript adventures — The variables
As usual, feel free to share this article if you liked it!

