Let’s make a website: the JavaScript adventures.
Sh*t just got real.

Hot damn it’s been a long time ladies and gents. My last article was funnily enough named Intermission, well, understatement of the friggin decade since two years have passed since my last post!
It’s been super rewarding seeing all your claps and comments on my series of articles (seriously, thanks a lot!), and I hope they’ve been useful for those of you who want to learn web development from scratch. 🙂
So what’s next then? Well, in the previous chapters, we’ve already covered HTML and CSS. But we’re missing the third pillar of the web: JavaScript.
Believe it or not, you’ve already learned two things here:
- The S is capitalized in the word JavaScript.
- Did you know that the color orange was named after the fruit and not the reverse?
Note that #1 doesn’t really matter anyway because from now on I’ll write it as JS.

Alright, you’ve come to the right place. Let’s friggin do this. 🚀
Wait what was that about the orange?
So, what is JS really? 🤔
You might have heard of it before. I mentioned it in my previous articles.
JS is a programming language. I’ve talked about programming languages in chapter 2 but I’ll explain the concept again here for those of you who just joined the party to learn JS.
In the mystical world of computers, a language is actually quite similar to spoken languages like French, English, or Māori. It lets you (the star in this story) talk to your computer in a language you can both understand.

Just like there’s a lot of languages in the world, there’s also a lot of programming languages. JS is one of the most famous among them, if not the most famous (I can already hear the rumble of keyboards ready to prove me wrong in the comments ❤).
Others you might have heard of could be C, C++, C#, PHP, Java (no relation with JavaScript… yes JS came after and yes that choice of name is the worst), Ruby 💎 (one of my favorites ❤)… and many, many more. They all allow you to talk to your machine in different ways. Today, we’ll focus on JS.

The source code
The text we type to communicate with the computer is called the source code, or simply “code” in its shorter form. In JS, code looks like this:
const test = "abc";
console.log(test);
Now you might be thinking hmmmmmm yes, I see wtf is this sh BUT bear (yes, 🐻) with me here and I’m sure it’ll make more sense pretty soon.
OK let’s code
Let’s start with some easy stuff.
1 + 1This is valid JS. I know, it’s crazy. And I’m sure you already know what your computer would display here when reading this code.
Yes, 11!
…
…
…
Just kidding it was 2, as you probably guessed! 😛
I am indeed a comedian.
OK let’s code for real now
So you might be thinking: “ok yes that’s great and all but how do I actually tell my computer to read this code? I want to try this on my machine!”.
You already know how to use a code editor, we talked about it in chapter 5. However, it’s a little more complicated to run (a.k.a. tell your machine to read) JS code and see the results than to open an HTML file, so we’ll keep it simple for this first lesson and use an editor that’s already present in your web browser: the developer tools.
The developer tools
If you’re using Firefox (❤) or Chrome (💔): press Ctrl + Shift + C (on Windows and Linux) or Cmd + Option + C (on Mac).
If you’re using Safari on Mac, it’s a (little) bit more complicated. Open the Safari menu, then click on Preferences, then Advanced, then check Show Develop menu in menu bar. It’s at the very bottom of the Preferences window. Now you can close that window and use the Cmd + Option + C shortcut (be sure to have opened a page before, e.g. https://www.wikipedia.org/).
The developer tools will open, either at the bottom of your screen, or on the right, depending of your configuration. There’s a lot of super useful stuff there to help you create (and debug) a website. I use this tool every day.
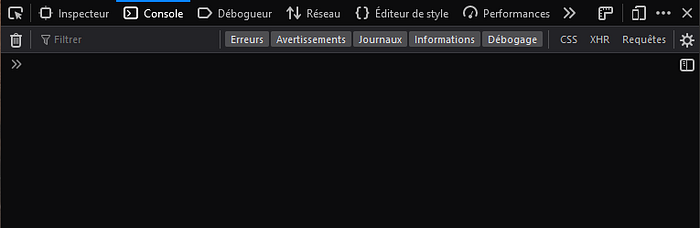
For now, click on the Console tab. It should be at the top of the developer tools window, whether you use Firefox, Chrome, or Safari. The Console section appears (note that you might have already been in the Console section when you opened the developer tools, depending on your configuration).
See the > or >> at the bottom? Click right next to it. You can now type JS code in this area.
It’s JS time
Type 1 + 1 there. Note that I use spaces between the numbers and the +. In my opinion, it's a good habit to take. It doesn't make much difference here, but later when you'll be writing much longer code, it'll make things more readable. But you could also type 1+1, it's totally valid.
Now take a deep breath and press Enter.
Can you see the 2 that appeared just below? Yes, this is your computer answering you! 🤯
You made it. You just ran your first JavaScript code! 🎉🎊✨

Until next time
And that’s a wrap for that first lesson. Next time, we’ll talk about variables and maybe even display some actual text, not just numbers!
In the meantime, feel free to experiment with the console! Of course, you’re not limited to 1 + 1, you can actually enter any operation there. Yes, you got yourself a free calculator! A small note: in JS, the multiplication sign is * (the asterisk), not x. It won't work if you use x!
Stay safe, and see you next time! 🚀
The next article is available here!
PS: As usual, lemme know what you think in the comments! All constructive feedback is appreciated! 😊
Note: This post is part of a series.
- Let’s make a website. (Episode I)
- Let’s make a website. Episode II — HTML
- Let’s make a website. Episode III — Your first page
- Let’s make a website. Episode IV — Images
- Let’s make a website. Episode V — The code editor
- Let’s make a website. Episode VI — CSS
- Let’s make a website. Episode VII — Let’s make a Pokédex!
- Let’s make a website. Episode VIII — Intermission
- Let’s make a website: the JavaScript adventures — The variables
- Let’s make a website: the JavaScript adventures — The variables II
- Let’s make a website: the JavaScript adventures — The conditions
- Let’s make a website: the JavaScript adventures — The conditions II
- Let’s make a website: JavaScript arrays

